△点击上方“Python猫”关注 ,回复“1”领取电子书
1. 前言
大家好,我是猫哥!
一提到自动化,可能大家想到的是 App 端的 Appium、Airtest、AutoJS,亦或是 Selenium、Puppeteer、Cypress 等 Web 端的自动化框架
本篇文章,将和大家聊聊 PC 端的自动化工具 - WinAppDriver
2. 准备
WinAppDriver,全称为 Windows Application Driver,它是 Windows 上一个类似 Selenium 的 UI 自动化驱动服务框架
它支持 Appium,可以使用 Appium-Python-Client 依赖库完成对 Windows 桌面程序的自动化操作
项目地址:https://github.com/Microsoft/WinAppDriver
需要注意的是,要使用 WinAppDriver 服务框架完成 Windows 的自动化,需要满足 Windows10 或 Windows Server 2016 以上系统
另外,它支持的应用程序包含:
在实现之前,我们需要做好以下准备工作
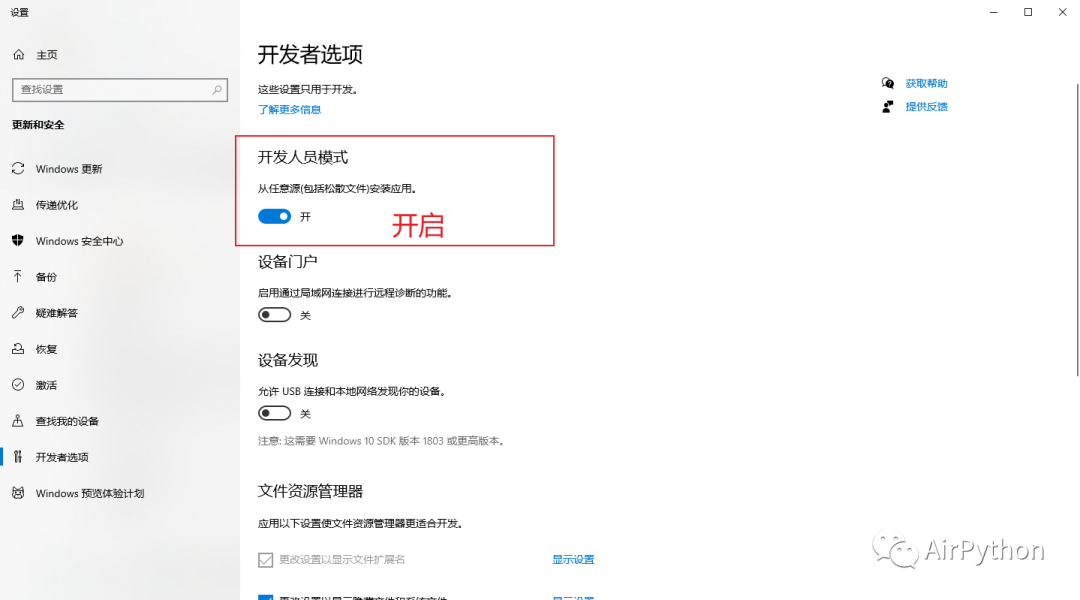
2-1 开启「 开发者模式 」
关键字搜索「 开发者设置 」,选择开启「 开发者模式 」
2-2 安装窗口组件元素识别工具
常用的 2 种窗口元素识别工具为:inspect.exe、FlaUInspect
其中
作为官方的组件元素识别工具,inspect.exe 集成于 Windows SDK
如果本地不存在该文件,可以通过下面链接进行安装
https://download.microsoft.com/download/4/d/2/4d2b7011-606a-467e-99b4-99550bf24ffc/windowssdk/winsdksetup.exe
相比 inspect.exe,FlaUInspect 界面更简洁,功能更易用( 推荐 )
项目地址:https://github.com/FlaUI/FlaUInspect
2-3 安装 WinAppDriver
通过下面链接下载 WinAppDriver 应用程序,并在本地运行起来
https://github.com/Microsoft/WinAppDriver/releases
2-4 搭建 Appium 环境
这部分内容涉及 NodeJS 安装及 Appium-Server 环境的搭建
可以参考:https://www.cnblogs.com/amoyshmily/p/10500687.html
2-5 安装依赖
最后安装 Python 依赖库 Appium-Python-Client
# 安装依赖 Appium-Python-Client
pip3 install Appium-Python-Client
3. 实战一下
我们以操作 PC 端的微信为例,聊聊自动化的常见步骤
首先,我们在本机打开 WinAppDriver 服务,让它在后台运行
然后,我们使用 Python 编写自动化脚本
通过 ip 地址、端口号及 PC 版微信的绝对路径,使用 Appium 打开微信
import time, os
from appium import webdriver
from selenium.webdriver import ActionChains
from selenium.webdriver.common.keys import Keys
from time import sleep
class Auto():
def
open_weixin(self, host='localhost', port=4723):
# 打开WinAppDriver服务
# 注意:如果手动开启,则可以注释掉
# os.system(r'start "" /d "C:\Program Files\Windows Application Driver\" "WinAppDriver.exe"')
# 配置信息
# 包含:平台名、系统、应用程序绝对路径
desired_caps = {'platformName': 'Windows', 'deviceName': 'WindowsPC',
'app': r"D:\Program Files (x86)\Tencent\WeChat\WeChat.exe"}
try:
# 连接WinAppDriver服务,打开目标软件
self.driver = webdriver.Remote('http://{}:{}'.format(host, port), desired_caps)
except Exception as e:
raise AssertionError(e)
接着,通过「 组件元素识别工具 」拿到界面元素的属性值,执行常见的点击、移动、滑动等操作
比如:点击「 文件传输助手 」,发送一条信息
# 给文件传输助手发送一条信息
def send_msg(self, element_name, msg):
    """
    :param element_name:元素name值
    :param msg:
    :return:
    """
    # 通过name属性,找到目标元素
    chat_element = self.weixin_driver.find_element_by_name(target_name)

    # 点击元素,进入聊天界面
    chat_element.click()

    # 找到输入框,并输入
    self.weixin_driver.find_element_by_name("输入").send_keys(msg)

    # 点击右下角的发送,发送消息出去
    self.weixin_driver.find_element_by_name("发送(S)").click()
需要注意的是,如果涉及界面的滑动,可以使用「 ActionChains 」移动鼠标,然后使用 win32api 和 win32con 模拟屏幕滑动即可
import win32api
import win32con
from appium import webdriver
from selenium.webdriver import ActionChains
# 模拟屏幕滑动
# 1、移动到某个元素区域
ActionChains(self.weixin_driver).move_to_element(
self.weixin_driver.find_element_by_name("element_name")).perform()
# 2、滑动界面
# 比如,向上滚动,模拟滑动
win32api.mouse_event(win32con.MOUSEEVENTF_WHEEL, 0, 0, -500)
完成自动化操作后,就可以主动释放资源、关闭 WinAppDriver 服务
# 释放资源及关闭服务
def tearDownFunc(self):
    print("准备退出")
    sleep(2)

    # 1、释放资源
    self.weixin_driver.quit()

    # 2、关闭WinAppDriver应用程序
    os.system(' @taskkill /f /im WinAppDriver.exe')
4. 最后
在实际使用过程中,可能会遇到复杂的桌面应用程序,这时我们可以通过打印驱动对象的「 page_source」元素控制树值,以此来帮助我们进行快速定位元素,进而完善自动化脚本。
Python猫技术交流群开放啦!群里既有国内一二线大厂在职员工,也有国内外高校在读学生,既有十多年码龄的编程老鸟,也有中小学刚刚入门的新人,学习氛围良好!想入群的同学,请在公号内回复『交流群』,获取猫哥的微信(谢绝广告党,非诚勿扰!)~


