
-- Illustrations by Tom Haugomat --
开源图像处理框架imagepy核心开发者。
imagepy@sina.com
GitHub ID:yxdragon
开源图像处理框架,插件式设计,可以快速集成任何基于或支持numpy的图像处理算法,经过简单配置,快速生成交互环境,可供非计算机专业人员使用,可以理解为是算法研发人员到专业使用人员之间的以做桥梁。
一定程度上,可以认为是一个以OpenCV为内核的PhotoShop,但更加偏重于图像分析,可用于医学,生物,材料各个学科的科学实验分析上。
项目借鉴了ImageJ,但充分发挥Python的优势,整个项目架构,扩展开发,都更加简洁高效。
ImagePy已经与多家高校或科研单位进行了合作,并且在牛津大学的Bioinformatic期刊上发表有文章。
ImagePy Basic Tutorial
https://github.com/yxdragon/imagepy.git
Introduction: ImagePy is an image processing software developed in Python, supporting bmp, rgb, png and other commonly used image formats. It can handle grayscale images and multi-channel (color) images, and supports image stack (sequence) operations. It supports a variety of selection operations (point, line, surface, multi-line, multi-face, hollow polygon). It can carry out a variety of commonly used mathematical operations, commonly used filter operation, image measurements, as well as pixel statistics. It can carry on dem surface reconstruction and three-dimensional reconstruction of image sequences. And the framework is based around Python development. The image data is represented by numpy. And thus it can easily access scikit-image, opencv, itk, mayavi and other third-party mature image processing libraries.
Download and install
works on windows, linux, mac, under python2.7 and python3.4+
# Now ImagePy is on Pypi
pip install imagepy
# Or install with conda
conda install imagepy
# Then start imagepy like this
python -m imagepy
some trouble
ImagePy is a ui framework based on wxpython, which can not install with pip on Linux. You need download the whl acrodding to your Linux system.
On Linux and Mac, there may be permission denied promblem, for ImagePy will write some config information, So please start with sudo. If you install with pip, please add --user parameter like this: pip install -user imagepy
If you install ImagePy in a Anaconda virtual environment, you may got a error when start like this: This program needs access to the screen. Please run with a Framework build of python, and only when you are logged in on the main display, if so, please start with pythonw -m imagepy.
Main Interface

The main interface consists of four parts, from top to bottom: the title bar, menu bar, toolbar, and status bar. Here are a few examples to illustrate what ImagePy can do.
First example: Mathematical operations, filter operations.
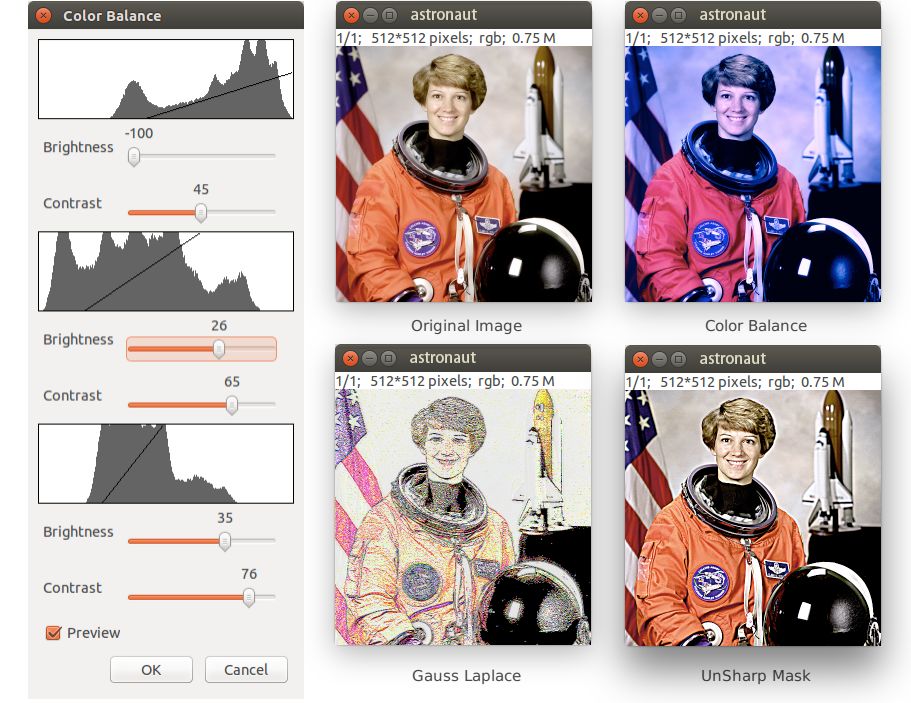
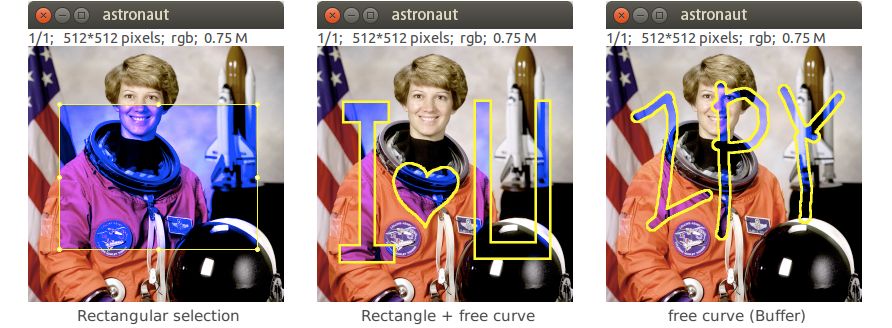
Selection Introduction: Selection refers to processing the image only in the the specific identification areas on the image. ImagePy supports single point, multi-point, single line, multi-line, rectangular, circular, arbitrary polygon and free curve selection. It can superimpose something using Shift key, hollow out something using Ctrl key. In addition, all the selection objects can carry out expansion, shrink, convex hull and other geometric operations.
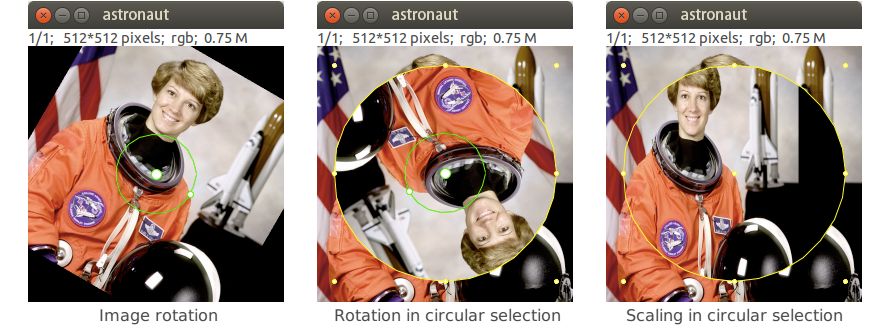
Geometric Transformation: ImagePy supports geometric transformations. It can carry out rotation, translation and other conventional matrix transformations. What’s more, these rotations are interactive and support selection.
Second example: An example of a cell count
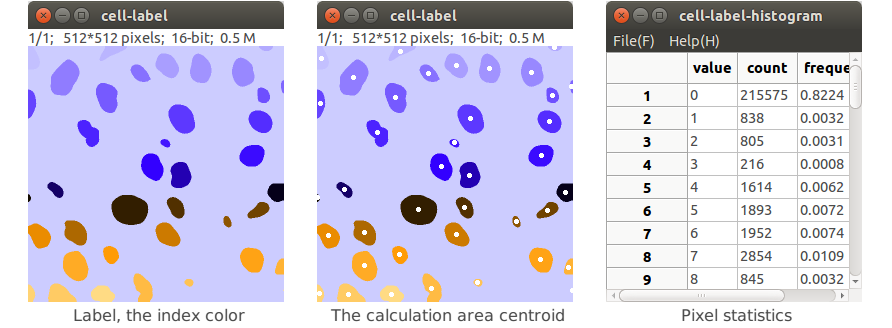
Look up table introduction:
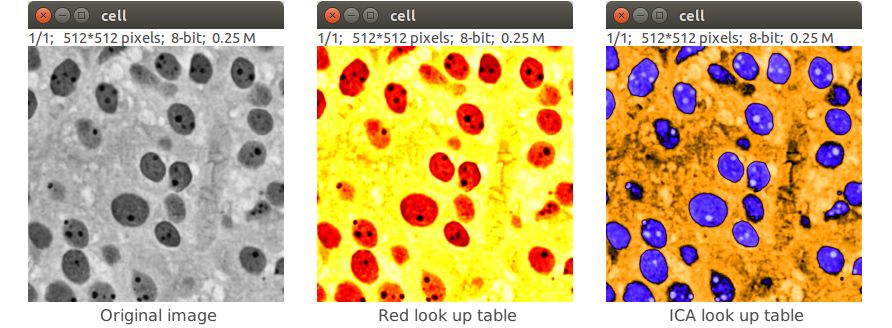
Index color is also called false color. The essence of it is to map the gray color to a predefined spectrum. The index color does not increase the amount of information in the image, but does enhance the visual contrast.
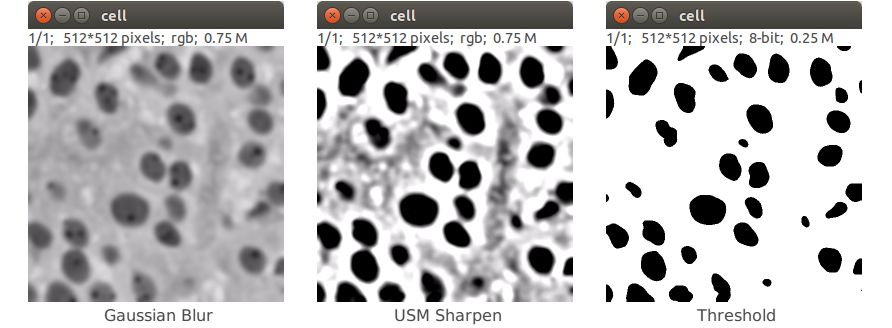
Here, for a cell under a microscope, we organize the image and compute statistics.
Open the original image and go on Gaussian blur to anti-noise.
In order to highlight the cells, a large-scale USM mask treatment was performed.
After processing the picture, it is easy to use the threshold function to carry on binarization.
Label the binary image, mark unicom area.
Calculate the centroid of each Unicom area
Calculate the area occupied by each cell
Third example: Image matching
Use the Surf feature matching algorithm implemented in OpenCV.
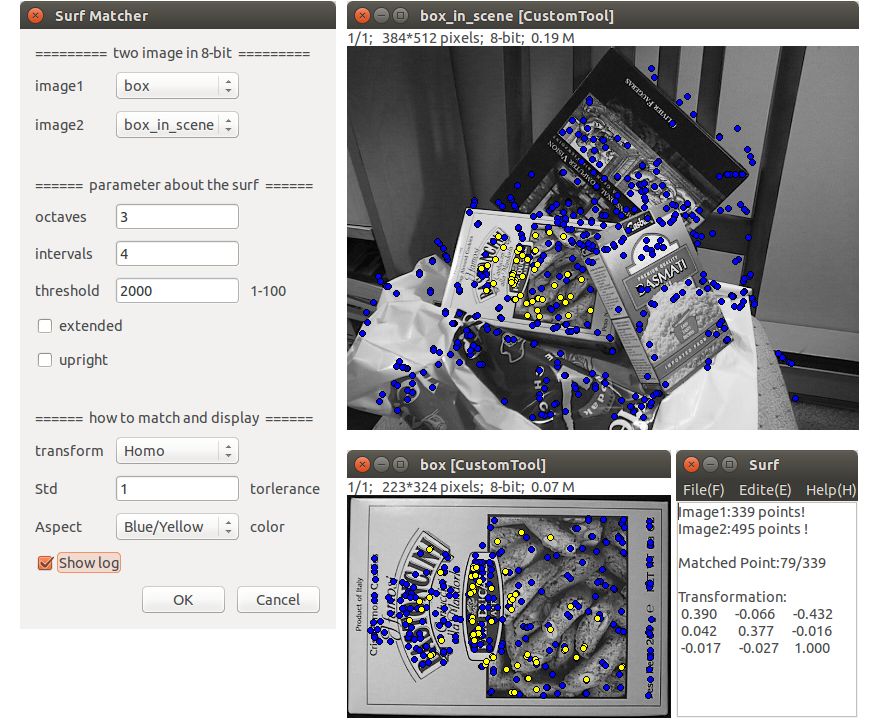
The two graphs are covered by points, that is, Surf feature points, where the correct match is shown in yellow.
Also output a log of the opations. Identify the feature points of the two graphs, the correct number of matches, and the rotation matrix between the two graphs.
When a point is clicked with the mouse, the dot will be red with the corresponding match point of the other picture at the same time.
Fourth example: Dem Reconstruction
Use the mayavi library, to perform a large number of three-dimensional reconstructions and three-dimensional visualization functions.
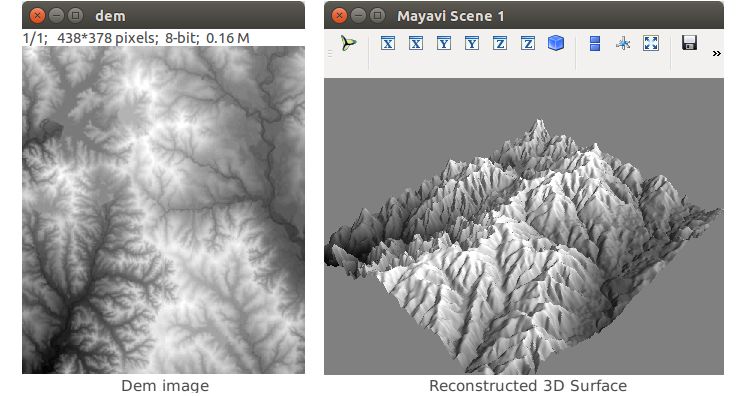
Dem is the digital elevation model, which means that the brightness of the image represents the elevation. Through the Dem data, you can calculate the height, slope. You can draw contours, and perform surface reconstruction.
Fifth example: CT data 3D reconstruction
The following image represents dental MicroCT data. The data were filtered, segmented and three-dimensional reconstructed, as well as visually manipulated.
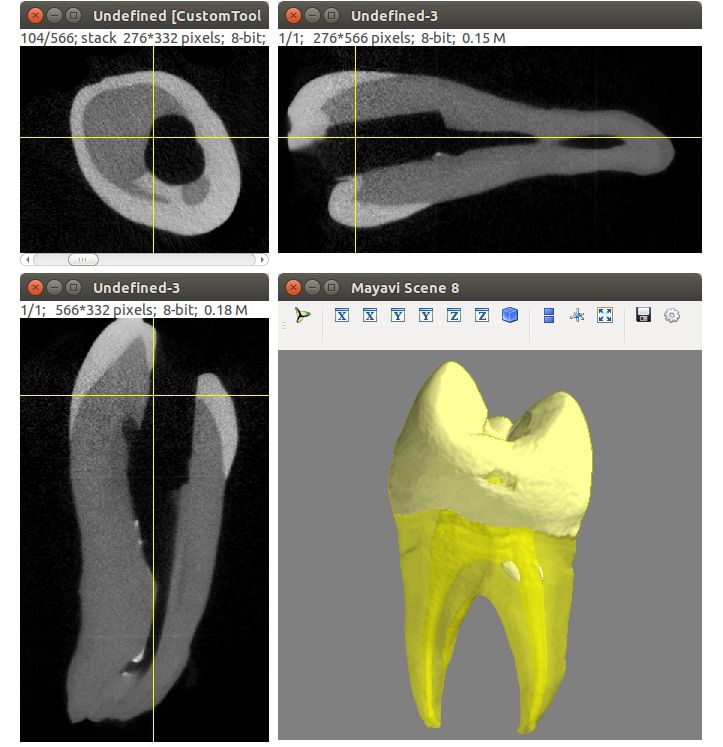
The figure above is a tooth CT data. Importing the image sequence, you can view the three views, and then go on its three-dimensional reconstruction.
Image Stack: ImagePy supports image stack processing, it has the following two characteristics:
Images in the image stack have the same format and the same size.
They will act on each image in the stack when processed.
Plugins and Macros:
In ImagePy itself, each functional component is plug-in (all menus, tools). The implementation of each function, in essence, is through interaction to get a group of parameters and then act on the current image. We can view the plug-in's organizational structure in Plugin Tree View, find plug-ins quickly in Plugin List View, record macros in Macros Recorder, and batch process when needed to do series of related functions and improve work efficiency.
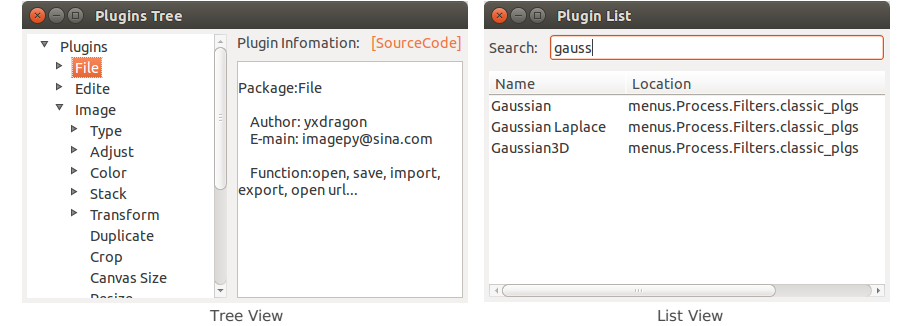
From the two views above, you can get a global view of all the plug-ins, like viewing its related information, introduction, and source code. You can quickly find the commands. You can run a related command directly by double-clicking.
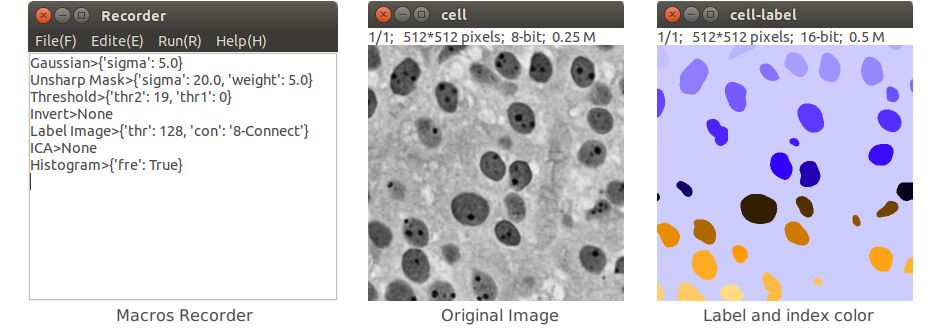
Macro Recording of Cell Count Example: We open the Plugins -> Macros -> Macros Recorder plug-in, and then re-operate the cell counting process...
After each step, Macros Recorder will add a log. When all is completed, you can get the following log:
These logs, each line essentially records “plug-in name> {parameter}”. Click “Run> Run Macros (F5)” to perform each action of the record in turn. You can also use the mouse to select a line or a few lines. Click “Run> Run Line (F6)” to implement the selected line. In addition macros have the following characteristics.
You can save a file where the suffix of macro is (.mc). You can run the specified macro file via Plugins -> Macros -> Run Macros.
Put the macro file on the menus directory or any of its subdirectories in the project. Starting once again, the macro will be loaded as a menu item. The title is the file name. In fact, some project function are in series by the macro.
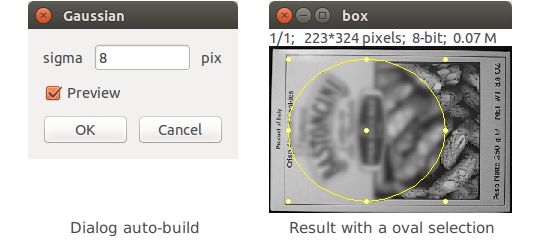
Extend a filter: The examples above only list some of the functionality of the ImagePy. However, ImagePy is not only an image processing program, but a highly scalable framework. Any numpy-based processing function can be easily incorporated. For example, to make a Gaussian blur filter, we only need:
# -*- coding: utf-8 -*
import scipy.ndimage as nimg
from imagepy.core.engine import Filter
class Gaussian(Filter):
title = 'Gaussian'
note = ['all', 'auto_msk', 'auto_snap','preview']
#parameter
para = {'sigma':2}
view = [(float, (0,30), 1, 'sigma', 'sigma', 'pix')]
#process
def run(self, ips, snap, img, para = None):
nimg.gaussian_filter(snap, para['sigma'], output=img)
Create a Filter:
Import related class library. It can be third-party or implemented in C.
Create a class that subclasses Filter.
title, this line is the name of the plug-in and will also serve as the title of the menu.
note indicates how the plug-in works and the associated preprocessing and post-processing work. This includes which types of images can be processed, whether selections are supported or not, and so on.
para is the parameter the kernel function needs.
view and para are corresponding. They inform how the various parameters of the framework plug-in interact (the framework will generate your interactive interface automatically).
run is the core function, if conditional, given img to the results of the process (save memory), or return out (the framework will help you give img).
Place the file in any subdirectory of menus in the project, and it will be loaded as a menu item at startup.
What has the framework helped us do?
They framework enables complex tasks in a uniform way. Simply, you do not need to determine for yourself whether the image type is legitimate. You do not need to make your own image cache to support undo. You do not need to support the selection by yourself. Do not need to monitor the interface by yourself to achieve real-time preview. You do not need to write any interface code after you have defined the required parameters, the type and the range of values for each parameter. When a color image is encountered, the each channel of the image is processed sequentially. When the image stack is encountered, each frame is automatically traversed. You are free to work on either the task of image analysis, or creating new plugins for the framework.
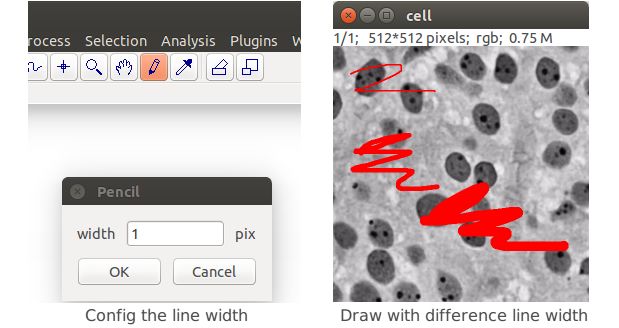
Extend a Tool:
Another scenario is to interact on the canvas through the mouse, like the selection operations mentioned above. Here is an example of a brush:
from imagepy.core.draw import paint
from imagepy.core.engine
import Tool
import wx
class Plugin(Tool):
title = 'Pencil'
para = {'width':1}
view = [(int, (0,30), 0, 'width', 'width', 'pix')]
def __init__(self):
self.sta = 0
self.paint = paint.Paint()
self.cursor = wx.CURSOR_CROSS
def mouse_down(self, ips, x, y, btn, **key):
self.sta = 1
self.paint.set_curpt(x,y)
ips.snapshot()
def mouse_up(self, ips, x, y, btn, **key):
self.sta = 0
def mouse_move(self, ips, x, y, btn, **key):
if self.sta==0:return
self.paint.lineto(ips.img,x,y, self.para['width'])
ips.update = True
def mouse_wheel(self, ips, x, y, d, **key):pass
Create Tool:
Inherited from Tool in the engine.
Specify the title, which will be the tool name, and the message of the status bar.
Adds several methods to achieve mousedown, mouseup, mousemove, mousewheel.
If the tool requires parameters (for example, pen width), use the dictionary to assign to para. Similarly, view specifies its interactive interface. When the tool is double-clicked, the dialog box will pop-up in accordance with the specified interface.
Files are stored in the sub-folder of tools, with a generated 16 * 16 thumbnail icon. The icon and the tool are stored in the same name as the gif file.
About ImagePy:
The above only lists some features of ImagePy, covering the basic mathematical operations, filters, pixel statistics, a slightly complex feature extraction, 3D reconstruction and other functions. It gives a brief introduction to macros , how to write new filters, tools and integrate them like ImagePy. Stay tuned for more detail in the coming manual and development documents.
I (yxdragon) have used ImageJ for a long time and also used to use Python for scientific computing. ImageJ's outstanding plug-in design philosophy allows it to absorb the contributions of industry professionals quickly. However, Python has an advantage over Java in image processing.
Java is a system language, the relative threshold of it is relatively high.
The related open source libraries under Java are not as rich as C / C++.
Python has simple grammar so it is easy to learn. It is a good choice for non-computer professionals.
Python has a wealth of third-party extensions, such as Scikit-image, OpenCV, Matplotlib, Mayavi, etc.
Almost all scientific computing class libraries are based on Numpy! so the framework can be built up easily.
Python can be extended by C/C++ with ctypes/cython.
Because of busy work, I wrote ImagePy in my spare time. All of the development work lasted about two months. Personally I think that this efficiency is mainly due to a large number of third-party libraries of Python as well as the project’s "borrowlism" design ideas. The project uses wxpython as the interface library, Numpy as the base data type. Because the time is short, many interactive details of the plug-in will show problems, you please give a positive feedback to me. I will do my best to safeguard the healthy growth of this project.
为促进Python中文开发者的开源项目的发展,Python中文社区全平台将定期报导华人Python开发者开源项目的发展情况,让更多的开发者关注和参与您的开源项目,并且我们将凭借在业界的影响力努力开拓更多资源,为开源项目开发者提供更多支持,欢迎开源项目开发者踊跃报名,也欢迎您推荐优秀的开源项目,请点击阅读原文报名。
Python中文社区是一个去中心化的全球技术社区,以成为全球Python中文开发者的精神部落为愿景,社区目前覆盖各大主流媒体和协作平台,与阿里、腾讯、百度、开源中国、极客邦、CSDN等业界知名公司和技术社区建立了广泛的联系,拥有来自十多个国家和地区数万名登记会员,会员来自以公安部、清华大学、中金公司、中科院、BAT等为代表的政府机关、科研单位、金融机构以及海内外知名公司,全平台近20万开发者关注。
往期开源项目介绍
Python开源项目介绍:用zmail简单地发邮件
Python开源项目介绍:网站日志分析工具
▼点击下方阅读原文参与报名或推荐


