作者:chestnut_egg Python爱好者社区专栏作者
博客:https://www.cnblogs.com/chestnut-egg
完整代码已上传至GitHub:
https://github.com/chestnut-egg/Face
一. 准备工作
1. 此程序使用的是 Face++ 的API,所以需要去Face++官网注册账号:
https://www.faceplusplus.com.cn/
2. 创建应用,获取 key 和 secret
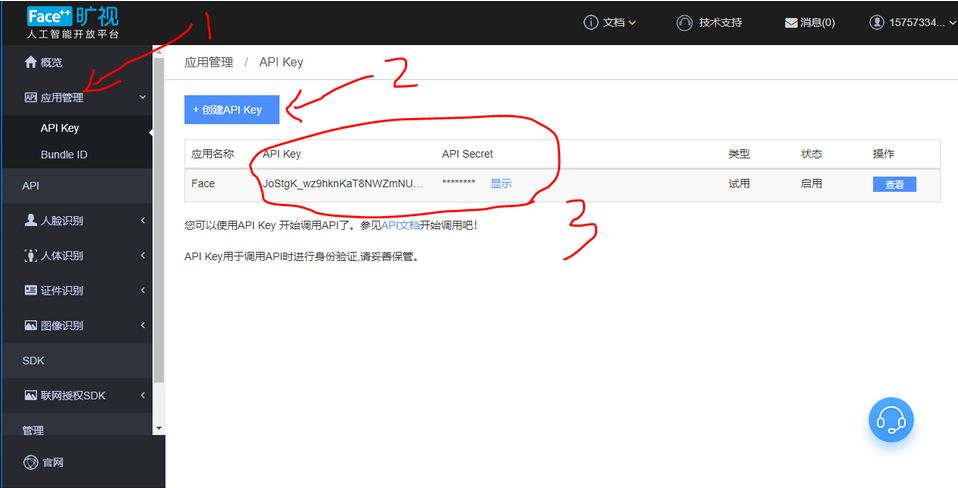
3. 下载 simplejson 模块 ,使用pip就可以下载了
pip install simplejson
二. 程序思路
1. 使用 decect 接口,获取人脸关键点
接口详细文档:
https://console.faceplusplus.com.cn/documents/4888373
* return_landmark 参数 不能为 0 不然不会返回人脸关键点
return_landmark | Int | 是否检测并返回人脸关键点。合法值为: 2 | 检测。返回 106 个人脸关键点。 | 1 | 检测。返回 83 个人脸关键点。 | 0 | 不检测 |
注:本参数默认值为 0 |
核心代码:
def find_face(imgpath):
    print("finding")
    http_url = 'https://api-cn.faceplusplus.com/facepp/v3/detect'
    data = {"api_key": key, "api_secret": secret, "image_url": imgpath, "return_landmark": 1}
    files = {"image_file": open(imgpath, "rb")}
    response = requests.post(http_url, data=data, files=files)
    req_con = response.content.decode('utf-8')
    req_dict = JSONDecoder().decode(req_con)

    this_json = simplejson.dumps(req_dict)
    this_json2 = simplejson.loads(this_json)

    faces = this_json2['faces']
    list0 = faces[0]
    rectangle = list0['face_rectangle']
    # print(rectangle)
    return rectangle
2. 使用 mergeface 接口,合成脸部图像
接口详细文档:
https://console.faceplusplus.com.cn/documents/20813963
* 注意图片文件大小不超过 2 MB
核心代码:
# 模板图片地址 合成图片地址 生成图片地址 合成指数0-100
def add_face(image_url_1,image_url_2,image_url,number):
ff1 = find_face(image_url_1)
ff2 = find_face(image_url_2)
rectangle1 = str(str(ff1['top']) + "," + str(ff1['left']) + "," + str(ff1['width']) + "," + str(ff1['height']))
rectangle2 = str(ff2['top']) + "," + str(ff2['left']) + "," + str(ff2['width']) + "," + str(ff2['height'])
# print(rectangle1)
# print(rectangle2)
url_add = "https://api-cn.faceplusplus.com/imagepp/v1/mergeface"
f1 = open(image_url_1, 'rb')
f1_64 = base64.b64encode(f1.read())
f1.close()
f2 = open(image_url_2, 'rb')
f2_64 = base64.b64encode(f2.read())
f2.close()
data = {"api_key": key, "api_secret": secret, "template_base64": f1_64, "template_rectangle": rectangle1,
"merge_base64": f2_64, "merge_rectangle": rectangle2, "merge_rate": number}
response = requests.post(url_add, data=data)
req_con = response.content.decode('utf-8')
req_dict = JSONDecoder().decode(req_con)
print(req_dict)
result = req_dict['result']
imgdata = base64.b64decode(result)
file = open(image_url, 'wb')
file.write(imgdata)
file.close()
3. 示例运行代码
# 单独两张照片的合成示例

image_url_1 = r"C:\Users\1.jpg"
image_url_2 = r"C:\Users\2.jpg"
image_url = r'C:\Users\result.jpg'
add_face(image_url_1,image_url_2,image_url,50)
4. 封装一个多张照片的合成函数
用 列表List 储存图片地址,先以最开始的两张进行合成,然后将合成后的图片与列表中的其他图像依次合成
* 程序没有做List的长度验证,注意边界特殊情况
def add_many(list_face):

    print("正在合成第1-2张")
    image_now = r'C:\Users\now.jpg'
    add_face(list_face[0], list_face[1], image_now, 50)

    for index in range(2,len(list_face)):
        print("正在合成第"+str(index+1)+"张")
        add_face(image_now, list_face[index], image_now, 50)
5. 成果展示
素材1:
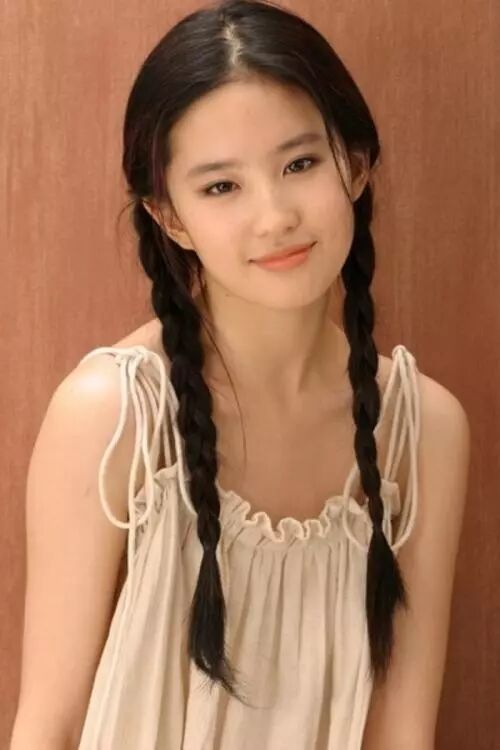
素材2:

合成结果:

完整代码:
https://github.com/chestnut-egg/Face

Python爱好者社区历史文章大合集:
Python爱好者社区历史文章列表(每周append更新一次)
 福利:文末扫码立刻关注公众号,
“Python爱好者社区”,开始学习Python课程:
福利:文末扫码立刻关注公众号,
“Python爱好者社区”,开始学习Python课程:
关注后在公众号内回复“课程”即可获取:
小编的转行入职数据科学(数据分析挖掘/机器学习方向)【最新免费】
小编的Python入门免费视频课程!!!
小编的Python快速上手matplotlib可视化库!!!
崔老师爬虫实战案例免费学习视频。
陈老师数据分析报告制作免费学习视频。
玩转大数据分析!Spark2.X+Python 精华实战课程免费学习视频。