
作者 | Adam Geitgey
译者 | 风车云马 整理 | Jane
本文转自 | AI科技大本营(ID:rgznai100)
作者通过相机结合深度学习算法,基于 Python 语言建立一个高精度的停车位的通知系统,每当有新停车位时就会发短信提醒我。听起来好像很复杂,真的方便实用吗?但实际上所使用的工具都是现成的,只要将这些工具进行有机的组合,就可以快速、简便的实现。

下面我们就开始学习整个工程流程:
分解问题
解决一个复杂的问题,首先第一步是要把问题分解成几个简单子任务。然后,针对每个子任务,运用机器学习中不同的方法来分别解决每个问题。最后把这些子任务贯穿起来,形成整套解决方案。
下面是检测开放停车位的流程图:

输入:普通摄像头采集的视频流
有了输入数据后,接下来我们需要知道图像的哪一部分是停车位,而且停车位是没有人使用的。
第一步:检测视频帧中所有可能的停车位。
第二步:检测每一帧视频中的所有车辆。可以跟踪每辆车从一帧到另一帧的运动。
第三步:确定目前有哪些停车位被占用,哪些没有被占用。这需要结合第一步和第二步的结果。
最后一步:当停车位变成可用时,系统发出通知。
其实可以使用多种不同的方法来完成这些步骤。不同的方法将具有不同的优势和缺点。接下来具体来看:
一、探测停车位
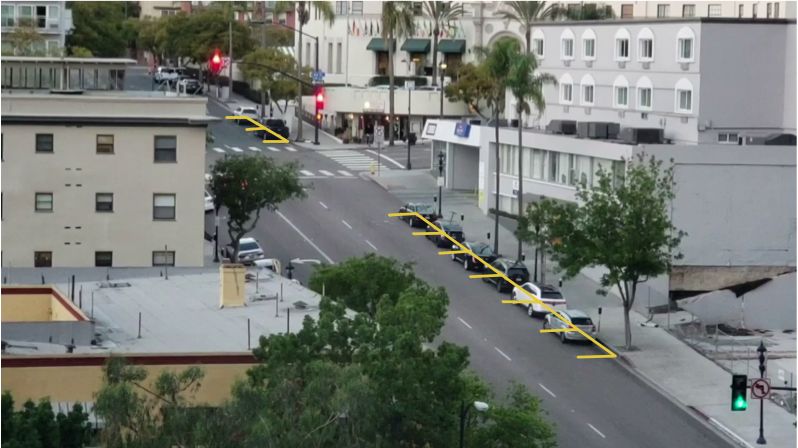
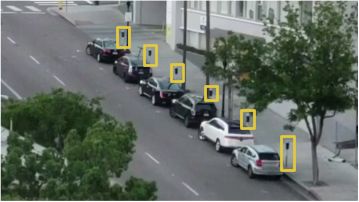
相机视图如下图所示:

需要扫描图像,并得到有效停车区域,如下面黄色标识出来的位置:
一个懒办法是程序写死每个停车场的位置,而不是自动检测停车场。但是如果移动摄像机,探测不同街道上的停车位,就必须再次手动定位停车位置。这样看来这个方法一点都不好,还是要采用自动检测停车位的方法。
其中一个想法是识别停车计时器并假设每个计时器旁边都有一个停车位:
但是这种方法也有一些问题。首先,并不是每个停车位有一个停车计时器,而且我们最想先找到免费停车位。第二,知道停车计时器的位置还不能告诉我们确切的停车位置点。
另一个想法是搭建一个目标检测模型,找到在马路上画的停车位记号,就像下图标识出来的:
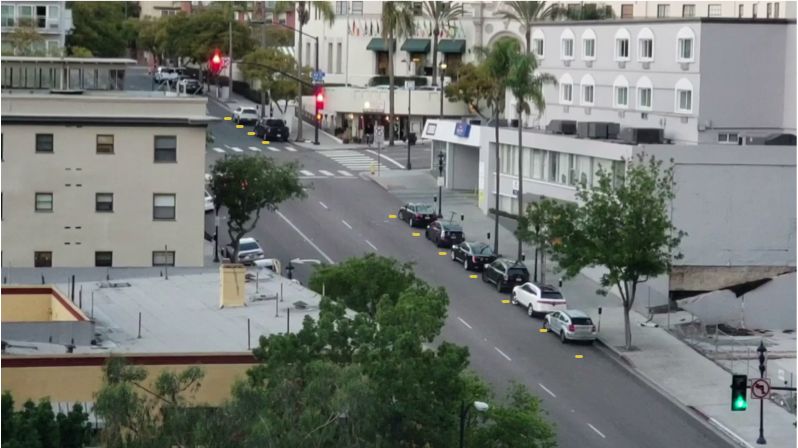
这种方法也有两个难点。首先,从远处看,停车位线的标志很小,很难看到,增加了识别难度;其次,道路上还有各种交通标记线,比如车道线、人行道斑马线,这也给识别增加了难度。
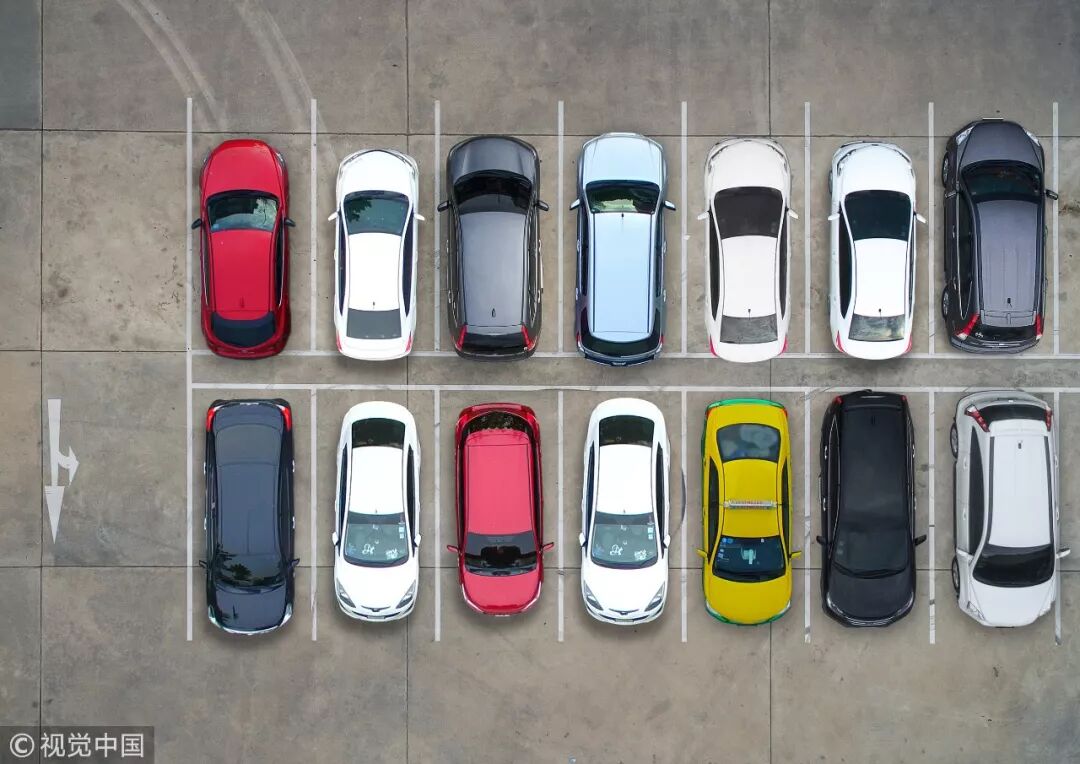
或许还可以换个思维方式,回避一些技术挑战。重新思考停车位到底是什么呢?无非是一个车需要停放一定时间的位置。所以我们可能根本不需要检测停车位,只要检测出长时间不动的车,并假设它们的位置就是停车位。
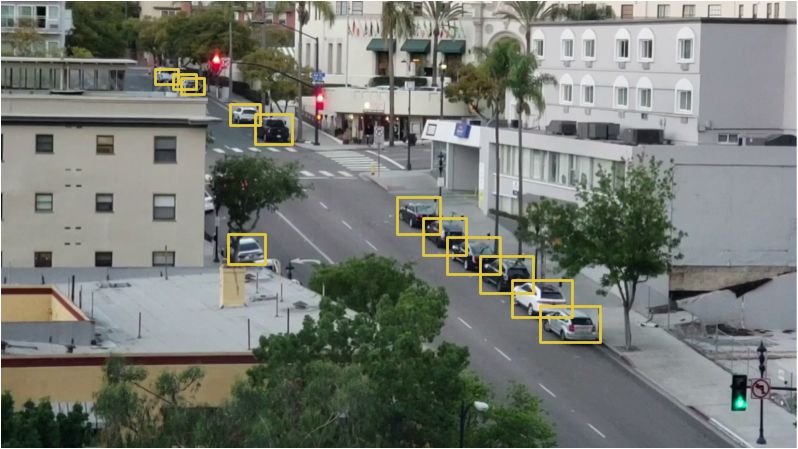
所以,如果我们能检测出汽车,并找出哪些车在视频帧之间没有移动,就可以推断停车位的位置。
二、在图像中检测汽车
在视频中检测车辆是一个经典的目标检测问题。有很多机器学习方法可以实现。下面列出了一些最常见的目标检测算法:
1、通过 HOG(梯度方向直方图)目标检测器检测出所有的车。这种非深度学习方法运行起来相对较快,但它无法处理汽车在不同方向上的旋转问题。
2、通过 CNN(卷积神经网络)目标检测器检测所有的车。这种方法是准确的,但是效率比较低,因为同一张图像必须扫描多次,以检测到所有的汽车。虽然它可以很容易地对不同旋转方向的汽车定向,但是比 HOG 方法需要更多的训练数据。
3、使用新的深度学习方法,如 Mask R-CNN,Faster R-CNN 或者 YOLO 算法,兼容准确性和运行效率,大大加快了检测过程。一旦有大量的训练数据,在 GPU 上运行也很快。
通常来说,我们希望选择最简单可行的算法和最少的训练数据,而不是一定要用那些流行的新的算法。基于目前这种特殊场景下,Mask R- CNN 是一个不错的选择。
Mask R-CNN 架构就是在整个图像中检测对象,不使用滑动窗口的方式,所以运行速度很快。有了 GPU 处理器,我们能够每秒处理多帧的高分辨率视频,从中检测到车辆。
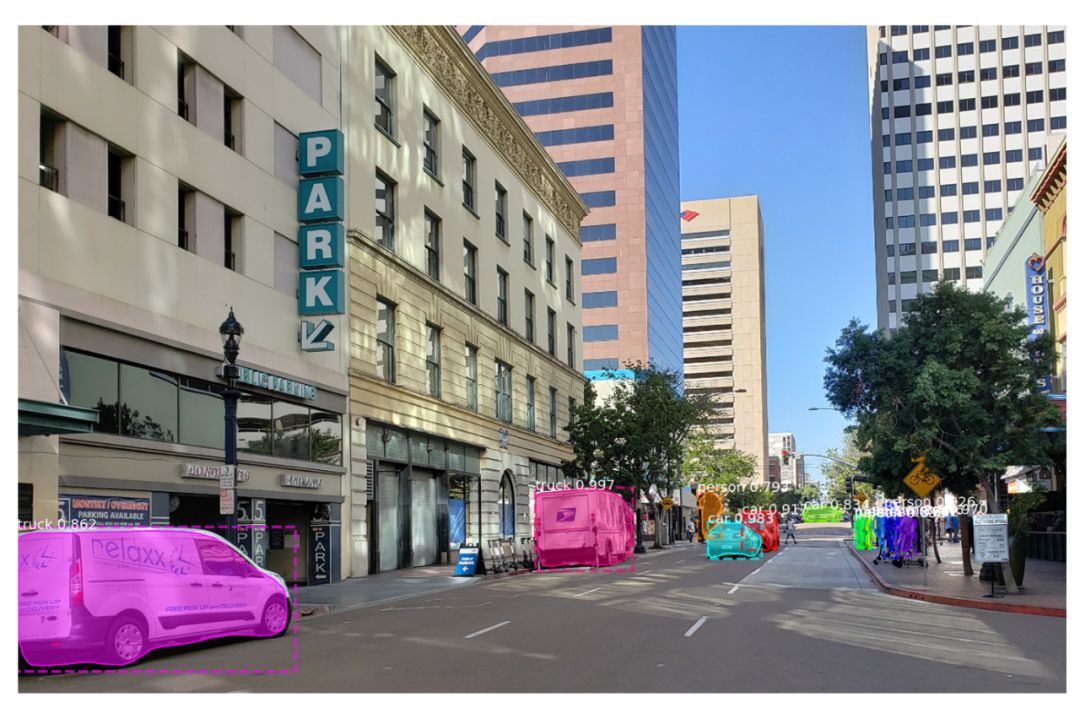
Mask R-CNN 为我们提供了很多检测到的信息。大多数目标检测算法只返回每个对象的边框。但是 Mask R-CNN 不仅会给我们每个对象的位置,也会给出一个对象的轮廓,像这样:
为了训练 Mask R-CNN 模型,我们需要很多这类检测物体的图片。可以花几天的时间出去拍摄照片,不过已经存在一些汽车图像的公共数据集。有一个很流行的数据集叫做COCO(Common Objects In Context的缩写),它里面已经有超过 12000 张汽车的图片。下面就是一个 COCO 数据集中的图像:
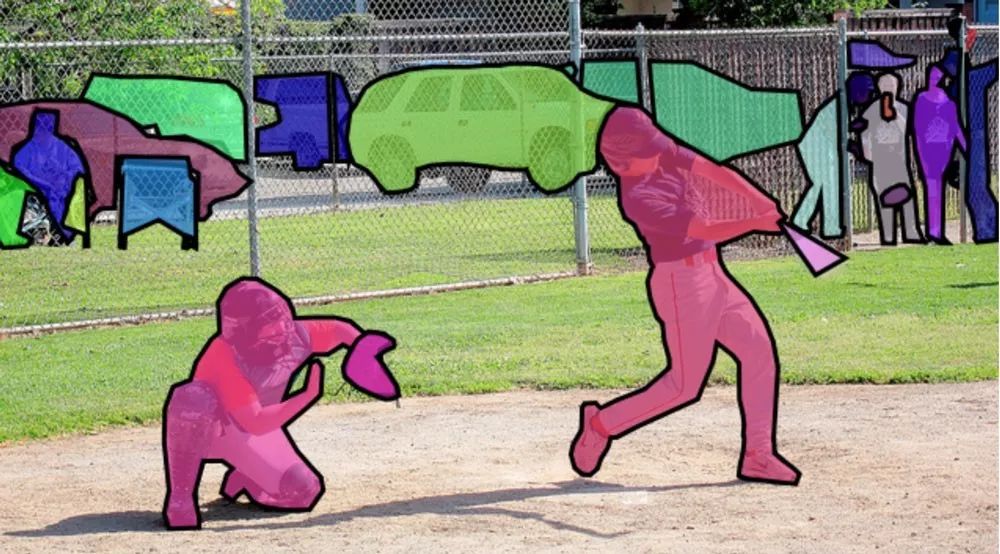
这些数据可以很好的训练 Mask R-CNN 模型,而且已经有很多人使用过 COCO数据集,并分享了训练的结果。所以我们可以直接使用一些训练好的模型,在本项目中使用 Matterport 的开源模型。

不仅能识别车辆,还能识别到交通灯和人。有趣的是,它把其中一棵树识别成“potted plant”。对于图像中检测到的每个对象,我们从 MaskR-CNN 模型得出以下 4 点:
(1)不同对象的类别,COCO 模型可以识别出 80 种不同的物体,比如小轿车和卡车。
(2)目标识别的置信度,数字越大,说明模型识别对象的精准度越高。
(3)图像中物体的边界框,给定了 X/Y 像素的位置。
(4)位图“mask”说明了边框内哪些像素是对象的一部分,哪些不是。使用“mask”数据,我们也可以算出物体的轮廓。
下面是 Python 代码,使用 Matterport 的 Mask R-CNN 的训练模型和 OpenCV 来检测汽车边框:
1import os
2import numpy as np
3import cv2
4import mrcnn.config
5import mrcnn.utils
6from mrcnn.model import MaskRCNN
7from pathlib import Path
8
9
10# Configuration that will be used by the Mask-RCNN library
11class MaskRCNNConfig(mrcnn.config.Config):
12 NAME = "coco_pretrained_model_config"
13 IMAGES_PER_GPU = 1
14 GPU_COUNT = 1
15 NUM_CLASSES = 1 + 80 # COCO dataset has 80 classes + one background class
16 DETECTION_MIN_CONFIDENCE = 0.6
17
18
19# Filter a list of Mask R-CNN detection results to get only the detected cars / trucks
20def get_car_boxes(boxes, class_ids):
21 car_boxes = []
22
23 for i, box in enumerate(boxes):
24 # If the detected object isn't a car / truck, skip it
25 if class_ids[i] in [3, 8, 6]:
26 car_boxes.append(box)
27
28 return np.array(car_boxes)
29
30
31# Root directory of the project
32ROOT_DIR = Path(".")
33
34# Directory to save logs and trained model
35MODEL_DIR = os.path.join(ROOT_DIR, "logs")
36
37# Local path to trained weights file
38COCO_MODEL_PATH = os.path.join(ROOT_DIR, "mask_rcnn_coco.h5")
39
40# Download COCO trained weights from Releases if needed
41if not os.path.exists(COCO_MODEL_PATH):
42 mrcnn.utils.download_trained_weights(COCO_MODEL_PATH)
43
44# Directory of images to run detection on
45IMAGE_DIR = os.path.join(ROOT_DIR, "images")
46
47# Video file or camera to process - set this to 0 to use your webcam instead of a video file
48VIDEO_SOURCE = "test_images/parking.mp4"
49
50# Create a Mask-RCNN model in inference mode
51model = MaskRCNN(mode="inference", model_dir=MODEL_DIR, config=MaskRCNNConfig())
52
53# Load pre-trained model
54model.load_weights(COCO_MODEL_PATH, by_name=True)
55
56# Location of parking spaces
57parked_car_boxes = None
58
59# Load the video file we want to run detection on
60video_capture = cv2.VideoCapture(VIDEO_SOURCE)
61
62# Loop over each frame of video
63while video_capture.isOpened():
64 success, frame = video_capture.read()
65 if not success:
66 break
67
68 # Convert the image from BGR color (which OpenCV uses) to RGB color
69 rgb_image = frame[:, :, ::-1]
70
71 # Run the image through the Mask R-CNN model to get results.
72 results = model.detect([rgb_image], verbose=0)
73
74 # Mask R-CNN assumes we are running detection on multiple images.
75 # We only passed in one image to detect, so only grab the first result.
76 r = results[0]
77
78 # The r variable will now have the results of detection:
79 # - r['rois'] are the bounding box of each detected object
80 # - r['class_ids'] are the class id (type) of each detected object
81 # - r['scores'] are the confidence scores for each detection
82 # - r['masks'] are the object masks for each detected object (which gives you the object outline)
83
84 # Filter the results to only grab the car / truck bounding boxes
85 car_boxes = get_car_boxes(r['rois'], r['class_ids'])
86
87 print("Cars found in frame of video:")
88
89 # Draw each box on the frame
90 for box in car_boxes:
91 print("Car: ", box)
92
93 y1, x1, y2, x2 = box
94
95 # Draw the box
96 cv2.rectangle(frame, (x1, y1), (x2, y2), (0, 255, 0), 1)
97
98 # Show the frame of video on the screen
99 cv2.imshow('Video', frame)
100
101 # Hit 'q' to quit
102 if cv2.waitKey(1) & 0xFF
== ord('q'):
103 break
104
105# Clean up everything when finished
106video_capture.release()
107cv2.destroyAllWindows()
运行该脚本后,将会看到在图像中识别到的汽车和边框:
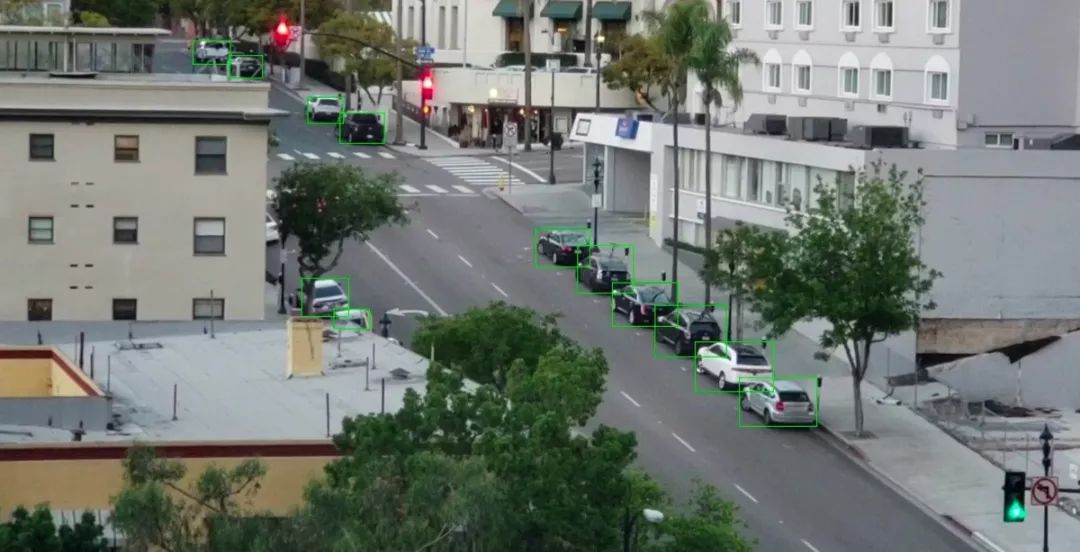
同时会得到检测的每辆车的像素坐标:

这样我们已经成功地在图像中检测到了汽车。接下来到了下一个步骤。
三、探测空车位
知道图像中每辆车的像素位置后,通过观察连续多帧视频,可以很容易地算出哪帧里汽车没有移动。但我们如何检测到汽车何时离开停车位?经观察,图像中汽车的边框部分有所重叠:
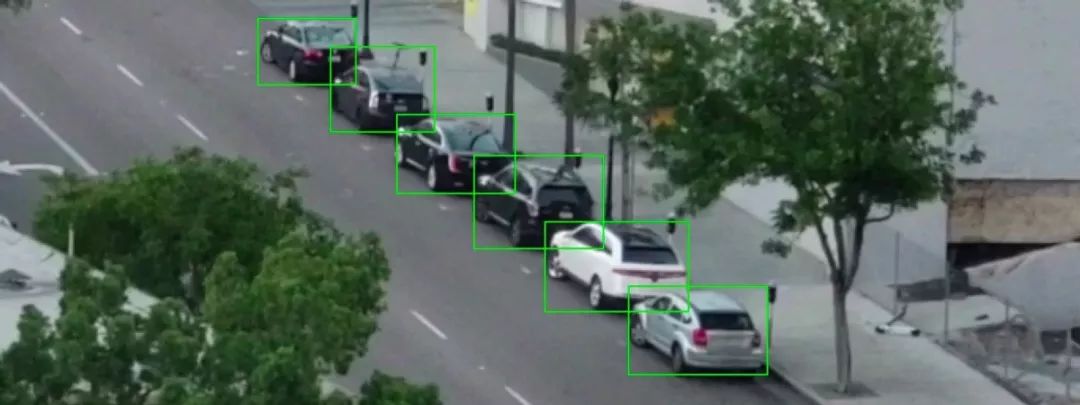
如果假设每个边界框代表一个停车场空间,这个区域即使有车开走了,但是仍可能被另外汽车部分占据。因此我们需要一种方法来测量重叠,检查出“大部分为空”的框。我们使用的度量方法称为 Intersection Over Union(IoU)。通过计算两个物体重叠的像素量,然后除以两个物体所覆盖的像素:

有了这个值,接下来就可以很容易确定一辆车是否在停车位。如果 IoU 测量值低,比如 0.15,表示汽车并没有占据大部分的停车位空间。但是如果测量值很高,比如 0.6,就表示汽车占据了大部分的停车位,因此可以确定停车位已被占用。
IoU 是计算机视觉中常用的一种测量方法,提供了现成的代码。Matterport 的Mask R-CNN 库可以直接调用这个函数 mrcnn.utils.compute_overlaps()。假设我们有一个表示停车位边界框的列表,要检识别到的车辆是否在这些边界内框很简单,只需添加一两行代码:
1    # Filter the results to only grab the car / truck bounding boxes
2    car_boxes = get_car_boxes(r['rois'], r['class_ids'])
3
4    # See how much cars overlap with the known parking spaces
5    overlaps = mrcnn.utils.compute_overlaps(car_boxes, parking_areas)
6
7    print(overlaps)
结果显示为:
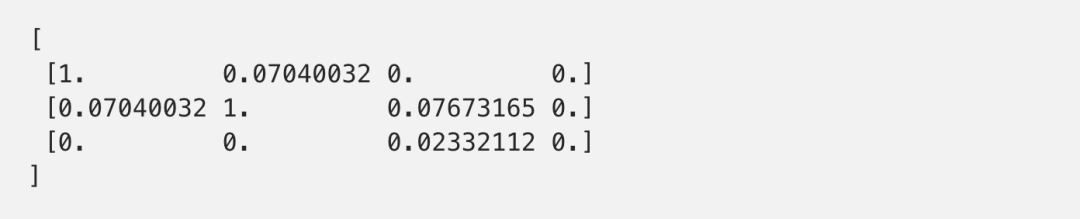
在二维数组中,每一行表示一个停车位边界框。同样的,每一列表示停车场被汽车所覆盖的程度。1.0 分意味着汽车完全占据了,而 0.02 这样的低分数,意味着有重叠区域,但不会占据大部分空间。
要找到无人使用的停车位,只需要计算出这个数组。如果所有的数都是 0 或者很小,也就表示空间没有被占用,因此一定是空停车位。
尽管 Mask R-CNN 非常精确,但目标检测并不能做到完美。有时也会在一段视频中漏掉一两辆车。所以在定位到一个空车位时,还应该检测在一段时间内都是空的,比如 5或10帧连续视频。这也可以避免视频本身出现故障而造成误检。一旦看到几个连续视频中都有空车位,马上发送提醒通知!
四、发送消息
最后一步是发送 SMS 提醒消息。利用 Twilio 通过 Python 发送 SMS 消息非常简单,基本上几行代码就可以实现。当然,Twilio 只是这个项目中用到的方法,你也可以用其他方式实现。
要使用 Twilio,先要注册一个试用帐户,创建一个 Twilio 电话号码并获取您的帐户凭证。然后,您需要安装 Twilio Python 客户端库:

下面是发送 SMS 消息的 Python 代码 (需用自己的帐户信息替换这些值):
1from
twilio.rest import Client
2
3# Twilio account details
4twilio_account_sid = 'Your Twilio SID here'
5twilio_auth_token = 'Your Twilio Auth Token here'
6twilio_source_phone_number = 'Your Twilio phone number here'
7
8# Create a Twilio client object instance
9client = Client(twilio_account_sid, twilio_auth_token)
10
11# Send an SMS
12message = client.messages.create(
13 body="This is my SMS message!",
14 from_=twilio_source_phone_number,
15 to="Destination phone number here"
16)
在添加 SMS 发送功能时要注意,不要连续发送已经识别过的空车位信息。可以用一个 flag 来跟踪已经发过的短信,除非是设定一段时间后再次提醒或是检测到新的空车位。
五、把所有流程串在一起
现在将每个步骤集成一个Python脚本。下面是完整代码,要运行这段代码,需要安装Python 3.6+,Matterport 的 Mask R-CNN 和 OpenCV:
1import os
2import numpy as np
3import cv2
4import mrcnn.config
5import mrcnn.utils
6from mrcnn.model import MaskRCNN
7from pathlib import Path
8from twilio.rest import Client
9
10
11# Configuration that will be used by the Mask-RCNN library
12class
MaskRCNNConfig(mrcnn.config.Config):
13 NAME = "coco_pretrained_model_config"
14 IMAGES_PER_GPU = 1
15 GPU_COUNT = 1
16 NUM_CLASSES = 1 + 80 # COCO dataset has 80 classes + one background class
17 DETECTION_MIN_CONFIDENCE = 0.6
18
19
20# Filter a list of Mask R-CNN detection results to get only the detected cars / trucks
21def get_car_boxes(boxes, class_ids):
22 car_boxes = []
23
24 for i, box in enumerate(boxes):
25 # If the detected object isn't a car / truck, skip it
26 if class_ids[i] in [3
, 8, 6]:
27 car_boxes.append(box)
28
29 return np.array(car_boxes)
30
31
32# Twilio config
33twilio_account_sid = 'YOUR_TWILIO_SID'
34twilio_auth_token = 'YOUR_TWILIO_AUTH_TOKEN'
35twilio_phone_number = 'YOUR_TWILIO_SOURCE_PHONE_NUMBER'
36destination_phone_number = 'THE_PHONE_NUMBER_TO_TEXT'
37client = Client(twilio_account_sid, twilio_auth_token)
38
39
40# Root directory of the project
41ROOT_DIR = Path(".")
42
43# Directory to save logs and trained model
44MODEL_DIR = os.path.join(ROOT_DIR, "logs")
45
46# Local path to trained weights file
47COCO_MODEL_PATH = os.path.join(ROOT_DIR, "mask_rcnn_coco.h5")
48
49# Download COCO trained weights from Releases if needed
50if not os.path.exists(COCO_MODEL_PATH):
51 mrcnn.utils.download_trained_weights(COCO_MODEL_PATH)
52
53# Directory of images to run detection on
54IMAGE_DIR = os.path.join(ROOT_DIR, "images")
55
56# Video file or camera to process - set this to 0 to use your webcam instead of a video file
57VIDEO_SOURCE = "test_images/parking.mp4"
58
59# Create a Mask-RCNN model in inference mode
60model = MaskRCNN(mode="inference", model_dir=MODEL_DIR, config=MaskRCNNConfig())
61
62# Load pre-trained model
63model.load_weights(COCO_MODEL_PATH, by_name=True)
64
65# Location of parking spaces
66parked_car_boxes = None
67
68# Load the video file we want to run detection on
69video_capture = cv2.VideoCapture(VIDEO_SOURCE)
70
71# How many frames of video we've seen in a row with a parking space open
72free_space_frames = 0
73
74# Have we sent an SMS alert yet?
75sms_sent = False
76
77# Loop over each frame of video
78while video_capture.isOpened():
79 success, frame = video_capture.read()
80 if not success:
81 break
82
83 # Convert the image from BGR color (which OpenCV uses) to RGB color
84 rgb_image = frame[:, :, ::-1]
85
86 # Run the image through the Mask R-CNN model to get results.
87 results = model.detect([rgb_image], verbose=0)
88
89 # Mask R-CNN assumes we are running detection on multiple images.
90 # We only passed in one image to detect, so only grab the first result.
91 r = results[0]
92
93 # The r variable will now have the results of detection:
94 # - r['rois'] are the bounding box of each detected object
95 # - r['class_ids'] are the class id (type) of each detected object
96 # - r['scores'] are the confidence scores for each detection
97
# - r['masks'] are the object masks for each detected object (which gives you the object outline)
98
99 if parked_car_boxes is None:
100 # This is the first frame of video - assume all the cars detected are in parking spaces.
101 # Save the location of each car as a parking space box and go to the next frame of video.
102 parked_car_boxes = get_car_boxes(r['rois'], r['class_ids'])
103 else:
104 # We already know where the parking spaces are. Check if any are currently unoccupied.
105
106 # Get where cars are currently located in the frame
107 car_boxes = get_car_boxes(r['rois'], r['class_ids'])
108
109 # See how much those cars overlap with the known parking spaces
110 overlaps = mrcnn.utils.compute_overlaps(parked_car_boxes, car_boxes)
111
112 # Assume no spaces are free until we find one that is free
113
free_space = False
114
115 # Loop through each known parking space box
116 for parking_area, overlap_areas in zip(parked_car_boxes, overlaps):
117
118 # For this parking space, find the max amount it was covered by any
119 # car that was detected in our image (doesn't really matter which car)
120 max_IoU_overlap = np.max(overlap_areas)
121
122 # Get the top-left and bottom-right coordinates of the parking area
123 y1, x1, y2, x2 = parking_area
124
125 # Check if the parking space is occupied by seeing if any car overlaps
126 # it by more than 0.15 using IoU
127 if max_IoU_overlap 0.15:
128 # Parking space not occupied! Draw a green box around it
129 cv2.rectangle(frame, (x1, y1), (x2, y2), (0, 255
, 0), 3)
130 # Flag that we have seen at least one open space
131 free_space = True
132 else:
133 # Parking space is still occupied - draw a red box around it
134 cv2.rectangle(frame, (x1, y1), (x2, y2), (0, 0, 255), 1)
135
136 # Write the IoU measurement inside the box
137 font = cv2.FONT_HERSHEY_DUPLEX
138 cv2.putText(frame, f"{max_IoU_overlap:0.2}", (x1 + 6, y2 - 6), font, 0.3, (255, 255, 255))
139
140 # If at least one space was free, start counting frames
141
# This is so we don't alert based on one frame of a spot being open.
142 # This helps prevent the script triggered on one bad detection.
143 if free_space:
144 free_space_frames += 1
145 else:
146 # If no spots are free, reset the count
147 free_space_frames = 0
148
149 # If a space has been free for several frames, we are pretty sure it is really free!
150 if free_space_frames > 10:
151 # Write SPACE AVAILABLE!! at the top of the screen
152 font = cv2.FONT_HERSHEY_DUPLEX
153 cv2.putText(frame, f"SPACE AVAILABLE!", (10, 150), font, 3.0, (0, 255, 0), 2, cv2.FILLED)
154
155 # If we haven't sent an SMS yet, sent it!
156 if not sms_sent:
157 print("SENDING SMS!!!")
158 message = client.messages.create(
159 body="Parking space open - go go go!",
160 from_=twilio_phone_number,
161 to=destination_phone_number
162 )
163 sms_sent = True
164
165 # Show the frame of video on the screen
166 cv2.imshow('Video', frame)
167
168 # Hit 'q' to quit
169 if cv2.waitKey(1) & 0xFF == ord('q'):
170 break
171
172# Clean up everything when finished
173video_capture.release()
174cv2.destroyAllWindows()
这段代码写的比较简洁,实现了基本的功能。大家也可以试着修改代码以适应不同的场景。仅仅更改一下模型参数,出现的效果就可能完全不同,在不同应用中尽情发挥想象力!
原文链接:
https://medium.com/@ageitgey/snagging-parking-spaces-with-mask-r-cnn-and-python-955f2231c400


