目前我们在互联网和论文中看到的大多数面部识别算法都是以图像为基础进行处理。这些方法在检测和识别来自摄像头的图像、或视频流各帧中的人脸时效果很好。但是,他们无法区分现实生活中的人脸和照片上的人脸,因为这些算法处理的是2D帧。
现在,让我们想象一下,如果我们想要实现一个面部识别开门器。该系统可以很好地区分已知面孔和未知面孔,保证只有特定人员才能访问。尽管如此,任意一个陌生人只要拥有他们的照片就很容易进入该区域,这时3D检测器(类似于Apple的FaceID)就被纳入考虑范围。但是,如果我们没有3D探测器怎么办?
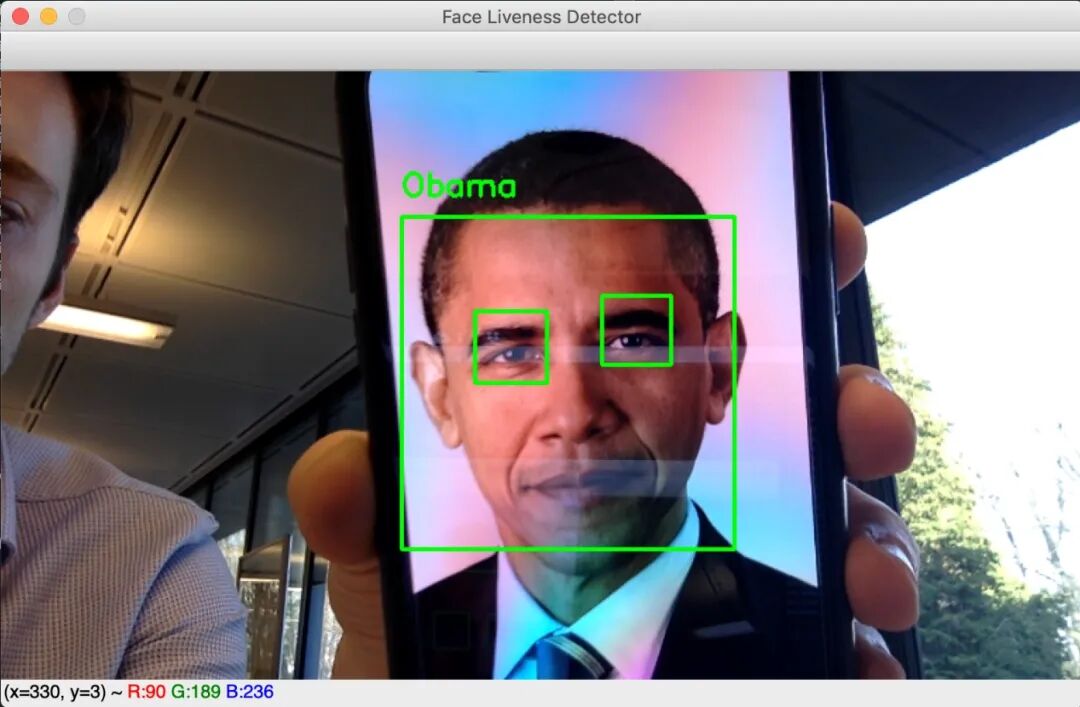
奥巴马脸部照片识别案例❌
本文旨在实现一种基于眨眼检测的面部活动检测算法来阻止照片的使用。该算法通过网络摄像头实时工作,并且仅在眨眼时才显示该人的姓名。程序流程如下:
1. 对网络摄像头生成的每一帧图像,进行面部检测。
2. 对于每个检测到的脸部区域,进行眼睛检测。
3. 对于检测到的每只眼睛,进行眨眼检测。
4. 如果在某个时刻检测到眼睛合上后又睁开了,则认为该人眨了眨眼,程序将显示他的名字(对于面部识别开门器,我们将授权该人进入)。
为了检测和识别面部,我们需要安装face_recognition库,该库提供了非常棒的深度学习算法来查找和识别图像中的人脸。特别是face_locations,face_encodings和compare_faces函数是3个最常用的函数。face_locations函数有两种可使用两种方法进行人脸检测:梯度方向的Histrogram(HOG)和C onvolutional神经网络(CNN)。由于时间限制 ,选择了HOG方法。face_encodings函数是一个预训练的卷积神经网络,能够将图像编码为128个特征的向量。这些向量的信息足够以区分两个不同的人。最后,使用compare_faces计算两个嵌入向量之间的距离。它将允许算法识别从摄像头帧中提取的面部,并将其嵌入矢量与我们数据集中的所有编码面部进行比较。最接近的向量对应于同一个人。
1.已知的人脸数据集编码
就我们的算法而言,它能够识别我们自己和巴拉克·奥巴马。分别选择了约10张图片。以下是用于处理和编码已知面孔数据库的代码。
def process_and_encode(images): known_encodings = [] known_names = [] print("[LOG] Encoding dataset ...")
for image_path in tqdm(images): image = cv2.imread(image_path) image = cv2.cvtColor(image, cv2.COLOR_BGR2RGB)
boxes = face_recognition.face_locations(image, model='hog')
encoding = face_recognition.face_encodings(image, boxes)
name = image_path.split(os.path.sep)[-2]
if len(encoding) > 0 : known_encodings.append(encoding[0]) known_names.append(name)
return {"encodings": known_encodings, "names": known_names}
现在我们知道了要识别的每个人的编码,我们可以尝试通过网络摄像头识别和识别面部。但是,在进行此部分操作之前,我们需要区分面部照片和活人的面部。
2.面部活跃度检测
提醒一下,目标是在某个点检测“睁开-闭合-睁开”的眼图。我训练了卷积神经网络来对眼睛是闭合还是睁开进行分类。选择的模型是LeNet-5,该模型已在 Closed Eyes In The Wild (CEW) 数据集中进行了训练。它由大小约为24x24的4800眼图像组成。
from keras.models import Sequentialfrom keras.layers import Conv2Dfrom keras.layers import AveragePooling2Dfrom keras.layers import Flattenfrom keras.layers import Densefrom keras.preprocessing.image import ImageDataGenerator
IMG_SIZE = 24def train(train_generator, val_generator): STEP_SIZE_TRAIN=train_generator.n STEP_SIZE_VALID=val_generator.n model = Sequential()
model.add(Conv2D(filters=6, kernel_size=(3, 3), activation='relu', input_shape=(IMG_SIZE,IMG_SIZE,1))) model.add(AveragePooling2D())
model.add(Conv2D(filters=16, kernel_size=(3, 3), activation='relu')) model.add(AveragePooling2D())
model.add(Flatten())
model.add(Dense(units=120, activation='relu'))
model.add(Dense(units=84, activation='relu'))
model.add(Dense(units=1, activation = 'sigmoid'))
model.compile(loss='binary_crossentropy', optimizer='adam', metrics=['accuracy']) print('[LOG] Training CNN') model.fit_generator(generator=train_generator, steps_per_epoch=STEP_SIZE_TRAIN, validation_data=val_generator, validation_steps=STEP_SIZE_VALID, epochs=20 ) return model
在评估模型时,准确率达到94%。
每次检测到眼睛时,我们都会使用模型预测其状态,并跟踪每个人的眼睛状态。因此,借助以下功能,可使检测眨眼变得很容易,该功能尝试在眼睛状态历史记录中查找闭合-闭合-闭合模式。
def isBlinking(history, maxFrames): """ @history: A string containing the history of eyes status where a '1' means that the eyes were closed and '0' open. @maxFrames: The maximal number of successive frames where an eye is closed """ for i in range(maxFrames): pattern = '1' + '0'*(i+1) + '1' if pattern in history: return True return False
3.活人的面部识别
我们拥有构建“真实”面部识别算法的所有要素,只需要一种实时检测面部和眼睛的方法即可。我们选择使用OpenCV预训练的Haar级联分类器执行这些任务。
def detect_and_display(model, video_capture, face_detector, open_eyes_detector, left_eye_detector, right_eye_detector, data, eyes_detected): frame
= video_capture.read() frame = cv2.resize(frame, (0, 0), fx=0.6, fy=0.6)
gray = cv2.cvtColor(frame, cv2.COLOR_BGR2GRAY) rgb = cv2.cvtColor(frame, cv2.COLOR_BGR2RGB) faces = face_detector.detectMultiScale( gray, scaleFactor=1.2, minNeighbors=5, minSize=(50, 50), flags=cv2.CASCADE_SCALE_IMAGE )
for (x,y,w,h) in faces: encoding = face_recognition.face_encodings(rgb, [(y, x+w, y+h, x)])[0]
matches = face_recognition.compare_faces(data["encodings"], encoding)
name = "Unknown"
if True in matches: matchedIdxs = [i for (i, b) in enumerate(matches) if b] counts = {} for i in matchedIdxs: name = data["names"][i] counts[name] = counts.get(name, 0) + 1
name = max(counts, key=counts.get)
face = frame[y:y+h,x:x+w] gray_face = gray[y:y+h,x:x+w]
eyes = [] open_eyes_glasses = open_eyes_detector.detectMultiScale( gray_face, scaleFactor=1.1, minNeighbors=5, minSize=(30, 30), flags = cv2.CASCADE_SCALE_IMAGE ) if len(open_eyes_glasses) == 2: eyes_detected[name]+='1' for (ex,ey,ew,eh) in open_eyes_glasses: cv2.rectangle(face,(ex,ey),(ex+ew,ey+eh),(0,255,0),2) else: left_face = frame[y:y+h, x+int(w/2):x+w] left_face_gray = gray[y:y+h, x+int(w/2):x+w]
right_face = frame[y:y+h, x:x+int(w/2)] right_face_gray = gray[y:y+h, x:x+int(w/2)]
left_eye = left_eye_detector.detectMultiScale( left_face_gray, scaleFactor=1.1, minNeighbors=5, minSize=(30, 30), flags = cv2.CASCADE_SCALE_IMAGE )
right_eye = right_eye_detector.detectMultiScale( right_face_gray, scaleFactor=1.1, minNeighbors=5, minSize=(30, 30), flags = cv2.CASCADE_SCALE_IMAGE )
eye_status = '1' # we suppose the eyes are open
for (ex,ey,ew,eh) in right_eye: color = (0,255,0) pred = predict(right_face[ey:ey+eh,ex:ex+ew],model) if pred == 'closed': eye_status='0' color = (0,0,255) cv2.rectangle(right_face,(ex,ey),(ex+ew,ey+eh),color,2) for (ex,ey,ew,eh) in left_eye: color = (0,255,0) pred = predict(left_face[ey:ey+eh,ex:ex+ew],model) if pred == 'closed': eye_status='0' color = (0,0,255) cv2.rectangle(left_face,(ex,ey),(ex+ew,ey+eh),color,2) eyes_detected[name] += eye_status
if isBlinking(eyes_detected[name],3): cv2.rectangle(frame, (x, y), (x+w, y+h), (0, 255, 0), 2) y = y - 15 if y - 15 > 15 else y + 15 cv2.putText(frame, name, (x, y), cv2.FONT_HERSHEY_SIMPLEX,0.75, (0, 255, 0), 2)
return frame
上面的功能是用于检测和识别真实面部的代码。它所需的输入参数:
• 型号:睁眼/闭眼分类器
• video_capture:流视频
• face_detector:Haar级联的人脸分类器。我们选择了haarcascade_frontalface_alt.xml
• open_eyes_detector:Haar级联睁眼分类器。我选择了haarcascade_eye_tree_eyeglasses.xml
• left_eye_detector:Haar级联的左眼分类器。我选择了haarcascade_lefteye_2splits.xml,它可以检测睁眼或闭眼。
• right_eye_detector:Haar级联的右眼分类器。我们选择了haarcascade_righteye_2splits.xml,它可以检测睁眼或闭眼。
• 数据:已知编码和已知名称的字典
• eyes_detected:包含每个名称的眼睛状态历史记录的字典。
在第2至4行,我们从网络摄像头流中抓取一帧,然后调整其大小以加快计算速度。在第10 行,我们从帧中检测人脸,然后在第21行,将其编码为128-d向量。在第23-38行中,我们将此向量与已知的面部编码进行比较,然后通过计算匹配次数确定该人的姓名。匹配次数最多的一个被选中。从第45行开始,我们在脸部范围内检测眼睛是否存在。首先,我们尝试使用open_eye_detector检测睁眼。如果检测器成功,则在第54行,将 ''1''添加到眼睛状态历史记录。如果第一个分类器失败了(可能是因为闭眼或仅仅是因为它不识别眼睛),这意味着open_eye_detector无法检测到闭合的眼睛,则使用left_eye和right_eye检测器。该面部分为左侧和右侧,以便对各个检测器进行分类。从第92行开始,提取眼睛部分,经过训练的模型预测眼睛是否闭合。如果检测到一只闭合的眼睛,则预测两只眼睛都闭合,并且将''0''添加到眼睛状态历史记录中。否则,可以得出结论,眼睛睁开了。最后在第110行,isBlinking()功能用于检测眨眼以及是否眨眼的人。
参考资料
• https://docs.opencv.org/3.4.3/d7/d8b/tutorial_py_face_detection.html
• https://www.pyimagesearch.com/2018/06/18/face-recognition-with-opencv-python-and-deep-learning/