From:
https://pythoneers.cn/gui/pyqt5.html
1. PyQt5基础
1.1 GUI编程学什么
-
大致了解你所选择的GUI库
-
基本的程序的结构:使用这个GUI库来运行你的GUI程序
-
各种控件的特性和如何使用
-
控件的样式
-
资源的加载
-
控件的布局
-
事件和信号
-
动画特效
-
界面跳转
-
设计工具的使用
1.2 PyQT是什么
QT是跨平台C++库的集合,它实现高级API来访问现代桌面和移动系统的许多方面。这些服务包括定位和定位服务、多媒体、NFC和蓝牙连接、基于Chromium的web浏览器以及传统的UI开发。PyQt5是Qt v5的一组完整的Python绑定。它被实现为超过35个扩展模块,并使Python在所有支持的平台(包括IOS和Android)上被用作C++的替代应用程序开发语言。PyQT5也可以嵌入在基于C++的应用程序中,以允许这些应用程序的用户配置或增强这些应用程序的功能。
1.3 PyQT的优势
-
简单好用
-
功能强大
-
跨平台支持
-
性能高
-
文档齐全:PyQT本身就是对QT库Python的绑定,在绑定的时候保持了原有的QT库的API。也就是说,PyQT除了自己的文档外,也几乎可以通用QT文档。
-
稳定性高:面向对象、信号与槽的机制、界面设计与业务代码完全隔离
-
生态支持:QU Designer进行图形界面设计、ui转换成py文件、资源处理
-
开源免费:PyQT是双重许可的,开发人员可以在GPL和商业许可之间进行选择。采用GPL协议,软件著作权属于开发者本人所有,受国际相关版权法保护,允许其他用户对原作者软件进行复制和发行,也可以更改后发型自己的软件。
1.4 开发环境的安装
首先,基本的 Python3 环境和 PyCharm 开发工具的安装,由于比较简单,博主在这里不再详细演示了!实在有问题的可以自行Google或者百度。其次就是GUI开发环境的安装,也就是安装PyQT5。这里演示在Python的虚拟环境中来安装PyQT5(Ubuntu Linux系统):
# 在Python全局环境中安装pipenv
$ pip3 install pipenv -i https://pypi.tuna.tsinghua.edu.cn/simple
# 创建项目目录
$ mkdir pyqt5-pro
# 进入项目目录
$ cd pyqt5-pro/
# 创建虚拟环境
$ pipenv --three
# 激活虚拟环境(
激活环境后会自动创建Pipfile文件)
$ pipenv shell
# 为加速安装,将源改为国内源
(pyqt5-pro) $ vim Pipfile
url = "https://pypi.tuna.tsinghua.edu.cn/simple"
# 安装pyqt5库
(pyqt5-pro) $ pipenv install pyqt5
- 1
- 2
- 3
- 4
- 5
- 6
- 7
- 8
- 9
- 10
- 11
- 12
- 13
- 14
- 15
- 16
- 17
- 18
- 19
- 20
- 21
- 1
- 2
- 3
- 4
- 5
- 6
- 7
- 8
- 9
- 10
- 11
- 12
- 13
- 14
- 15
- 16
- 17
- 18
- 19
- 20
- 21
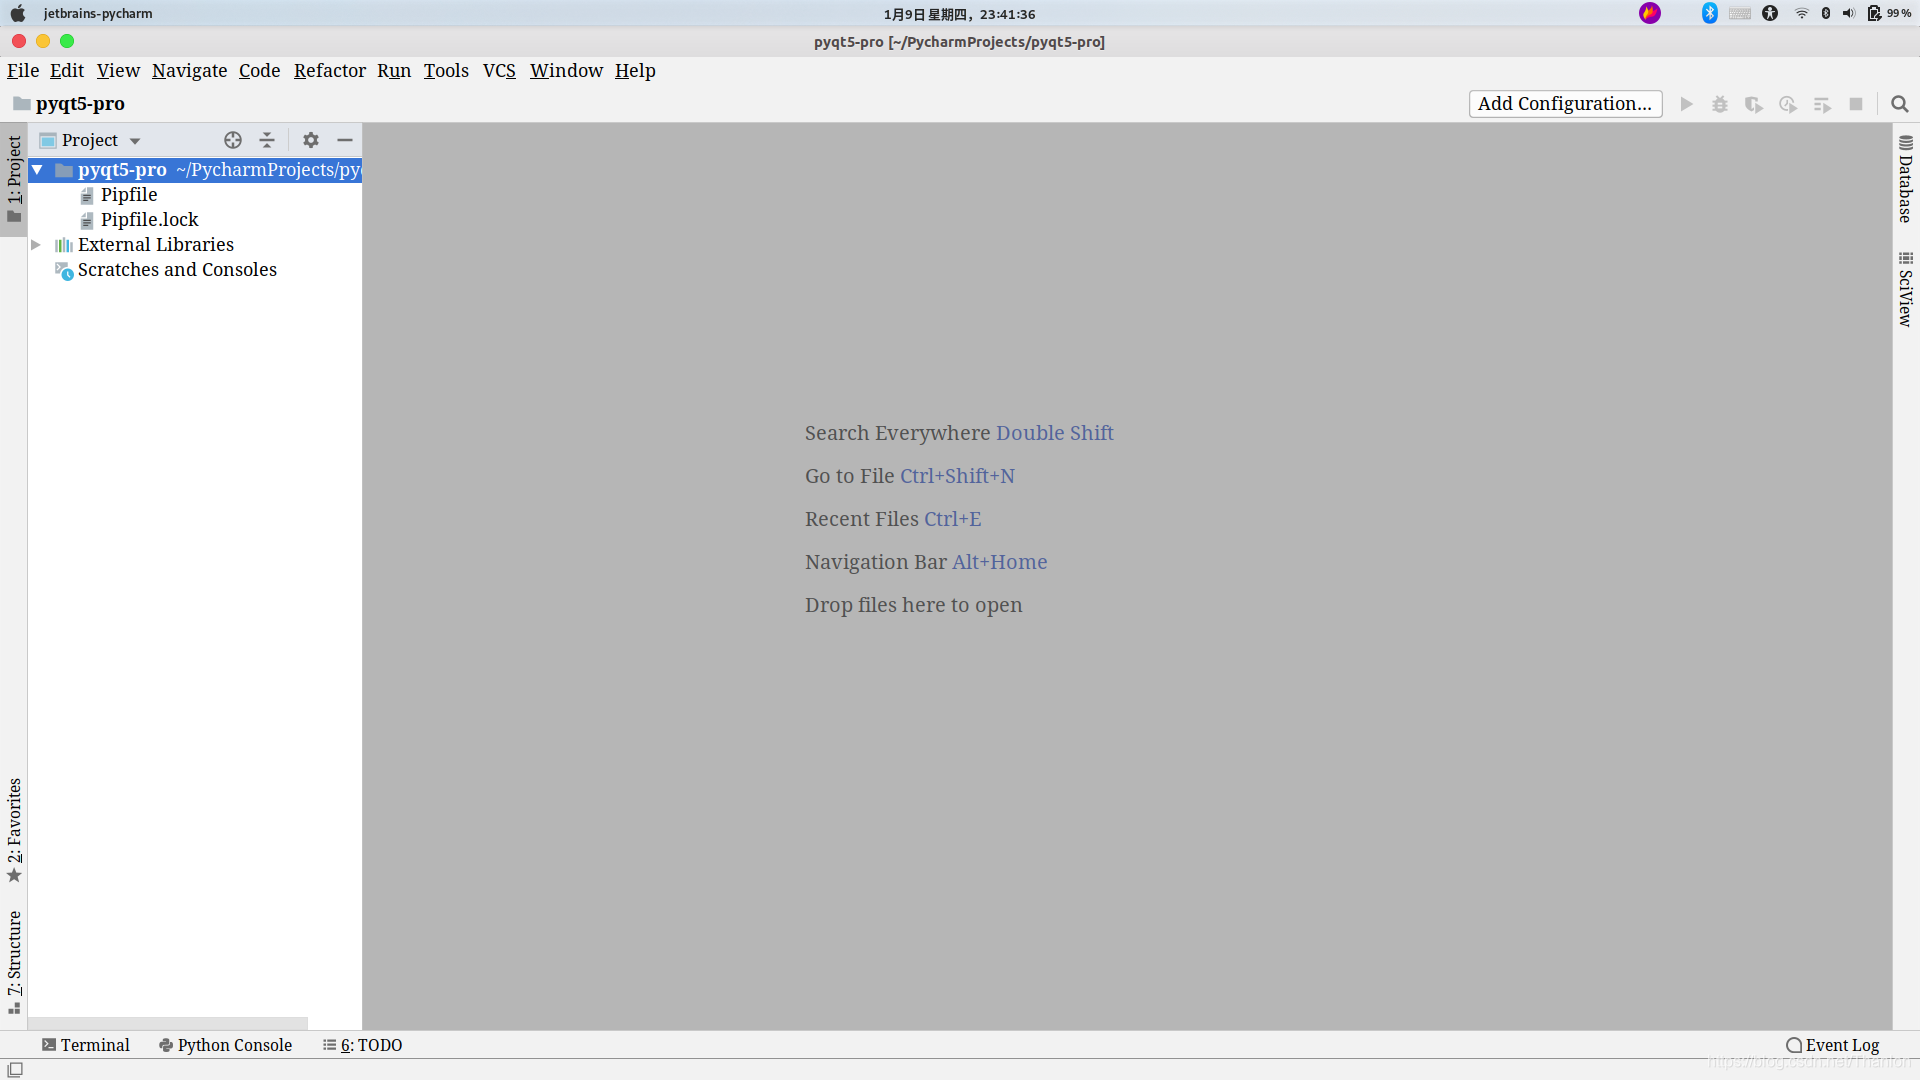
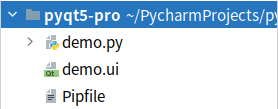
这个时候我们使用Pycharm打开这个项目文件夹:
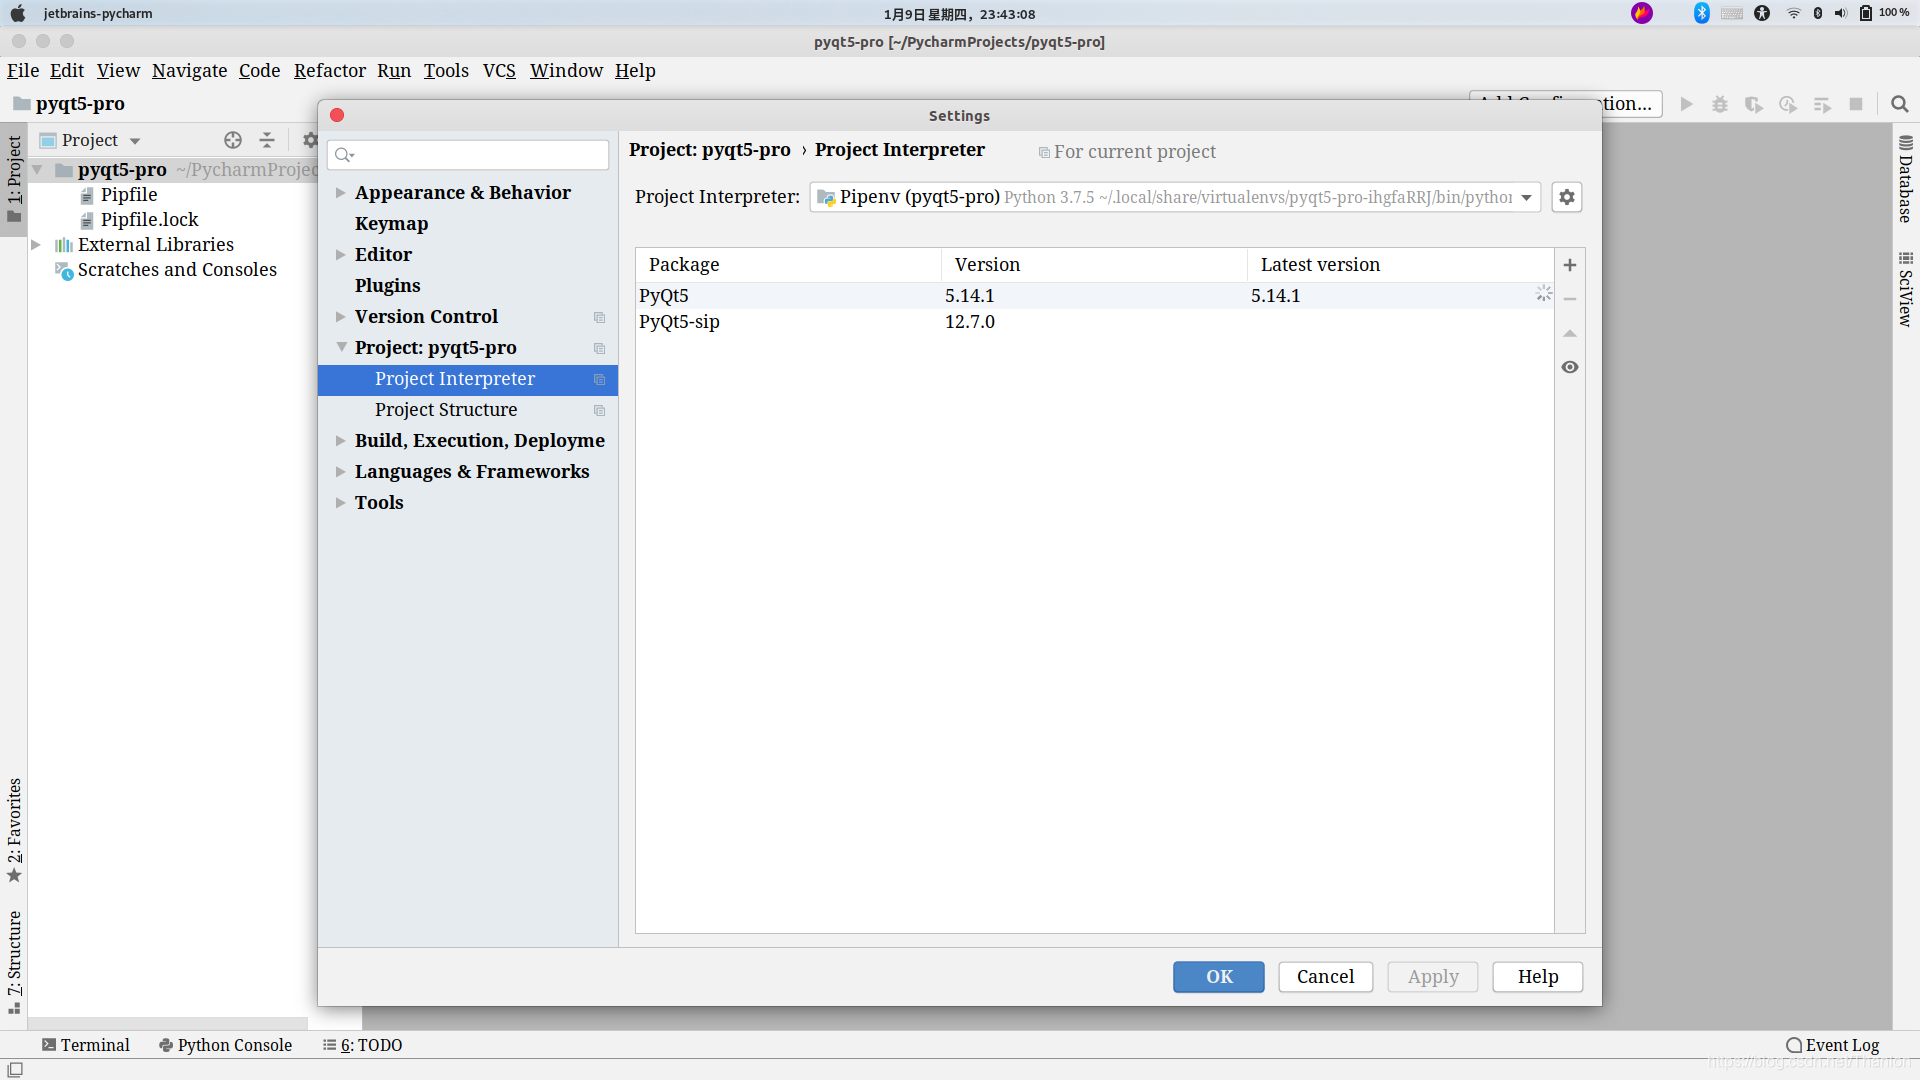
可以从设置中看到该项目依赖的Python环境:
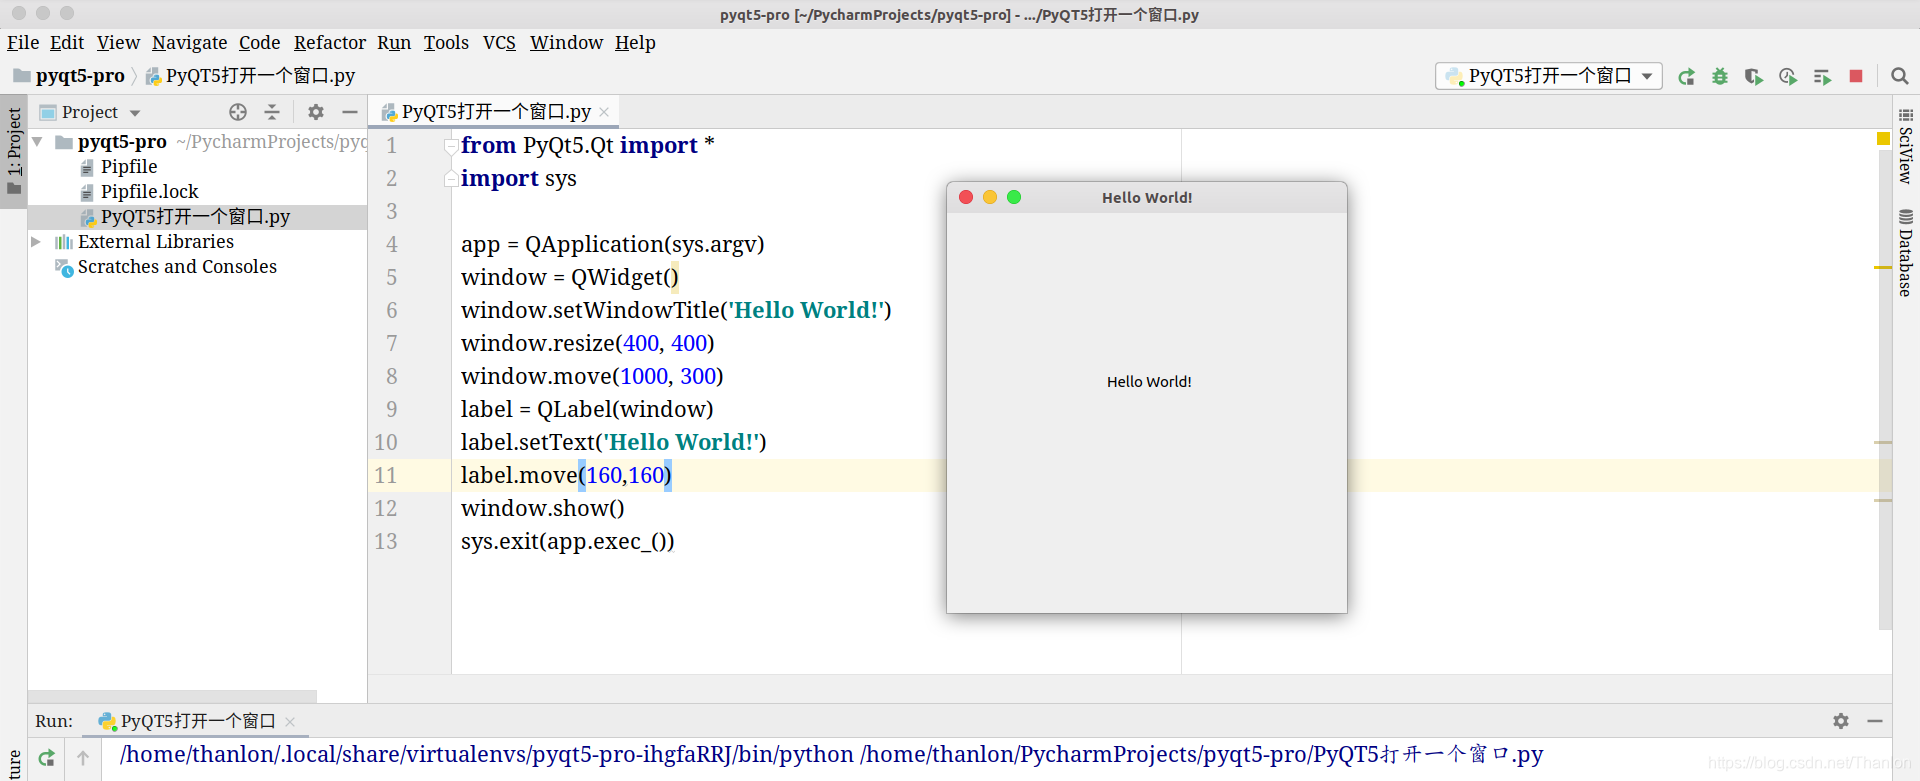
1.5 第一个pyqt5桌面应用
示例代码:
from PyQt5.Qt import *
import sys
if __name__ == '__main__':
app = QApplication(sys.argv)
window = QWidget()
window.setWindowTitle('Hello World!')
window.resize(400, 400)
window.move(1000, 300)
label = QLabel(window)
label.setText('Hello World!')
label.move(160, 160)
window.show()
sys.exit(app.exec_())
- 1
- 2
- 3
- 4
- 5
- 6
- 7
- 8
- 9
- 10
- 11
- 12
- 13
- 14
- 15
- 16
- 17
- 18
- 19
- 20
- 21
- 22
- 23
- 24
- 1
- 2
- 3
- 4
- 5
- 6
- 7
- 8
- 9
- 10
- 11
- 12
- 13
- 14
- 15
- 16
- 17
- 18
- 19
- 20
- 21
- 22
- 23
- 24
效果图[在windows平台中显示有差别于Linux(注意我这不是Mac OS系统,只是ubuntu linux系统使用了Mac OS的主题)]:
2. QtDesigner的使用
2.1 安装和配置
安装Qt的工具包:
pip install PyQt5-tools -i https://pypi.
douban.com/simple
安装完成后,QTdesigner 就在你的 python 环境下的扩展包里面了!
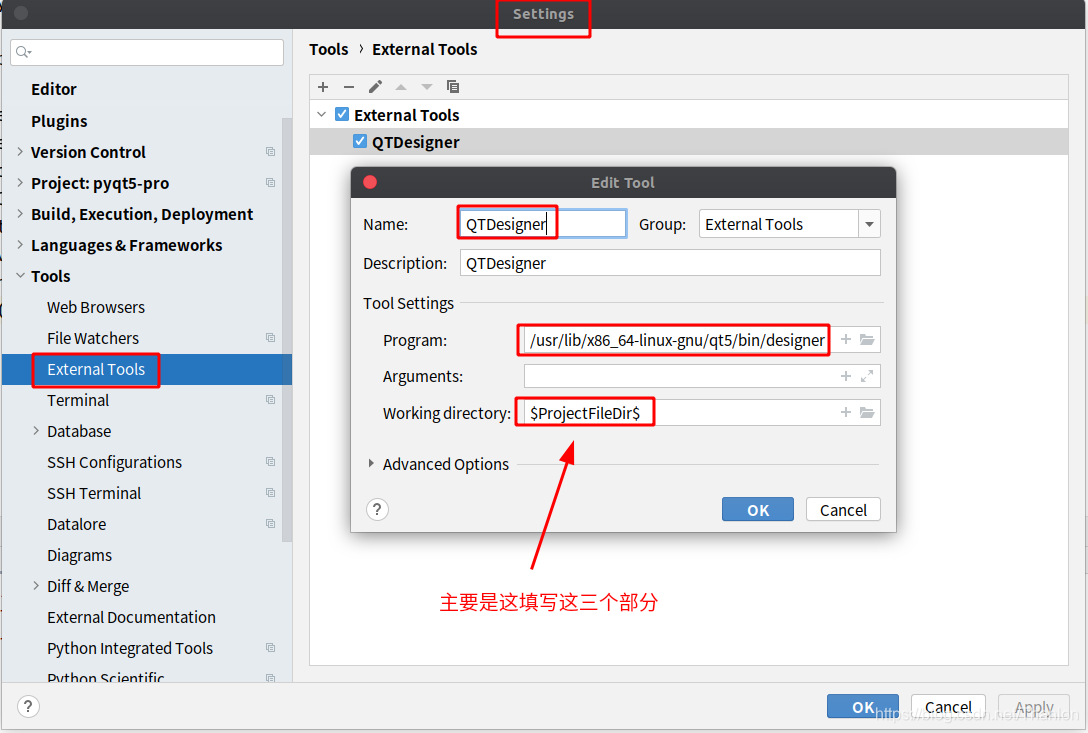
将QtDesigner集成到Pycharm:
2.2 快速入门
可以通过配置好的PyCharm扩展工具直接打开QTDesigner:
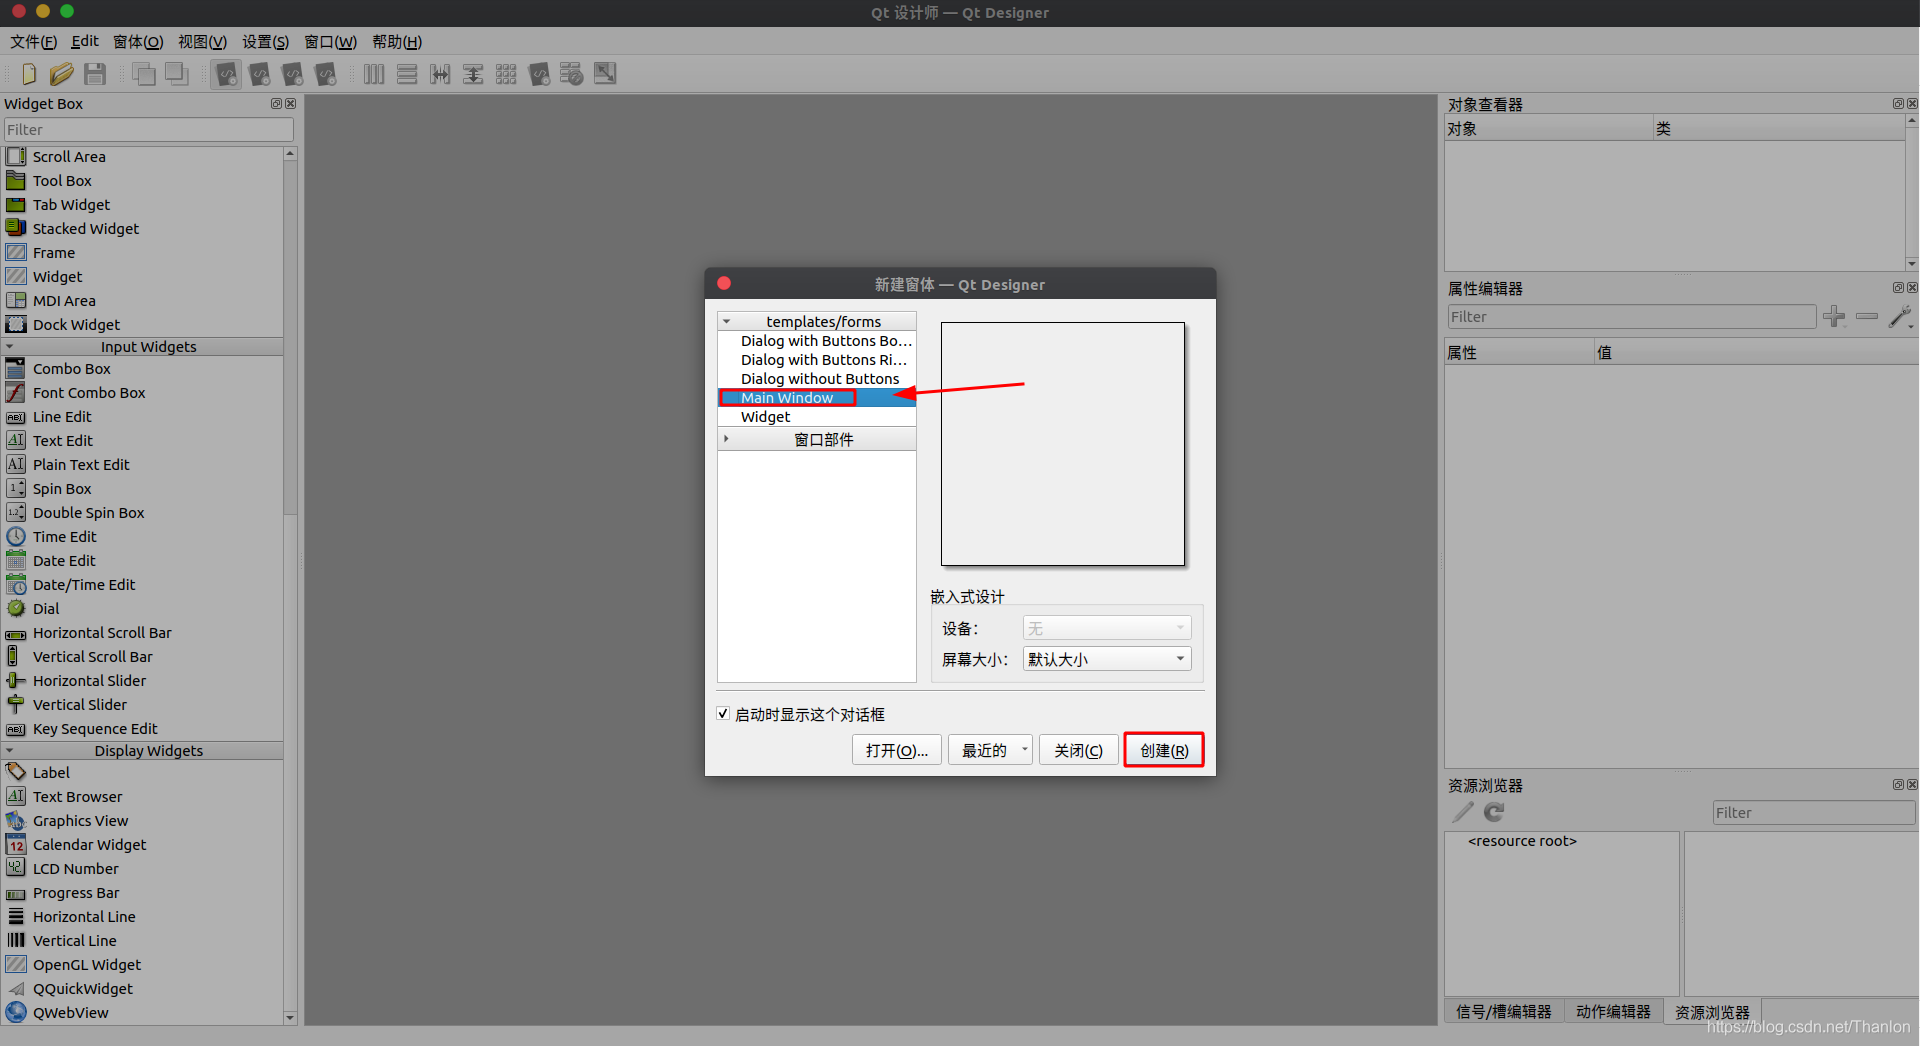
简单介绍QTDesigner几个主要部分:
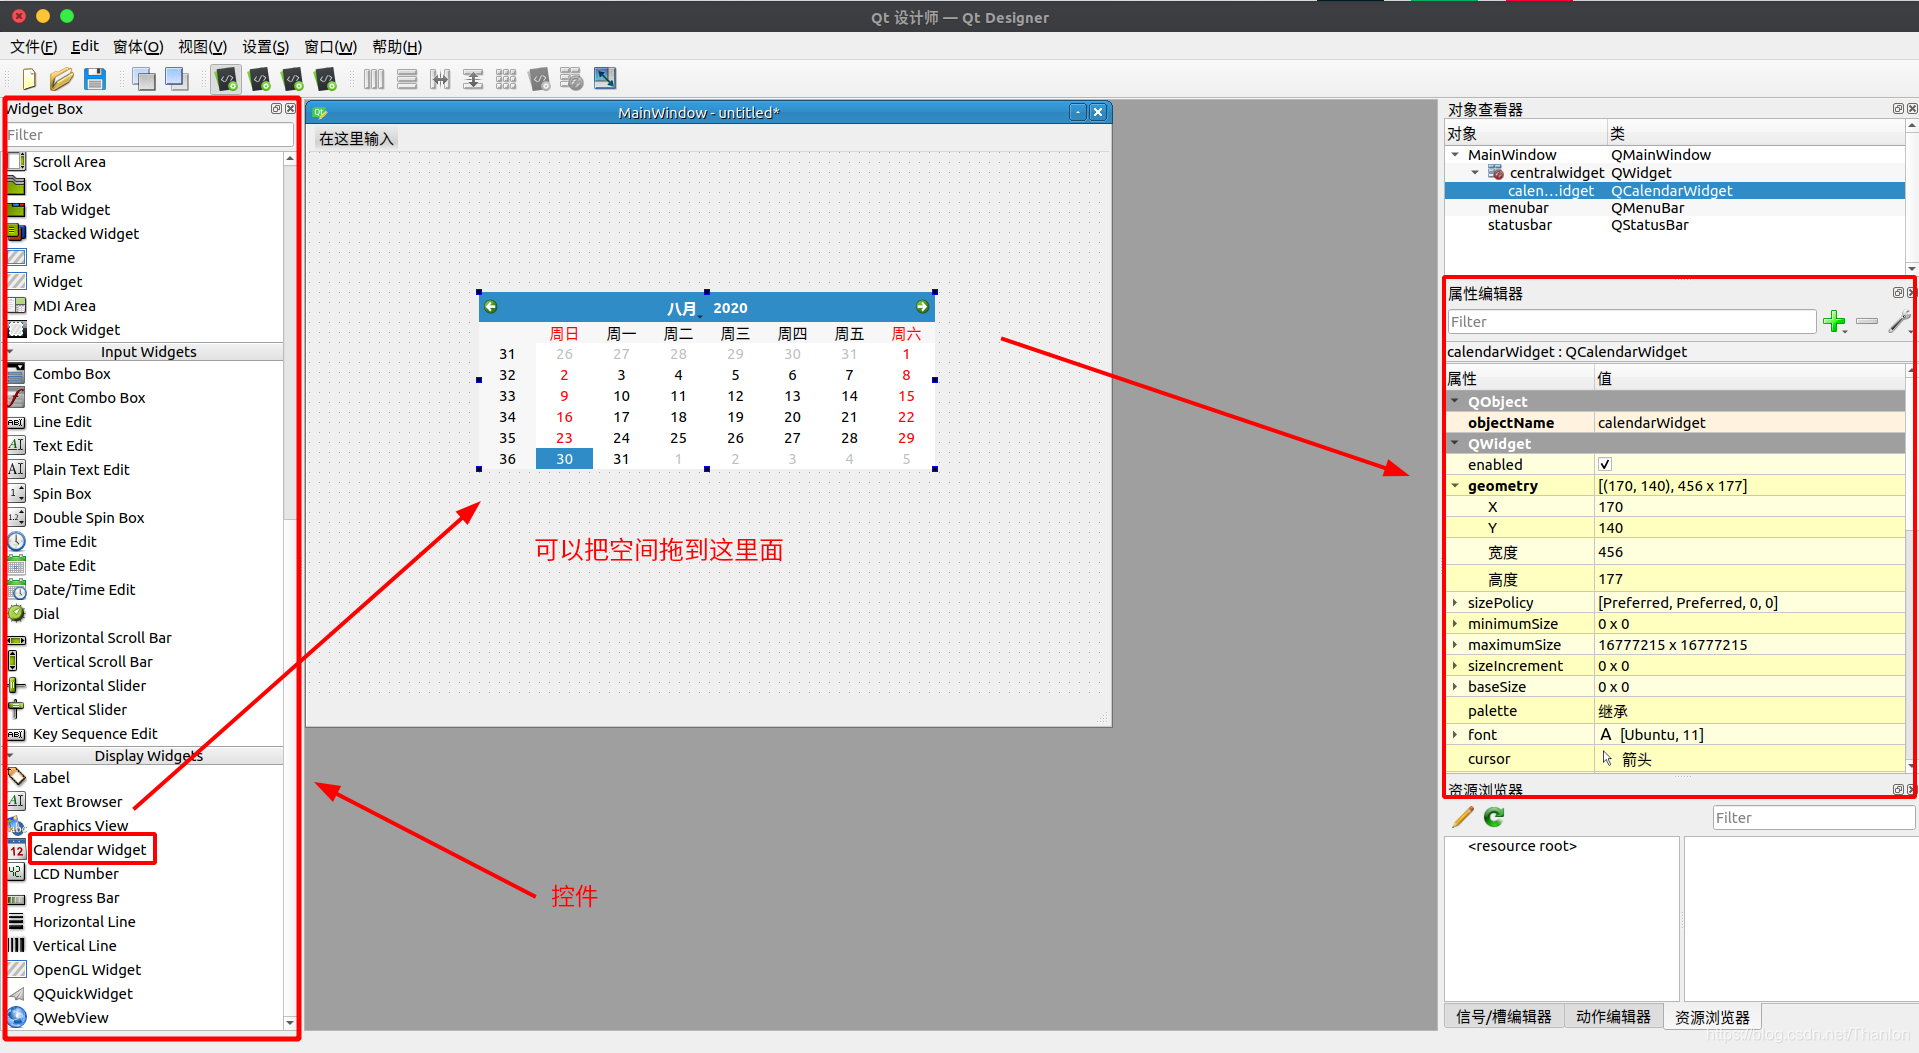
Ctrl+S后可以将其保存到项目根目录:

2.3 将ui文件转换成py文件
第一种方法:
$ python -m PyQt5.uic.pyuic demo.ui -o demo.py
第二种方法:
$ pyuic5 demo.ui -o demo.py
第三种方法:把第一种方法中命令集成到 PyCharm 中,首先需要使用
$ which python
查看当前使用的Python目录,
(pyqt5-pro) $ which python
/home/thanlon/.local/share/virtualenvs/pyqt5-pro-ihgfaRRJ/bin/python
将其复制粘贴到【Program】部分。然后再把
-m PyQt5.uic.pyuic $FileName$ -o $FileNameWithoutExtension$.py
加入到【Arguments】部分。再把
$FileDir$
加入到【Working directory】中:

转换之后,在项目目录下会生成.py文件:
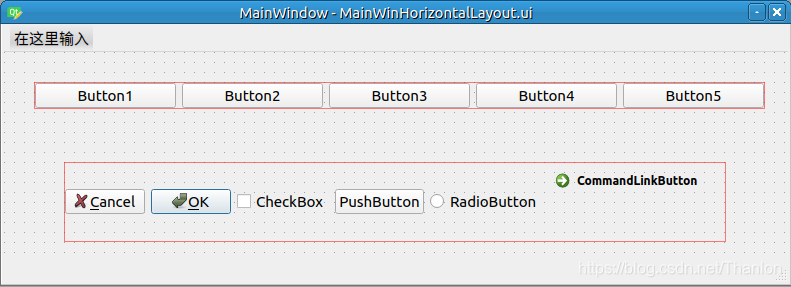
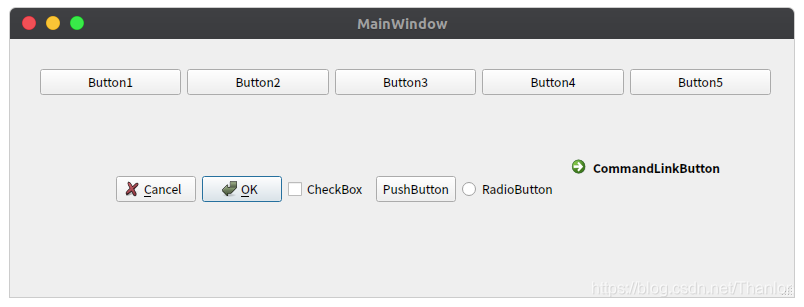
2.4 水平布局
使用水平布局的方式在QtDesigner中做一些简单的操作,如下图所示:
将.ui文件转换成.py文件后新建
RunMainWinHorizontalLayout.py
文件用来运行转换之后的.py文件
MainWinHorizontalLayout.py
:
import sys
import MainWinHorizontalLayout
from PyQt5.QtWidgets import QApplication, QMainWindow
if __name__ == '__main__':
app = QApplication(sys.argv)
mainWindow = QMainWindow()
ui = MainWinHorizontalLayout.Ui_MainWindow()
ui.setupUi(mainWindow)
mainWindow.show()
sys.exit(app.exec_())
- 1
- 2
- 3
- 4
- 5
- 6
- 7
- 8
- 9
- 10
- 11
- 12
- 13
- 14
- 15
- 16
- 17
- 1
- 2
- 3
- 4
- 5
- 6
- 7
- 8
- 9
- 10
- 11
- 12
- 13
- 14
- 15
- 16
- 17
运行这个Python文件得到:
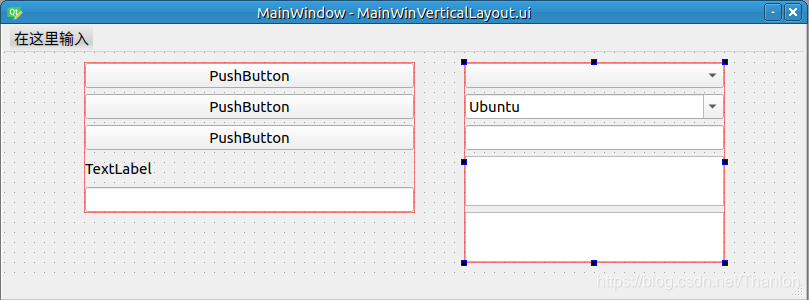
2.5 垂直布局
使用垂直布局的方式在QtDesigner中了做一些简单的操作,如下图所示:
将.ui文件转换成.py文件后新建
RunMainWinVerticalLayout.py
文件用来运行转换之后的.py文件
MainWinVerticalLayout.py
:
import sys
import MainWinVerticalLayout
from PyQt5.QtWidgets import QApplication, QMainWindow
if __name__ == '__main__':
app = QApplication(sys.argv)
mainWindow = QMainWindow()
ui = MainWinVerticalLayout.Ui_MainWindow()
ui.setupUi(mainWindow)
mainWindow.show()
sys.exit(app.exec_())
- 1
- 2
- 3
- 4
- 5
- 6
- 7
- 8
- 9
- 10
- 11
- 12
- 13
- 14
- 15
- 16
- 17
- 1
- 2
- 3
- 4
- 5
- 6
- 7
- 8
- 9
- 10
- 11
- 12
- 13
- 14
- 15
- 16
- 17
运行这个.py文件得到:

2.6 同时使用水平布局和垂直布局
“姓名”和“薪资”两行都使用水平布局,“备注+文本框”和它们一起使用垂直布局:

将.ui文件转换成.py文件后新建
RunMainWinHVLayout.py
文件用来运行转换之后的.py文件:
import sys
import RunMainWinVHLayout
from PyQt5.QtWidgets import QApplication, QMainWindow
if __name__ == '__main__':
app = QApplication(sys.argv)
mainWindow = QMainWindow()
ui = RunMainWinVHLayout.Ui_MainWindow()
ui.setupUi(mainWindow)
mainWindow.show()
sys.exit(app.exec_())
- 1
- 2
- 3
- 4
- 5
- 6
- 7
- 8
- 9
- 10
- 11
- 12
- 13
- 14
- 15
- 16
- 17
- 1
- 2
- 3
- 4
- 5
- 6
- 7
- 8
- 9
- 10
- 11
- 12
- 13
- 14
- 15
- 16
- 17

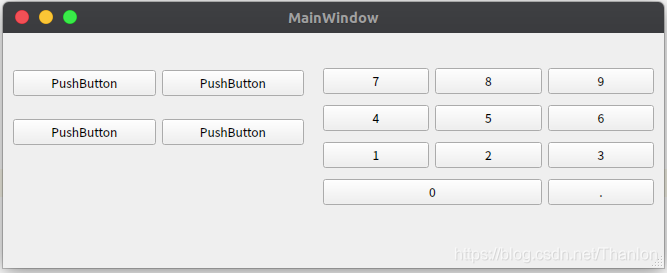
2.7 栅格布局
下面是使用栅格布局设计的:
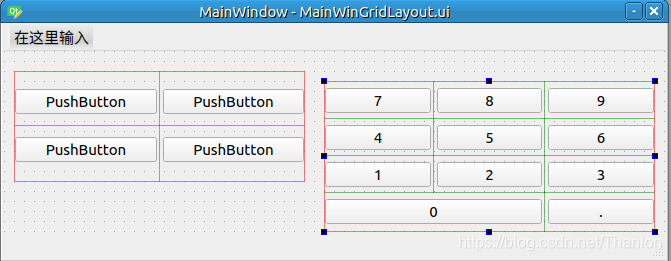
将.ui文件转换成.py文件后新建
RunMainWinGridLayout.py
文件用来运行转换之后的.py文件:
import sys
import MainWinGridLayout
from PyQt5.QtWidgets import QApplication, QMainWindow
if __name__ == '__main__':
app = QApplication(sys.argv)
mainWindow = QMainWindow()
ui = MainWinGridLayout.Ui_MainWindow()
ui.setupUi(mainWindow)
mainWindow.show()
sys.exit(app.exec_())
- 1
- 2
- 3
- 4
- 5
- 6
- 7
- 8
- 9
- 10
- 11
- 12
- 13
- 14
- 15
- 16
- 17
- 1
- 2
- 3
- 4
- 5
- 6
- 7
- 8
- 9
- 10
- 11
- 12
- 13
- 14
- 15
- 16
- 17
2.8 表单布局
下面是使用表单布局设计的:
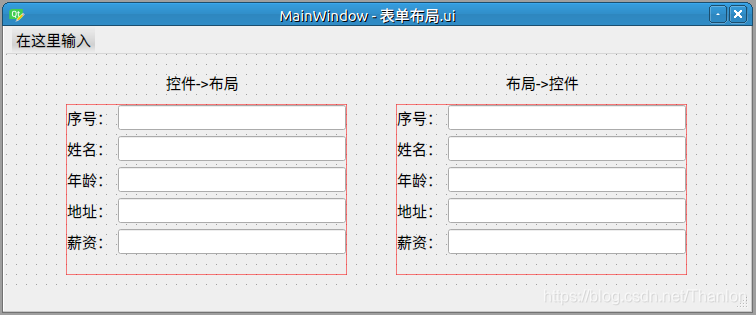
将.ui文件转换成.py文件后新建
RunMainWinFormLayout.py
文件用来运行转换之后的.py文件:
import sys
import MainWinFormLayout
from PyQt5.QtWidgets import QApplication, QMainWindow
if __name__ == '__main__':
app = QApplication(sys.argv)
mainWindow = QMainWindow()
ui = MainWinFormLayout.Ui_MainWindow()
ui.setupUi(mainWindow)
mainWindow.show()
sys.exit(app.exec_())
- 1
- 2
- 3
- 4
- 5
- 6
- 7
- 8
- 9
- 10
- 11
- 12
- 13
- 14
- 15
- 16
- 17
- 1
- 2
- 3
- 4
- 5
- 6
- 7
- 8
- 9
- 10
- 11
- 12
- 13
- 14
- 15
- 16
- 17
右键选择布局的时候选择“在窗体布局中布局”。

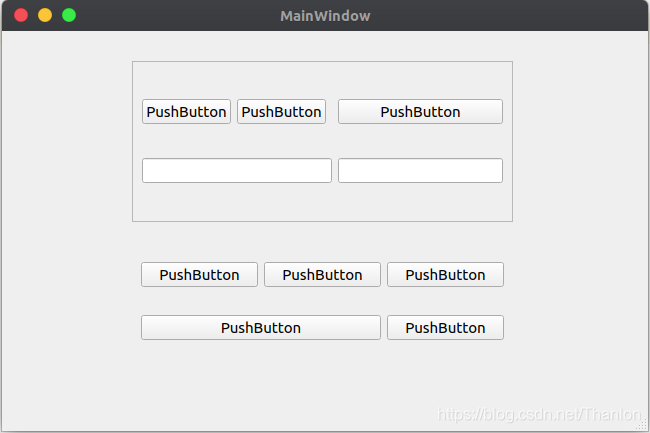
2.9 容器布局
布局和容器之间可以相互转换,下面以 QFrame 和 Grid Layout 相互转换为例子。第一个是把容器 QFrame 转换成 Grid Layout,第二个是把 Grid Layout 转换成容器 QFrame:
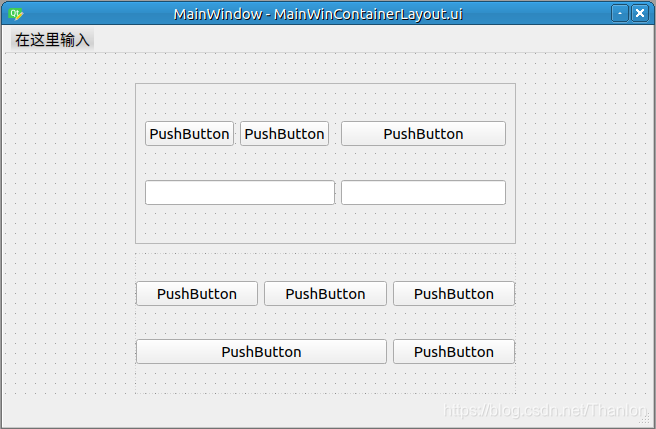
将 .ui 文件转换成 .py 文件后新建
RunMainWinContainerLayout.py
文件用来运行转换之后的 .py 文件:
import sys
from PyQt5.QtWidgets import QApplication,
QMainWindow
import MainWinContainerLayout
if __name__ == '__main__':
app = QApplication(sys.argv)
mainWindow = QMainWindow()
ui = MainWinContainerLayout.Ui_MainWindow()
ui.setupUi(mainWindow)
mainWindow.show()
sys.exit(app.exec_())
- 1
- 2
- 3
- 4
- 5
- 6
- 7
- 8
- 9
- 10
- 11
- 12
- 13
- 14
- 15
- 16
- 17
- 1
- 2
- 3
- 4
- 5
- 6
- 7
- 8
- 9
- 10
- 11
- 12
- 13
- 14
- 15
- 16
- 17
2.10 绝对布局
直接把空间放到容器或者窗口中默认是绝对布局,根据坐标属性可以控制显示的位置:

将 .ui 文件转换成 .py 文件后新建
RunMainWinAbsoluteLayout.py
文件用来运行转换之后的 .py 文件,发现出现报错:
/home/thanlon/PycharmProjects/venv/pyqt5-pro/bin/python /home/thanlon/PycharmProjects/pyqt5-pro/2.QtDesigner/绝对布局/RunMainWinHorizontalLayout.py
Traceback (most recent call last):
  File "/home/thanlon/PycharmProjects/pyqt5-pro/2.QtDesigner/绝对布局/RunMainWinHorizontalLayout.py", line 2, in <module>
    import MainWinAbsoluteLayout
  File "/home/thanlon/PycharmProjects/pyqt5-pro/2.QtDesigner/绝对布局/MainWinAbsoluteLayout.py", line 75, in <module>
    from PyQt5 import QtWebKitWidgets
ImportError: cannot import name 'QtWebKitWidgets' from 'PyQt5' (/home/thanlon/PycharmProjects/venv/pyqt5-pro/lib/python3.8/site-packages/PyQt5/__init__.py)
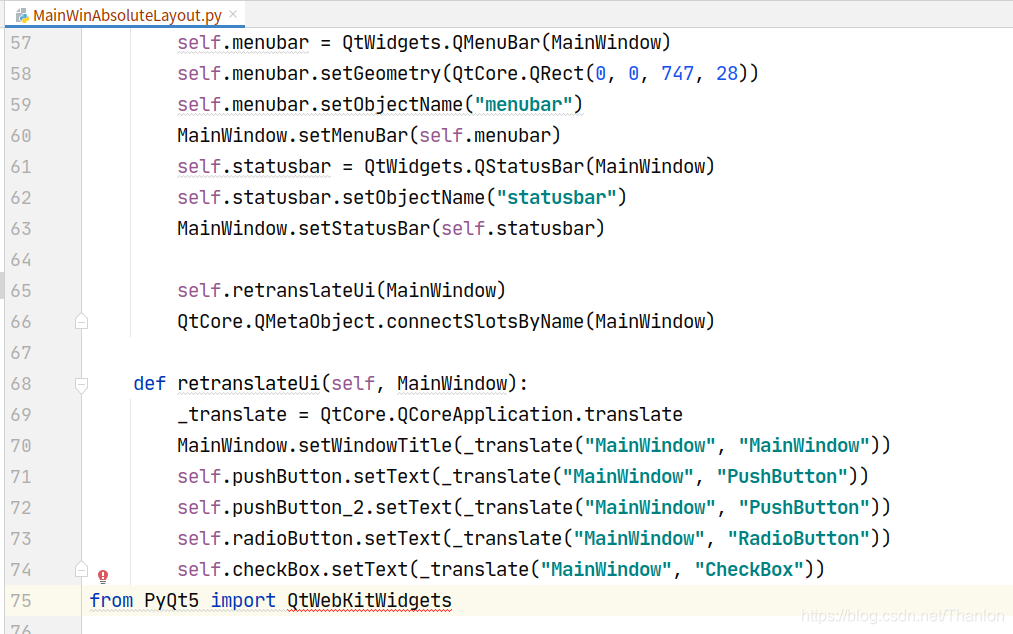
可以使用
from PyQt5.QtWebEngineWidgets import *
替换
from PyQt5 import QtWebKitWidgets
。
MainWinAbsoluteLayout.py:
from PyQt5 import QtCore, QtGui, QtWidgets
class Ui_MainWindow(object):
def setupUi(self, MainWindow):
...
self.webView = QWebEngineView(self.centralwidget)
...
from PyQt5.QtWebEngineWidgets import *
RunMainWinAbsoluteLayout.py:
import sys
import MainWinAbsoluteLayout
from PyQt5.QtWidgets import QApplication, QMainWindow
if __name__ == '__main__':
app = QApplication(sys.argv)
mainWindow = QMainWindow()
ui = MainWinAbsoluteLayout.Ui_MainWindow()
ui.setupUi(mainWindow)
mainWindow.show()
sys.exit(app.exec_())
- 1
- 2
- 3
- 4
- 5
- 6
- 7
- 8
- 9
- 10
- 11
- 12
- 13
- 14
- 15
- 16
- 17
- 1
- 2
- 3
- 4
- 5
- 6
- 7
- 8
- 9
- 10
- 11
- 12
- 13
- 14
- 15
- 16
- 17
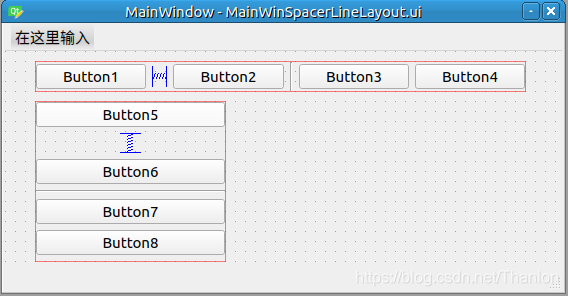
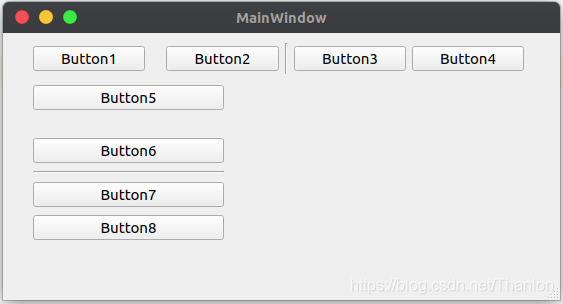
2.11 布局中的间隔和分割线
间隔分为水平和垂直间隔,分别是 Horizontal Spacer 和 Vertical Spacer 两个控件。分割线也分为水平和垂直分割线,使用的控件分别是 Horizontal Line 和 Vertical Line。分割线控件可以让两个控件之间有一条分割线,通常用分割线控件将相同或类似功能的控件放在一起,形成一个组。
RunMainWinSpacerLineLayout.py:
import sys
from PyQt5.QtWidgets import QApplication, QMainWindow
import MainWinSpacerLineLayout
if __name__ == '__main__':
app = QApplication(sys.argv)
mainWindow = QMainWindow()
ui = MainWinSpacerLineLayout.Ui_MainWindow()
ui.setupUi(mainWindow)
mainWindow.show()
sys.exit(app.exec_())
- 1
- 2
- 3
- 4
- 5
- 6
- 7
- 8
- 9
- 10
- 11
- 12
- 13
- 14
- 15
- 16
- 17
- 18
- 1
- 2
- 3
- 4
- 5
- 6
- 7
- 8
- 9
- 10
- 11
- 12
- 13
- 14
- 15
- 16
- 17
- 18
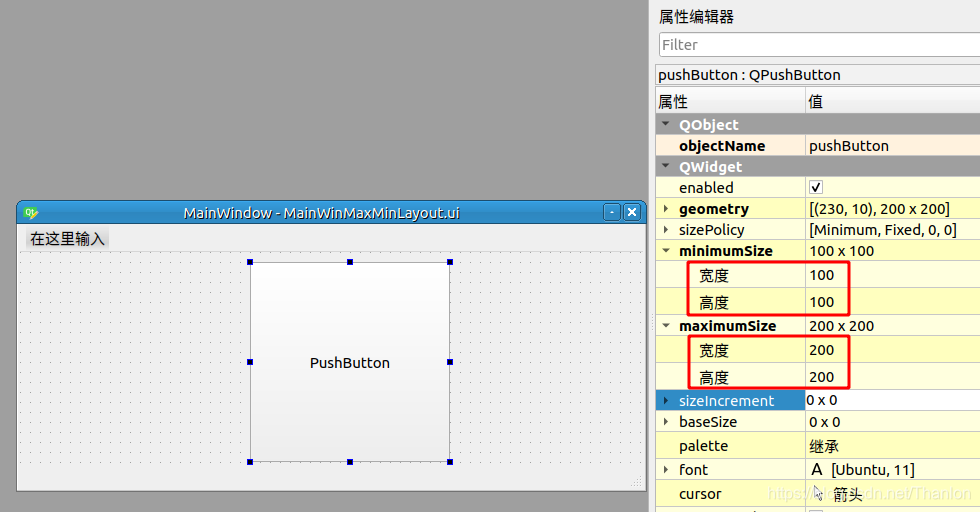
2.12 控件最大尺寸和最小尺寸
控件最大尺寸和最小尺寸分别由控件的 minimunmSize 和 maximumSize 属性来设置的,
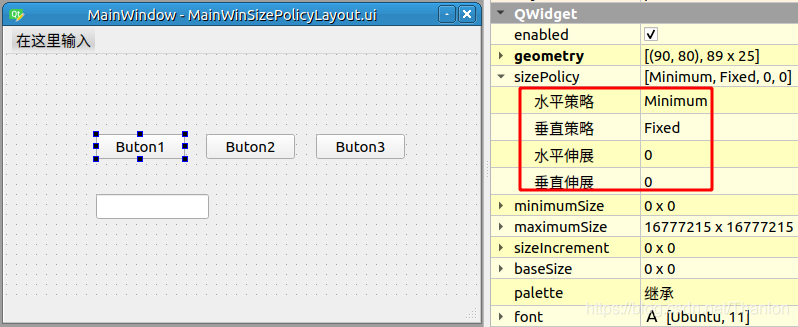
2.13 尺寸策略
每个控件都有期望尺寸,每一个控件的期望尺寸都是不一样的。未设置控件的最大值和最小值,推荐设置的尺寸,即建议尺寸。对大多数控件,期望尺寸是固定值,不能够去设置的。我们可以获取控件的期望尺寸:
RunMainWinSizePolicyLayout.py:
from PyQt5 import QtCore, QtGui, QtWidgets
class Ui_MainWindow(object):
def setupUi(self, MainWindow):
pass
push_button_width = self.pushButton.sizeHint().width()
push_button_height = self.pushButton.sizeHint().height()
print('pushButton控件期望尺寸的宽度:{}px'.format(push_button_width))
print('pushButton控件期望尺寸的高度:{}px'.format(push_button_height))
"""
pushButton控件期望尺寸的宽度:48px
pushButton控件期望尺寸的高度:25px
"""
pass
line_Edit_width = self.lineEdit.sizeHint().width()
line_Edit_height = self.lineEdit.sizeHint().height()
print('lineEdit控件期望尺寸的宽度:{}px'.format(line_Edit_width))
print('lineEdit控件期望尺寸的高度:{}px'.format(line_Edit_height))
"""
lineEdit控件期望尺寸的宽度:142px
lineEdit控件期望尺寸的高度:25px
"""
pass
def retranslateUi(self, MainWindow):
pass
- 1
- 2
- 3
- 4
- 5
- 6
- 7
- 8
- 9
- 10
- 11
- 12
- 13
- 14
- 15
- 16
- 17
- 18
- 19
- 20
- 21
- 22
- 23
- 24
- 25
- 26
- 27
- 28
- 1
- 2
- 3
- 4
- 5
- 6
- 7
- 8
- 9
- 10
- 11
- 12
- 13
- 14
- 15
- 16
- 17
- 18
- 19
- 20
- 21
- 22
- 23
- 24
- 25
- 26
- 27
- 28
还有最小期望尺寸的概念,对于很多控件期望尺寸和最小期望尺寸是一样的,如 pushButton 控件:
from PyQt5 import QtCore, QtGui, QtWidgets
class Ui_MainWindow(object):
def
setupUi(self, MainWindow):
pass
push_button_minimum_width = self.pushButton.minimumSizeHint().width()
push_button_minimum_height = self.pushButton.minimumSizeHint().height()
print('pushButton控件最小期望尺寸的宽度:{}px'.format(push_button_minimum_width))
print('pushButton控件最小期望尺寸的高度:{}px'.format(push_button_minimum_height))
"""
pushButton控件最小期望尺寸的宽度:48px
pushButton控件最小期望尺寸的高度:25px
"""
pass
def retranslateUi(self, MainWindow):
pass
- 1
- 2
- 3
- 4
- 5
- 6
- 7
- 8
- 9
- 10
- 11
- 12
- 13
- 14
- 15
- 16
- 17
- 18
- 1
- 2
- 3
- 4
- 5
- 6
- 7
- 8
- 9
- 10
- 11
- 12
- 13
- 14
- 15
- 16
- 17
- 18
也有不一样的如 lineEdit 控件:
from PyQt5 import QtCore, QtGui, QtWidgets
class Ui_MainWindow(object):
def setupUi(self, MainWindow):
pass
line_Edit_minimum_width = self.lineEdit.minimumSizeHint().width()
line_Edit_minimum_height = self.lineEdit.minimumSizeHint().height()
print('lineEdit控件最小期望宽度:{}px'.format(line_Edit_minimum_width))
print('lineEdit控件最小期望高度:{}px'.format(line_Edit_minimum_height))
"""
lineEdit控件最小期望宽度:59px
lineEdit控件最小期望高度:25px
"""
pass
def retranslateUi(self, MainWindow):
pass
- 1
- 2
- 3
- 4
- 5
- 6
- 7
- 8
- 9
- 10
- 11
- 12
- 13
- 14
- 15
- 16
- 17
- 18
- 1
- 2
- 3
- 4
- 5
- 6
- 7
- 8
- 9
- 10
- 11
- 12
- 13
- 14
- 15
- 16
- 17
- 18
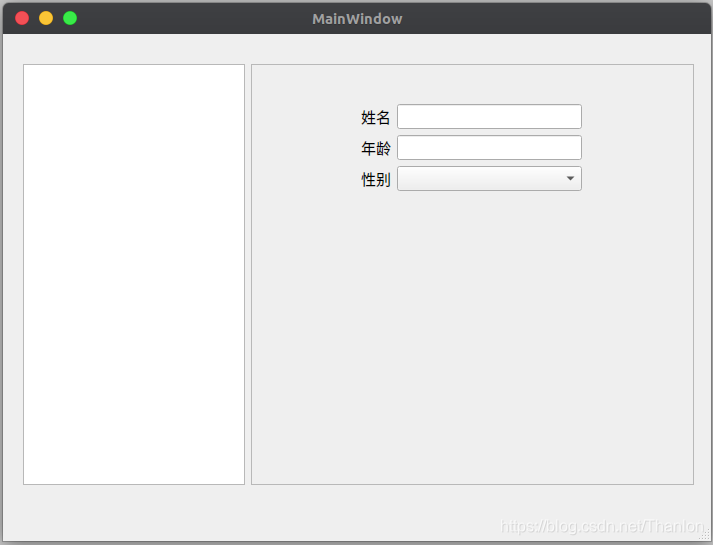
尺寸策略的应用,使用常用的属性值 Expanding:
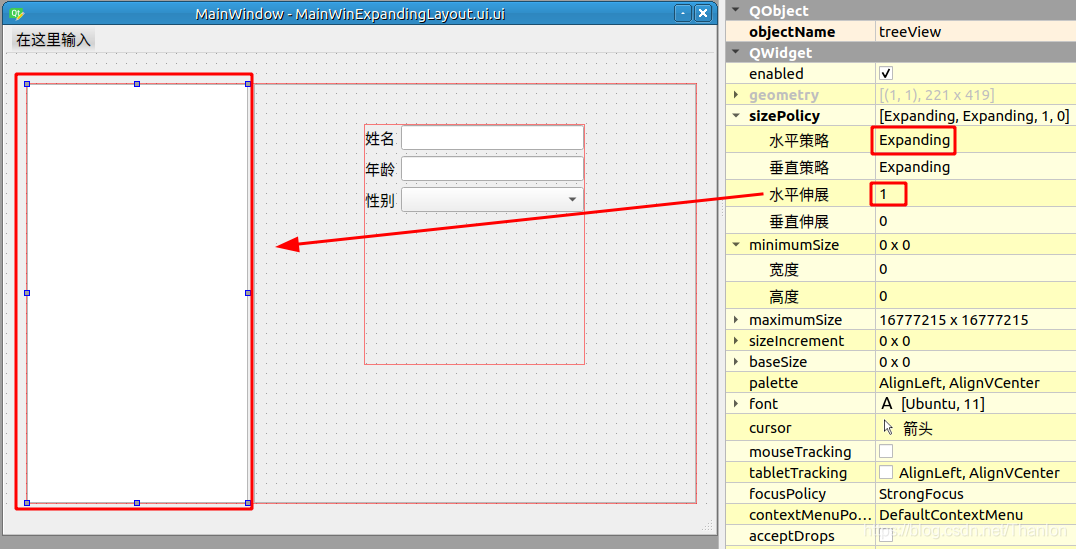
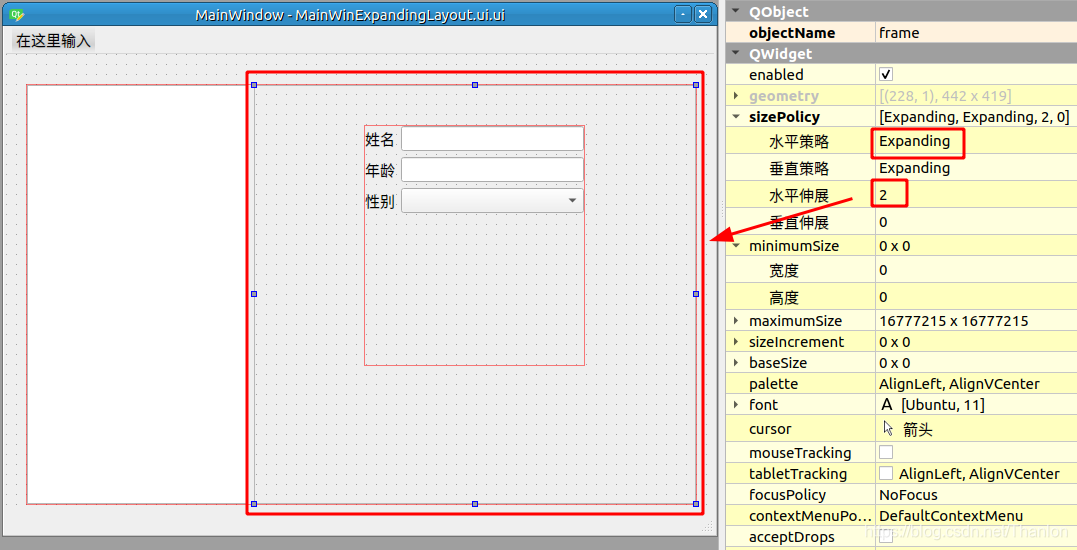
RunMainWinExpendingLayout.py:
import sys
from PyQt5.QtWidgets import QApplication, QMainWindow
import MainWinExpandingLayout
if __name__ == '__main__':
app = QApplication(sys.argv)
mainWindow = QMainWindow()
ui = MainWinExpandingLayout.Ui_MainWindow()
ui.setupUi(mainWindow)
mainWindow.show()
sys.exit(app.exec_())
- 1
- 2
- 3
- 4
- 5
- 6
- 7
- 8
- 9
- 10
- 11
- 12
- 13
- 14
- 15
- 16
- 17
- 18
- 1
- 2
- 3
- 4
- 5
- 6
- 7
- 8
- 9
- 10
- 11
- 12
- 13
- 14
- 15
- 16
- 17
- 18
2.14 设置控件之间的伙伴关系
把两个控件关联到一起,通过其中一个控件控制另外一个控件。使用 Form Layout 布局在里面添加 Label 和 Line Edit 空间,
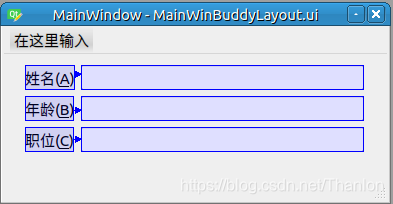
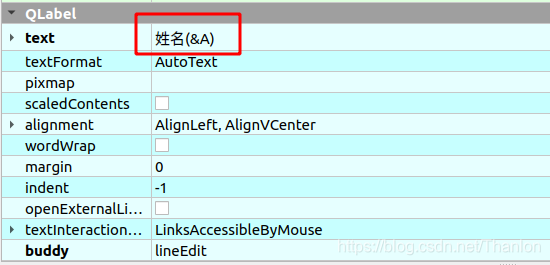
预览后同时按键盘中的 “ALT”和“A” 鼠标会定位到姓名的文本框中。同理,“ALT”和“B” 鼠标会定位到年龄的文本框中。
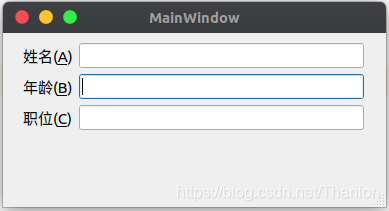
RunMainWinBuddyLayout.py:
import sys
import MainWinBuddyLayout
from PyQt5.QtWidgets import QApplication, QMainWindow
if __name__ == '__main__':
app = QApplication(sys.argv)
mainWindow = QMainWindow()
ui = MainWinBuddyLayout.Ui_MainWindow()
ui.setupUi(mainWindow)
mainWindow.show()
sys.exit(app.exec_())
- 1
- 2
- 3
- 4
- 5
- 6
- 7
- 8
- 9
- 10
- 11
- 12
- 13
- 14
- 15
- 16
- 17
- 1
- 2
- 3
- 4
- 5
- 6
- 7
- 8
- 9
- 10
- 11
- 12
- 13
- 14
- 15
- 16
- 17
2.15 修改控件的Tab顺序
控件布局好之后,如果是要求用户输入的控件,可以使用 Tab 键进行切换。实际上使用 Tab 键切换默认是按照控件添加顺序,当然还可以修改控件的 Tab 顺序。修改控件的 Tab 顺序有两种方法,方法一:选择 Edit --> 编辑 Tab 顺序:
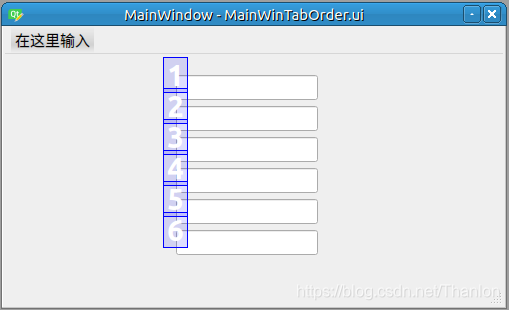
双击序号可切换序号:
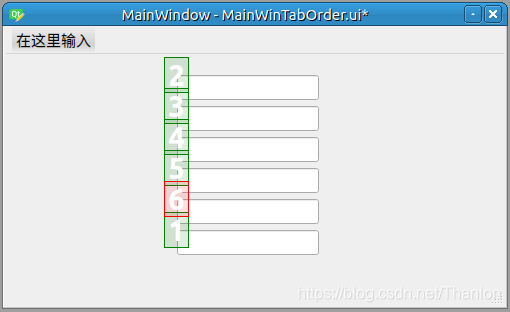
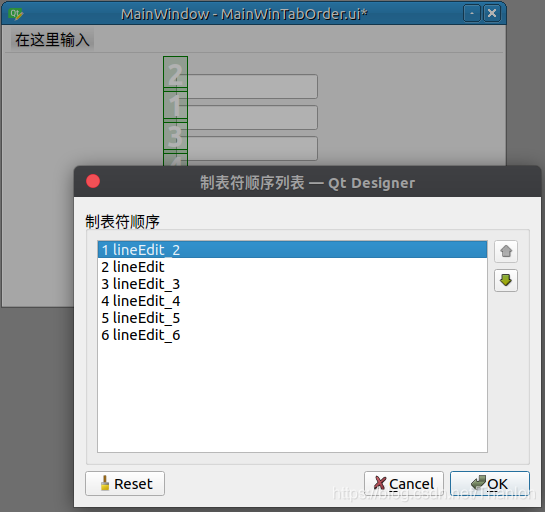
也可以选中序号,右键选择”制表符顺序列表“来调整顺序:
2.16 信号与槽的设置
信号(signal)与槽(slot)是 QT 的核心机制,也是 PyQt 的核心机制。信号:对象或者控件发出去的消息。单击一个按钮的时候按钮就会向外部发送单击的消息,这些发送出去的信号需要一些代码来拦截,这些代码就是槽。槽的本质是函数或方法,单击一个按钮其实就是执行了槽所对应的函数或方法,这个函数或方法本质上就相当于这个按钮的单击事件。
简单理解就是:信号就是一个单击事件,槽就是单击事件所对应的事件函数。一个信号可以和多个槽绑定,一个槽可以拦截多个信号。
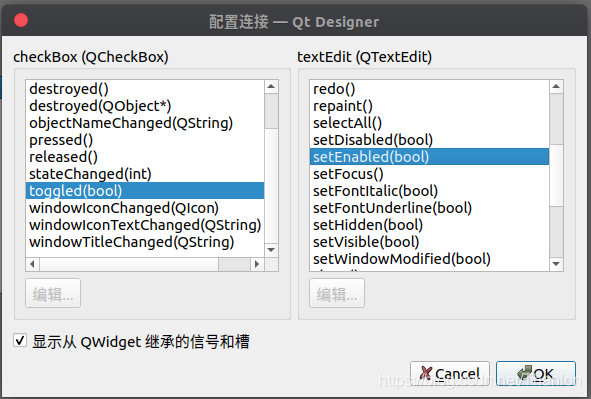
下面使用 QtDesigner 来完成信号与槽的绑定:
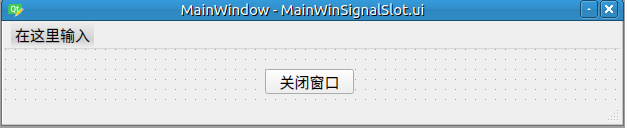
选择编辑信号/槽,为 “关闭窗口” 按钮添加点击事件,槽为 close( ) 函数:

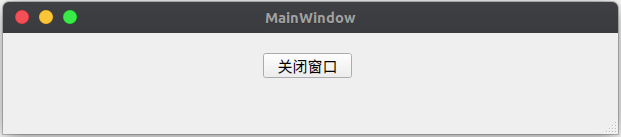
预览之后,点击按钮会关闭窗口:
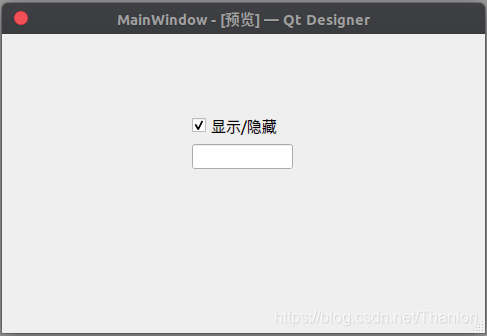
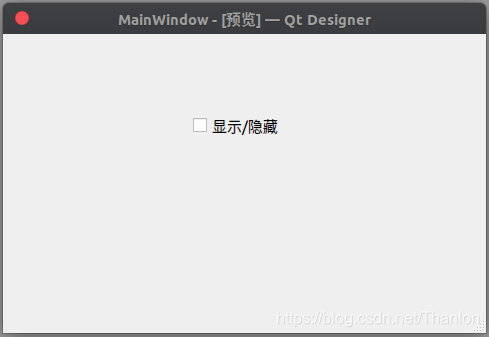
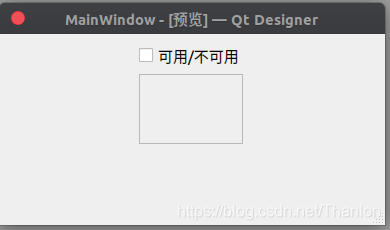
例子1:控制文本输入框的显示和隐藏

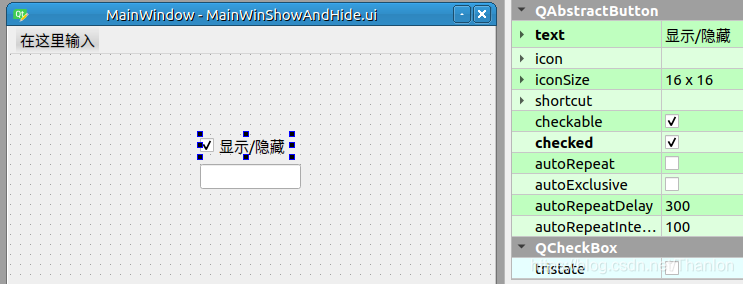
预览后的效果:
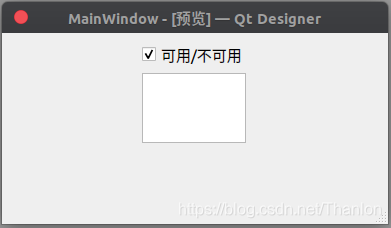
例子2:控制文本输入框是否可用

预览后的效果:
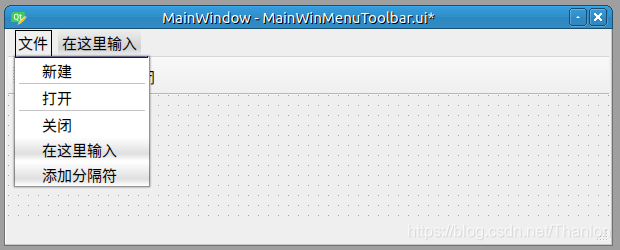
2.17 添加菜单和工具栏
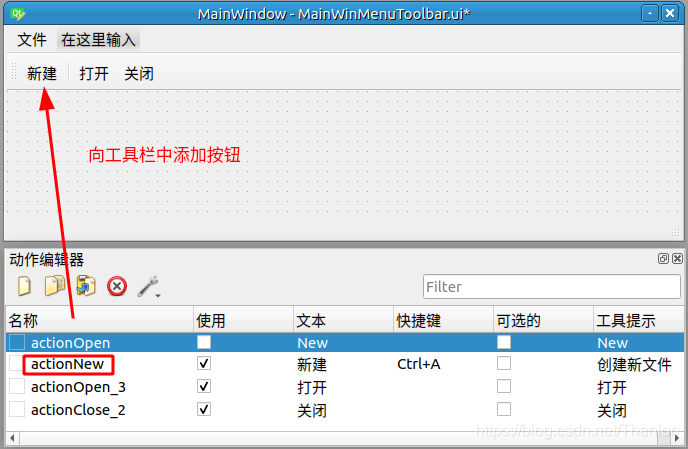
使用 QtDesigner 创建一个主窗口时,默认会在主窗口的上方添加一行菜单栏,在最下方添加一行状态栏。如果我们需要添加工具栏则需要单击右键选择【添加工具栏】,这部分主要探讨如何在窗口中创建菜单和工具栏以及分别向菜单栏、工具栏中添加菜单项、按钮。
默认菜单已经创建,所以只需要为菜单添加菜单项:
创建工具栏并且将按钮添加到工具栏中:
3. PyQt5核心API的使用
3.1 创建主窗口
有三种类型的窗口,分别是 QMainWindow、QDialog 和 QWidget。QMainWindow:可以包括菜单栏、工具栏、状态栏和标题栏,是最常见的窗口形式。QDialog:是对话窗口的基类。没有菜单栏、工具栏、标题栏。QWidget:不确定窗口的类型,就可以使用 QWidget。创建一个主窗口:
FirstMainWindow.py:
"""
@from:https://pythoneers.cn
@author: qq3330447288
@contact: erics1996@yeah.net
@software: PyCharm
@file: FirstMainWindow.py
@time: 2020/11/17 上午9:50
"""
import sys
from PyQt5.QtWidgets import QMainWindow, QApplication
from PyQt5.QtGui import QIcon
class FirstMainWin(QMainWindow):
def __init__(self):
"""
初始化
:param parent:控件放到parent
"""
super(FirstMainWin, self).__init__()
self.setWindowTitle('第一个窗口应用')
self.resize(400, 300)
self.status = self.statusBar()
self.status.showMessage('只显示5s的消息!', 5000)
if __name__ == '__main__':
app = QApplication(sys.argv)
app.setWindowIcon(QIcon('../images/Dragon.ico'))
main = FirstMainWin()
main.show()
sys.exit(app.exec_())
- 1
- 2
- 3
- 4
- 5
- 6
- 7
- 8
- 9
- 10
- 11
- 12
- 13
- 14
- 15
- 16
- 17
- 18
- 19
- 20
- 21
- 22
- 23
- 24
- 25
- 26
- 27
- 28
- 29
- 30
- 31
- 32
- 33
- 34
- 35
- 36
- 37
- 38
- 39
- 1
- 2
- 3
- 4
- 5
- 6
- 7
- 8
- 9
- 10
- 11
- 12
- 13
- 14
- 15
- 16
- 17
- 18
- 19
- 20
- 21
- 22
- 23
- 24
- 25
- 26
- 27
- 28
- 29
- 30
- 31
- 32
- 33
- 34
- 35
- 36
- 37
- 38
- 39
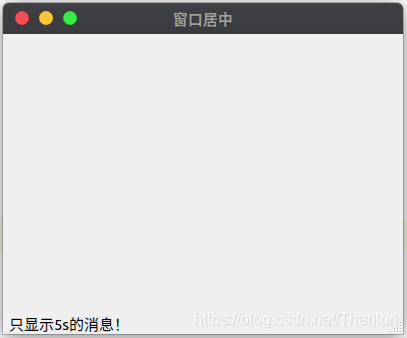
3.2 主窗口居中显示
PyQt5中没有API直接让窗口居中,所以需要自己去写。主窗口居中显示需要计算窗口的左上角的坐标值,横坐标可以通过屏幕的宽度减去窗口的宽度除以2,纵坐标可以通过屏幕的高度减去窗口的高度除以2。完成计算后可以使用move方法移动窗口。
CenterWindow.py:
"""
@from:https://pythoneers.cn
@author: qq3330447288
@contact: erics1996@yeah.net
@software: PyCharm
@file: FirstMainWindow.py
@time: 2020/11/17 上午9:50
"""
import sys
from PyQt5.QtWidgets import QMainWindow, QApplication, QDesktopWidget
from PyQt5.QtGui import QIcon
class CenterMainWin(QMainWindow):
def __init__(self):
"""
初始化
:param parent:控件放到parent
"""
super(CenterMainWin, self).__init__()
self.setWindowTitle('窗口居中')
self.resize(400, 300)
self.status = self.statusBar()
self.status.showMessage('只显示5s的消息!', 5000)
def center(self):
screen = QDesktopWidget().screenGeometry()
size = self.geometry()
left = (screen.width() - size.width()) / 2
top = (screen.height() - size.height()) / 2
self.move(left, top)
if __name__ == '__main__':
app = QApplication(sys.argv)
app.setWindowIcon(QIcon('../images/Dragon.ico'))
main = CenterMainWin()
main.show()
main.center()
sys.exit(app.exec_())
- 1
- 2
- 3
- 4
- 5
- 6
- 7
- 8
- 9
- 10
- 11
- 12
- 13
- 14
- 15
- 16
- 17
- 18
- 19
- 20
- 21
- 22
- 23
- 24
- 25
- 26
- 27
- 28
- 29
- 30
- 31
- 32
- 33
- 34
- 35
- 36
- 37
- 38
- 39
- 40
- 41
- 42
- 43
- 44
- 45
- 46
- 47
- 48
- 49
- 50
- 51
- 1
- 2
- 3
- 4
- 5
- 6
- 7
- 8
- 9
- 10
- 11
- 12
- 13
- 14
- 15
- 16
- 17
- 18
- 19
- 20
- 21
- 22
- 23
- 24
- 25
- 26
- 27
- 28
- 29
- 30
- 31
- 32
- 33
- 34
- 35
- 36
- 37
- 38
- 39
- 40
- 41
- 42
- 43
- 44
- 45
- 46
- 47
- 48
- 49
- 50
- 51
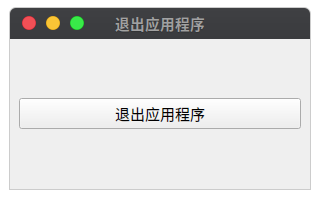
3.3 退出应用程序
退出应用程序,即退出整个窗口,
QuitApplication.py:
"""
@from:https://pythoneers.cn
@author: qq3330447288
@contact: erics1996@yeah.net
@software: PyCharm
@file: QuitApplication.py
@time: 2020/11/17 上午10:48
"""
import sys
from PyQt5.QtWidgets import QMainWindow, QPushButton, QHBoxLayout, QWidget, QApplication
class QuitApplication(QMainWindow):
def __init__(self):
super(QuitApplication, self).__init__()
self.resize(300, 150)
self.setWindowTitle('退出应用程序')
self.buttion1 = QPushButton('退出应用程序')
self.buttion1.clicked.connect(self.onClickButton)
layout = QHBoxLayout()
layout.addWidget(self.buttion1)
main_frame = QWidget()
main_frame.setLayout(layout)
self.setCentralWidget(main_frame)
def onClickButton(self):
sender = self.sender()
print(sender.text() + ' 按钮被按下!')
app = QApplication.instance()
app
.quit()
if __name__ == '__main__':
app = QApplication(sys.argv)
main = QuitApplication()
main.show()
sys.exit(app.exec_())
- 1
- 2
- 3
- 4
- 5
- 6
- 7
- 8
- 9
- 10
- 11
- 12
- 13
- 14
- 15
- 16
- 17
- 18
- 19
- 20
- 21
- 22
- 23
- 24
- 25
- 26
- 27
- 28
- 29
- 30
- 31
- 32
- 33
- 34
- 35
- 36
- 37
- 38
- 39
- 40
- 41
- 42
- 43
- 44
- 45
- 1
- 2
- 3
- 4
- 5
- 6
- 7
- 8
- 9
- 10
- 11
- 12
- 13
- 14
- 15
- 16
- 17
- 18
- 19
- 20
- 21
- 22
- 23
- 24
- 25
- 26
- 27
- 28
- 29
- 30
- 31
- 32
- 33
- 34
- 35
- 36
- 37
- 38
- 39
- 40
- 41
- 42
- 43
- 44
- 45

3.4 屏幕坐标系
窗口的位置可以通过窗口的左上角的坐标来描述,这个坐标就是相对于屏幕坐标系。我们可以获取窗口相关的一系列参数:
"""
@from:https://pythoneers.cn
@author: qq3330447288
@contact: erics1996@yeah.net
@software: PyCharm
@file: ScreenGeometry.py
@time: 2020/11/17 上午11:15
"""
import sys
from PyQt5.QtWidgets import QApplication, QWidget, QPushButton
def on_click_btn():
"""
单击button打印窗口的坐标和宽度和高度
:return:
"""
print('onclick')
print('------1------')
print('widget.x() = %d' % widget.x())
print('widget.y() = %d' % widget.y())
print('widget.width() = %d' % widget.width())
print('widget.height() = %d' % widget.height())
print('------2------')
print('widget.geometry().x() = %d' % widget.geometry().x())
print('widget.geometry().y() = %d' % widget.geometry().y())
print('widget.geometry().width() = %d'
% widget.geometry().width())
print('widget.geometry().height() = %d' % widget.geometry().height())
print('------3------')
print('widget.geometry().x() = %d' % widget.frameGeometry().x())
print('widget.geometry().y() = %d' % widget.frameGeometry().y())
print('widget.geometry().width() = %d' % widget.frameGeometry().width())
print('widget.geometry().height() = %d' % widget.frameGeometry().height())
if __name__ == '__main__':
app = QApplication(sys.argv)
widget = QWidget()
btn = QPushButton(widget)
btn.setText('按钮')
btn.move(10, 10)
btn.clicked.connect(on_click_btn)
widget.resize(300, 300)
widget.move(200, 200)
widget.setWindowTitle('屏幕坐标系')
widget.show()
sys.exit(app.exec_())
- 1
- 2
- 3
- 4
- 5
- 6
- 7
- 8
- 9
- 10
- 11
- 12
- 13
- 14
- 15
- 16
- 17
- 18
- 19
- 20
- 21
- 22
- 23
- 24
- 25
- 26
- 27
- 28
- 29
- 30
- 31
- 32
- 33
- 34
- 35
- 36
- 37
- 38
- 39
- 40
- 41
- 42
- 43
- 44
- 45
- 46
- 47
- 48
- 49
- 50
- 51
- 52
- 53
- 54
- 55
- 56
- 57
- 1
- 2
- 3
- 4
- 5
- 6
- 7
- 8
- 9
- 10
- 11
- 12
- 13
- 14
- 15
- 16
- 17
- 18
- 19
- 20
- 21
- 22
- 23
- 24
- 25
- 26
- 27
- 28
- 29
- 30
- 31
- 32
- 33
- 34
- 35
- 36
- 37
- 38
- 39
- 40
- 41
- 42
- 43
- 44
- 45
- 46
- 47
- 48
- 49
- 50
- 51
- 52
- 53
- 54
- 55
- 56
- 57
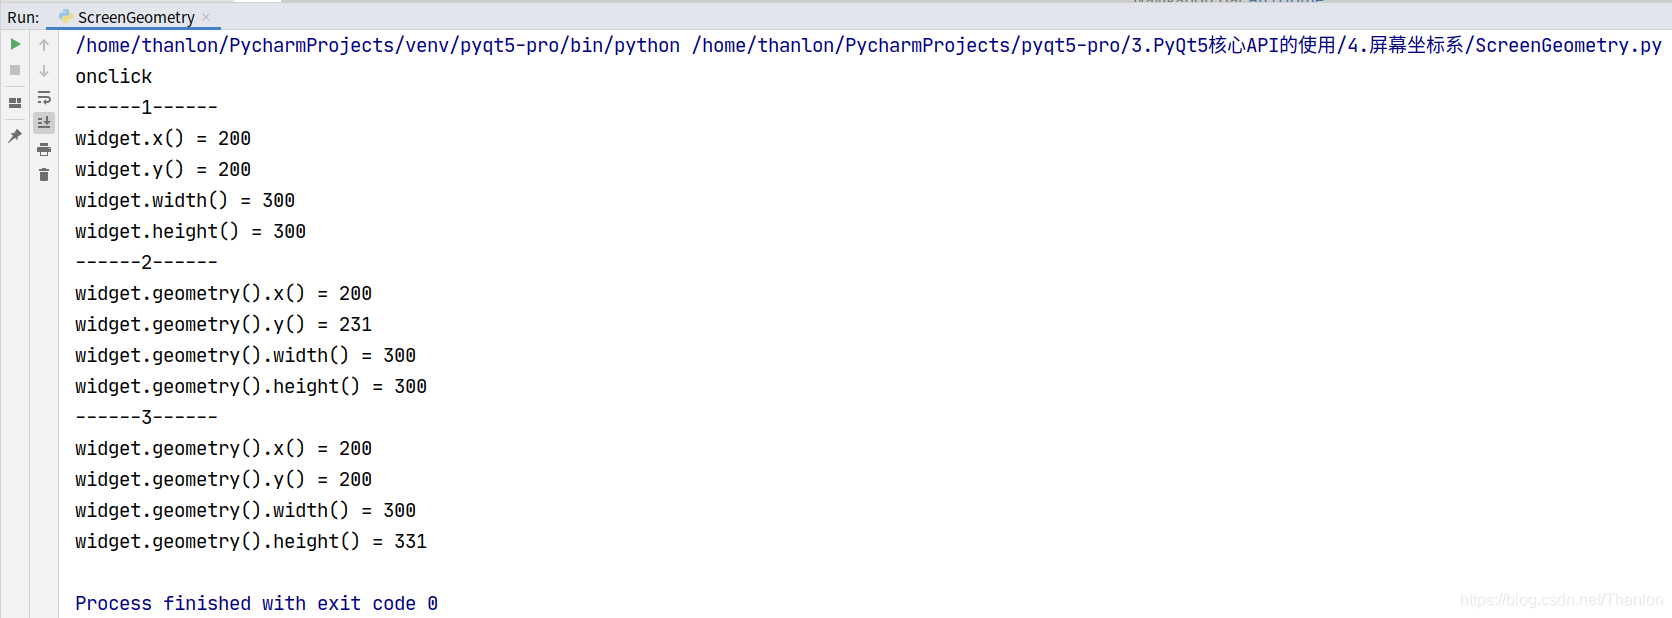
窗口相对于坐标系的位置和尺寸,侧面可以得到标题栏的高度是31px。
3.5 设置窗口和应用程序图标
使用 setWindowIcon 方法来设置图标,窗口的 setWindowIcon 方法用于设置窗口的图标,只在 Windows 中可用,只能在标题栏左上角显示图标。QApplication 中的 setWindowIcon 方法可以用来设置主窗口的图标和应用程序的图标,但是如果主窗口已经设置了的图标,这里只能用于设置应用程序的图标。
"""
@from:https://pythoneers.cn
@author: qq3330447288
@contact: erics1996@yeah.net
@software: PyCharm
@file: WinAndApplicationIcon.py.py
@time: 2020/11/17 上午11:33
"""
import sys
from PyQt5.QtWidgets import QMainWindow, QApplication
from PyQt5.QtGui import QIcon
class WinAndApplicationIcon(QMainWindow):
def __init__(self):
super(WinAndApplicationIcon, self).__init__()
self.init_ui()
def init_ui(self):
self.setWindowTitle('设置窗口图标')
self.setGeometry(400, 400, 300, 200)
self.setWindowIcon(QIcon('../images/Basilisk.ico'))
if __name__ == '__main__':
app = QApplication(sys.argv)
app.setWindowIcon(QIcon('../images/Dragon.ico'))
main = WinAndApplicationIcon()
main.show()
sys.exit(app.exec_())
- 1
- 2
- 3
- 4
- 5
- 6
- 7
- 8
- 9
- 10
- 11
- 12
- 13
- 14
- 15
- 16
- 17
- 18
- 19
- 20
- 21
- 22
- 23
- 24
- 25
- 26
- 27
- 28
- 29
- 30
- 31
- 32
- 33
- 34
- 35
- 36
- 37
- 1
- 2
- 3
- 4
- 5
- 6
- 7
- 8
- 9
- 10
- 11
- 12
- 13
- 14
- 15
- 16
- 17
- 18
- 19
- 20
- 21
- 22
- 23
- 24
- 25
- 26
- 27
- 28
- 29
- 30
- 31
-
32
- 33
- 34
- 35
- 36
- 37
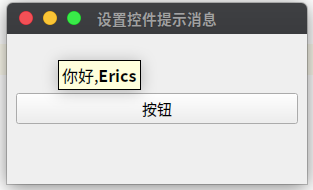
3.6 控件添加提示消息
当鼠标放在控件上的时候,可以显示提示消息。使用 setToolTip 方法设置的消息内容支持富文本。
"""
@from:https://pythoneers.cn
@author: qq3330447288
@contact: erics1996@yeah.net
@software: PyCharm
@file: ToolTip.py
@time: 2020/11/17 上午11:39
"""
import sys
from PyQt5.QtGui import QFont
from PyQt5.QtWidgets import QMainWindow, QToolTip, QHBoxLayout, QWidget, QPushButton, QApplication


class ToolTip(QMainWindow):
    def __init__(self):
        super(ToolTip, self).__init__()
        self.init_ui()

    def init_ui(self):
        QToolTip.setFont(QFont('SansSerif', 12))
        self.setToolTip('你好,<b>Erics</b>')
        self.setGeometry(300, 300, 300, 150)
        self.setWindowTitle('设置控件提示消息')

        self.button1 = QPushButton('按钮')
        self.button1.setToolTip('这是一个按钮!')
        layout = QHBoxLayout()
        layout.addWidget(self.button1)
        main_frame = QWidget()
        main_frame.setLayout(layout)
        self.setCentralWidget(main_frame)


if __name__ == '__main__':
    app = QApplication(sys.argv)
    tool_tip = ToolTip()
    tool_tip.show()
    sys.exit(app.exec_())
- 1
- 2
- 3
- 4
- 5
- 6
- 7
- 8
- 9
- 10
- 11
- 12
- 13
- 14
- 15
- 16
- 17
- 18
- 19
- 20
- 21
- 22
- 23
- 24
- 25
- 26
- 27
- 28
- 29
- 30
- 31
- 32
- 33
- 34
- 35
- 36
- 37
- 38
- 1
- 2
- 3
- 4
- 5
- 6
- 7
- 8
- 9
- 10
- 11
- 12
- 13
- 14
- 15
- 16
- 17
- 18
- 19
- 20
- 21
- 22
- 23
- 24
- 25
- 26
- 27
- 28
- 29
- 30
- 31
- 32
- 33
- 34
- 35
- 36
- 37
- 38
4. PyQt5中常用控件API的使用
4.1 QLabel控件的基本用法
QLabel 控件是用来显示文本信息的,QLabel 控件相关的方法如下:
|
方法名
|
说明
|
|
setAlignment()
|
设置文本的对齐方式
|
|
setIndent()
|
设置文本缩进
|
|
text()
|
获取文本内容
|
|
setBuddy()
|
设置伙伴关系
|
|
setText()
|
设置文本内容
|
|
selectedText()
|
返回所选的字符
|
|
setWordWrap()
|
设置是否允许换行
|
QLabel 控件常用的信号(事件)
|
信号
|
说明
|
|
linkHoverd
|
当鼠标滑过QLabel控件时触发
|
|
linkActivated
|
当鼠标单击QLabel控件时触发
|
"""
@from:https://pythoneers.cn
@author: qq3330447288
@contact: erics1996@yeah.net
@software: PyCharm
@file: QLabelDemo.py
@time: 2020/11/17 下午5:56
"""
import sys
from PyQt5.QtGui import QPalette, QPixmap
from PyQt5.QtCore import Qt
from PyQt5.QtWidgets import QWidget, QLabel, QVBoxLayout, QApplication
class QLabelDemo(QWidget):
def __init__(self):
super().__init__()
self.init_ui()
def init_ui(self):
label1 = QLabel(self)
label2 = QLabel(self)
label3 = QLabel(self)
label4 = QLabel(self)
label1.setText('<font color="orange">这是一个文本标签</font>')
palette = QPalette()
palette.setColor(QPalette.Window, Qt.blue)
label1.setPalette(palette)
label1.setAutoFillBackground(True)
label1.setAlignment(Qt.AlignCenter)
label2.setText('<a href="#">欢迎你使用Python GUI程序!</a>')
label3.setAlignment(Qt.AlignCenter)
label3.setToolTip('这是一个图片标签!')
label3.setPixmap(QPixmap('../images/python.jpg'))
label4.setText('<a href="https://pythoneers.cn">感谢您访问我的网站!</a>')
label4.setOpenExternalLinks(True)
label4.setAlignment(Qt.AlignRight)
label4.setToolTip('这是一个超链接!')
vbox = QVBoxLayout()
vbox.addWidget(label1)
vbox.addWidget(label2)
vbox.addWidget(label3)
vbox.addWidget(label4)
label2.linkHovered.connect(self.linkHovered)
label4.linkActivated.connect(self.linkClicked)
self.setLayout(vbox)
self.setWindowTitle('QLabel控件演示')
def linkHovered(self):
"""
当鼠标划过标签label2时触发事件
:return:
"""
print('当鼠标划过标签label2时触发事件')
def linkClicked(self):
"""
当鼠标单击标签label4时触发事件
:return:
"""
print('当鼠标单击标签label4时触发事件')
if __name__ == '__main__':
app = QApplication(sys.argv)
mainWindow = QLabelDemo()
mainWindow.show()
sys.exit(app.exec_())
- 1
- 2
- 3
- 4
- 5
- 6
- 7
- 8
- 9
- 10
- 11
- 12
- 13
- 14
- 15
- 16
- 17
- 18
- 19
- 20
- 21
- 22
- 23
- 24
- 25
- 26
- 27
- 28
- 29
- 30
- 31
- 32
- 33
- 34
- 35
- 36
- 37
- 38
- 39
- 40
- 41
- 42
- 43
- 44
- 45
- 46
- 47
- 48
- 49
- 50
- 51
- 52
- 53
- 54
- 55
- 56
- 57
- 58
- 59
- 60
- 61
- 62
- 63
- 64
- 65
- 66
- 67
- 68
- 69
- 70
- 71
- 72
- 73
- 74
- 75
- 76
- 77
- 78
- 79
- 80
- 81
- 82
- 83
- 84
- 85
- 86
- 87
- 88
- 89
- 90
- 91
- 1
- 2
- 3
- 4
- 5
- 6
- 7
- 8
- 9
- 10
- 11
- 12
- 13
- 14
- 15
- 16
- 17
- 18
- 19
- 20
- 21
- 22
- 23
- 24
- 25
- 26
- 27
- 28
- 29
- 30
- 31
- 32
- 33
- 34
- 35
- 36
- 37
- 38
- 39
- 40
- 41
- 42
- 43
- 44
- 45
- 46
- 47
- 48
- 49
- 50
- 51
- 52
- 53
- 54
- 55
- 56
- 57
- 58
- 59
- 60
- 61
- 62
- 63
- 64
- 65
- 66
- 67
- 68
- 69
-
70
- 71
- 72
- 73
- 74
- 75
- 76
- 77
- 78
- 79
- 80
- 81
- 82
- 83
- 84
- 85
- 86
- 87
- 88
- 89
- 90
- 91
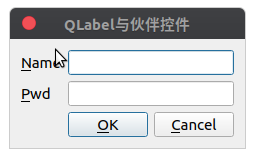
4.2 QLabel与伙伴控件
这里使用代码设置伙伴控件如下:
QLabelBuddy.py:
"""
@from:https://pythoneers.cn
@author: qq3330447288
@contact: erics1996@yeah.net
@software: PyCharm
@file: QLabelBuddy.py
@time: 2020/11/17 下午6:26
"""
import sys
from PyQt5.QtWidgets import QDialog, QLabel, QLineEdit, QPushButton, QGridLayout, QApplication
class QLabelBuddy(QDialog):
def __init__(self):
super().__init__()
self.init_ui()
def init_ui(self):
self.setWindowTitle('QLabel与伙伴控件')
nameQLabel = QLabel('&Name', self)
nameQLineEdit = QLineEdit(self)
nameQLabel.setBuddy(nameQLineEdit)
passwordQLabel = QLabel('&Pwd', self)
passwordQLineEdit = QLineEdit(self)
passwordQLabel.setBuddy(passwordQLineEdit)
ok_btn = QPushButton('&OK')
cancel_btn = QPushButton('&Cancel')
mainLayout = QGridLayout(self)
mainLayout.addWidget(nameQLabel, 0, 0)
mainLayout.addWidget(nameQLineEdit, 0, 1, 1, 2)
mainLayout.addWidget(passwordQLabel, 1, 0)
mainLayout.addWidget(passwordQLineEdit, 1, 1, 1, 2)
mainLayout.addWidget(ok_btn, 2, 1)
mainLayout.addWidget(cancel_btn, 2, 2)
"""
行索引rowIndex和列索引columnIndex是控件在栅格布局中位置,占用的行数row和占用的列数column是控件的尺寸
mainLayout.addWidget(控件对象, 行索引rowIndex, 列索引columnIndex, 占用的行数row, 占用的列数column)
"""
if __name__ == '__main__':
app = QApplication(sys.argv)
QLabel_Buddy = QLabelBuddy()
QLabel_Buddy.show()
sys.exit(app.exec_())
- 1
- 2
- 3
- 4
- 5
- 6
- 7
- 8
- 9
- 10
- 11
- 12
- 13
- 14
- 15
- 16
- 17
- 18
- 19
- 20
- 21
- 22
- 23
- 24
- 25
- 26
- 27
- 28
- 29
- 30
- 31
- 32
- 33
- 34
- 35
- 36
- 37
- 38
- 39
- 40
- 41
- 42
- 43
- 44
- 45
- 46
- 47
- 48
- 49
- 50
- 51
- 52
- 53
- 54
- 55
- 56
- 57
- 58
- 1
- 2
- 3
- 4
- 5
- 6
- 7
- 8
- 9
- 10
- 11
- 12
- 13
- 14
- 15
- 16
- 17
- 18
- 19
- 20
- 21
- 22
- 23
- 24
- 25
- 26
- 27
- 28
- 29
- 30
- 31
- 32
- 33
- 34
- 35
- 36
- 37
- 38
- 39
- 40
- 41
- 42
- 43
- 44
- 45
- 46
- 47
- 48
- 49
- 50
- 51
- 52
- 53
- 54
- 55
- 56
- 57
- 58