出品 | AI科技大本营(ID:rgznai100)不论是在游戏还是动画中,三维模型的引用始终都很广泛。但是三维模型的搭建却始终存在着较大的难点,一是模型的搭建是个非常费时费力的技术,其次学习三维建模也需要掌握较多的工具,对于日常没有接触过的人而言难度较大。所以,今天我们将实现一个可以将照片的人体创建成三维模型FBX格式的项目。通过这个项目,可以大量的节省建模工作者的时间,对游戏开发者和动画制作者而言将会是很大的福利。完整代码见文末!本次环境使用的是python3.6.5+windows平台,主要用的库有:Argparse库是python自带的命令行参数解析包,可以用来方便地读取命令行参数。;
glob获取本地文件,在这里用来快速获取训练数据集;
numpy模块用来矩阵和数据的运算处理,其中也包括和深度学习框架之间的交互等。
Cv2模块是python的opencv模型,用来图像读入,存储和边缘计算等图像处理;
Torch模块是深度学习框架。torch不仅更加灵活,支持动态图,而且提供了Python接口。它是由Torch7团队开发,是一个以Python优先的深度学习框架,不仅能够实现强大的GPU加速,同时还支持动态神经网络,这是很多主流深度学习框架比如Tensorflow等都不支持的。PyTorch既可以看作加入了GPU支持的numpy,同时也可以看成一个拥有自动求导功能的强大的深度神经网络。
Matplotlib模块用来可视化训练效果等数据图的制作。
PIL是python中用来处理图形的pillow库。
对于需要处理成三维模型的图片,我们需要提供照片所对应的骨骼点json文件。Json文件的生成,可以使用openpose生成。其中openpose环境的搭建需要利用cmake工具进行编译,包括大量需要版本对应的C++环境等,较为复杂,这里不再阐述。其中主要使用指令如下:分别是对摄像头、本地图片等生成json文件。OpenPoseDemo.exe --body 1 --face --face_detector 1 --hand --hand_detector 1
OpenPoseDemo.exe --camera 0 --write_json 1.json --model_pose COCO
OpenPoseDemo.exe --image_dir json/ --write_json 1.json --model_pose COCO
OpenPoseDemo.exe --camera 0 --write_json 1.json --model_pose BODY_25
OpenPoseDemo.exe --image_dir json/ --write_json 1.json --model_pose BODY_25
(1)本文所使用的是算法是PiFuHD算法。需要分别定义生成模型,模型颜色和模型贴图的函数,代码如下:
def save_obj_mesh(mesh_path, verts, faces=None):
file = open(mesh_path, 'w')
for v in verts:
file.write('v %.4f %.4f %.4f\n' % (v[0], v[1], v[2]))
if faces is not None:
for f in faces:
if f[0] == f[1] or f[1] == f[2] or f[0] == f[2]:
continue
f_plus = f + 1
file.write('f %d %d %d\n' % (f_plus[0], f_plus[2], f_plus[1]))
file.close()
def save_obj_mesh_with_color(mesh_path, verts, faces, colors):
file = open(mesh_path, 'w')
for idx, v in enumerate(verts):
c = colors[idx]
file.write('v %.4f %.4f %.4f %.4f %.4f %.4f\n' % (v[0], v[1], v[2], c[0], c[1], c[2]))
for f in faces:
f_plus = f + 1
file.write('f %d %d %d\n' % (f_plus[0], f_plus[2], f_plus[1]))
file.close()
def save_obj_mesh_with_uv(mesh_path, verts, faces, uvs):
file = open(mesh_path, 'w')
for idx, v in enumerate(verts):
vt = uvs[idx]
file.write('v %.4f %.4f %.4f\n' % (v[0], v[1], v[2]))
file.write('vt %.4f %.4f\n' % (vt[0], vt[1]))
for f in faces:
f_plus = f + 1
file.write('f %d/%d %d/%d %d/%d\n' % (f_plus[0], f_plus[0],
f_plus[2], f_plus[2],
f_plus[1], f_plus[1]))
file.close()
(2)PiFuHD算法是使用图片中的上下文信息,通过对原始不清晰图像先进行了超分辨率重建获得,其中高分辨率详细信息是通过在相似的轻量级PIFu网络中使用这些第一个3D输出作为高分辨率输入来添加的。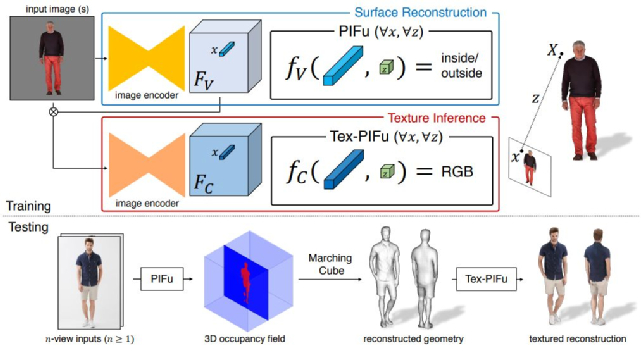
def gen_mesh(res, net, cuda, data, save_path, thresh=0.5, use_octree=True, components=False):
image_tensor_global = data['img_512']
image_tensor = data['img']
calib_tensor = data['calib']
net.filter_global(image_tensor_global)
net.filter_local(image_tensor[:,None])
try:
if net.netG.netF is not None:
image_tensor_global = torch.cat([image_tensor_global, net.netG.nmlF], 0)
if net.netG.netB is not None:
image_tensor_global = torch.cat([image_tensor_global, net.netG.nmlB], 0)
except:
pass
b_min = data['b_min']
b_max = data['b_max']
try:
save_img_path = save_path[:-4] + '.png'
save_img_list = []
for v in range(image_tensor_global.shape[0]):
save_img = (np.transpose(image_tensor_global[v].detach().cpu().numpy(), (1, 2, 0)) * 0.5 + 0.5)[:, :, ::-1] * 255.0
save_img_list.append(save_img)
save_img = np.concatenate(save_img_list, axis=1)
cv2.imwrite(save_img_path, save_img)
verts, faces, _, _ = reconstruction(
net, cuda, calib_tensor, res, b_min, b_max, thresh, use_octree=use_octree, num_samples=50000)
verts_tensor = torch.from_numpy(verts.T).unsqueeze(0).to(device=cuda).float()
# if 'calib_world' in data:
# calib_world = data['calib_world'].numpy()[0]
# verts = np.matmul(np.concatenate([verts, np.ones_like(verts[:,:1])],1), inv(calib_world).T)[:,:3]
color = np.zeros(verts.shape)
interval = 50000
for i in range(len(color) // interval + 1):
left = i * interval
if i == len(color) // interval:
right = -1
else:
right = (i + 1) * interval
net.calc_normal(verts_tensor[:, None, :, left:right], calib_tensor[:,None], calib_tensor)
nml = net.nmls.detach().cpu().numpy()[0] * 0.5 + 0.5
color[left:right] = nml.T
save_obj_mesh_with_color(save_path, verts, faces, color)
except Exception as e:
print(e)
(3)人体表面颜色重建。基于上一步的重建深度特征,这是模型只需要关注于模型各点的颜色即可,而不需要关注潜在的3D信息。def gen_mesh_imgColor(res, net, cuda, data, save_path, thresh=0.5, use_octree=True, components=False):
image_tensor_global = data['img_512'].to(device=cuda)
image_tensor = data['img'].to(device=cuda)
calib_tensor = data['calib'].to(device=cuda)
net.filter_global(image_tensor_global)
net.filter_local(image_tensor[:,None])
try:
if net.netG.netF is not None:
image_tensor_global = torch.cat([image_tensor_global, net.netG.nmlF], 0)
if net.netG.netB is not None:
image_tensor_global = torch.cat([image_tensor_global, net.netG.nmlB], 0)
except:
pass
b_min = data['b_min']
b_max = data['b_max']
try:
save_img_path = save_path[:-4] + '.png'
save_img_list = []
for v in range(image_tensor_global.shape[0]):
save_img = (np.transpose(image_tensor_global[v].detach().cpu().numpy(), (1, 2, 0)) * 0.5 + 0.5)[:, :, ::-1] * 255.0
save_img_list.append(save_img)
save_img = np.concatenate(save_img_list, axis=1)
cv2.imwrite(save_img_path, save_img)
verts, faces, _, _ = reconstruction(
net, cuda, calib_tensor, res, b_min, b_max, thresh, use_octree=use_octree, num_samples=100000)
verts_tensor = torch.from_numpy(verts.T).unsqueeze(0).to(device=cuda).float()
# if this returns error, projection must be defined somewhere else
xyz_tensor = net.projection(verts_tensor, calib_tensor[:1])
uv = xyz_tensor[:, :2, :]
color = index(image_tensor[:1], uv).detach().cpu().numpy()[0].T
color = color * 0.5 + 0.5
if 'calib_world' in data:
calib_world = data['calib_world'].numpy()[0]
verts = np.matmul(np.concatenate([verts, np.ones_like(verts[:,:1])],1), inv(calib_world).T)[:,:3]
save_obj_mesh_with_color(save_path, verts, faces, color)
except Exception as e:
print(e)
其中模型参数的定义主要是使用Argparse库,其中参数包括输入图像、读取的尺寸、模式、学习率等定义。代码如下:class BaseOptions():
def __init__(self):
self.initialized = False
self.parser = None
def initialize(self, parser):
# Datasets related
g_data = parser.add_argument_group('Data')
g_data.add_argument('--dataset', type=str, default='renderppl', help='dataset name')
g_data.add_argument('--dataroot', type=str, default='./data',
help='path to images (data folder)')
g_data.add_argument('--loadSize', type=int, default=512, help='load size of input image')
# Experiment related
g_exp = parser.add_argument_group('Experiment')
g_exp.add_argument('--name', type=str, default='',
help='name of the experiment. It decides where to store samples and models')
g_exp.add_argument('--debug', action='store_true', help='debug mode or not')
g_exp.add_argument('--mode', type=str, default='inout', help='inout || color')
# Training related
g_train = parser.add_argument_group('Training')
g_train.add_argument('--tmp_id', type=int, default=0, help='tmp_id')
g_train.add_argument('--gpu_id', type=int, default
=0, help='gpu id for cuda')
g_train.add_argument('--batch_size', type=int, default=32, help='input batch size')
g_train.add_argument('--num_threads', default=1, type=int, help='# sthreads for loading data')
g_train.add_argument('--serial_batches', action='store_true',
help='if true, takes images in order to make batches, otherwise takes them randomly')
g_train.add_argument('--pin_memory', action='store_true', help='pin_memory')
g_train.add_argument('--learning_rate', type=float, default=1e-3, help='adam learning rate')
g_train.add_argument('--num_iter', type=int, default=30000, help='num iterations to train')
g_train.add_argument('--freq_plot', type=int, default=100, help='freqency of the error plot')
g_train.add_argument('--freq_mesh', type=int, default=20000, help='freqency of the save_checkpoints')
g_train.add_argument('--freq_eval', type=int, default
=5000, help='freqency of the save_checkpoints')
g_train.add_argument('--freq_save_ply', type=int, default=5000, help='freqency of the save ply')
g_train.add_argument('--freq_save_image', type=int, default=100, help='freqency of the save input image')
g_train.add_argument('--resume_epoch', type=int, default=-1, help='epoch resuming the training')
g_train.add_argument('--continue_train', action='store_true', help='continue training: load the latest model')
g_train.add_argument('--finetune', action='store_true', help='fine tuning netG in training C')
# Testing related
g_test = parser.add_argument_group('Testing')
g_test.add_argument('--resolution', type=int, default=512, help='# of grid in mesh reconstruction')
g_test.add_argument('--no_numel_eval', action='store_true', help='no numerical evaluation')
g_test.add_argument('--no_mesh_recon', action='store_true', help='no mesh reconstruction')
# Sampling related
g_sample = parser.add_argument_group('Sampling')
g_sample.add_argument('--num_sample_inout', type=int
, default=6000, help='# of sampling points')
g_sample.add_argument('--num_sample_surface', type=int, default=0, help='# of sampling points')
g_sample.add_argument('--num_sample_normal', type=int, default=0, help='# of sampling points')
g_sample.add_argument('--num_sample_color', type=int, default=0, help='# of sampling points')
g_sample.add_argument('--num_pts_dic', type=int, default=1, help='# of pts dic you load')
g_sample.add_argument('--crop_type', type=str, default='fullbody', help='Sampling file name.')
g_sample.add_argument('--uniform_ratio', type=float, default=0.1, help='maximum sigma for sampling')
g_sample.add_argument('--mask_ratio', type=float, default=0.5, help='maximum sigma for sampling')
g_sample.add_argument('--sampling_parts', action='store_true', help='Sampling on the fly')
g_sample.add_argument('--sampling_otf', action
='store_true', help='Sampling on the fly')
g_sample.add_argument('--sampling_mode', type=str, default='sigma_uniform', help='Sampling file name.')
g_sample.add_argument('--linear_anneal_sigma', action='store_true', help='linear annealing of sigma')
g_sample.add_argument('--sigma_max', type=float, default=0.0, help='maximum sigma for sampling')
g_sample.add_argument('--sigma_min', type=float, default=0.0, help='minimum sigma for sampling')
g_sample.add_argument('--sigma', type=float, default=1.0, help='sigma for sampling')
g_sample.add_argument('--sigma_surface', type=float, default=1.0, help='sigma for sampling')
from .recon import reconWrapper
import argparse
parser = argparse.ArgumentParser()
parser.add_argument('-i', '--input_path', type=str, default='./sample_images')
parser.add_argument('-o', '--out_path'
, type=str, default='./results')
parser.add_argument('-c', '--ckpt_path', type=str, default='./checkpoints/pifuhd.pt')
parser.add_argument('-r', '--resolution', type=int, default=512)
parser.add_argument('--use_rect', action='store_true', help='use rectangle for cropping')
args = parser.parse_args()
resolution = str(args.resolution)
start_id = -1
end_id = -1
cmd = ['--dataroot', args.input_path, '--results_path', args.out_path,\
'--loadSize', '1024', '--resolution', resolution, '--load_netMR_checkpoint_path', \
args.ckpt_path,\
'--start_id', '%d' % start_id, '--end_id', '%d' % end_id]
reconWrapper(cmd, args.use_rect)
进入到项目文件夹,执行“python -m apps.simple_test ”即可运行。
https://pan.baidu.com/s/1dVo57yp89GiNExSfCisPMA作者简介:李秋键,CSDN博客专家,CSDN达人课作者。硕士在读于中国矿业大学,开发有taptap竞赛获奖等。


