点击下方卡片,关注“新机器视觉”公众号
视觉/图像重磅干货,第一时间送达
一、为什么数据增强

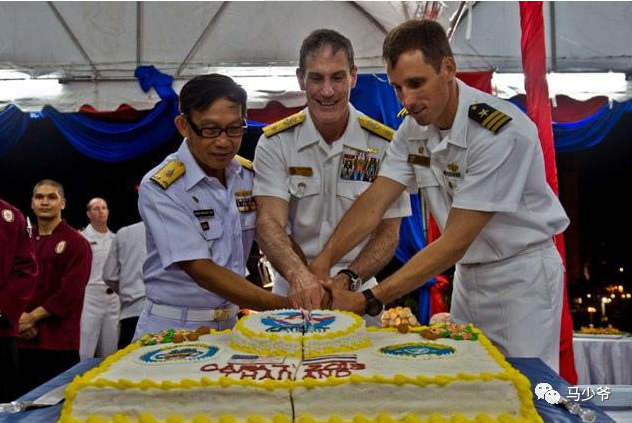
我们看上面这幅漫画,故事里是一个顾客去拍风景照,因为不是实地取景,又想拍出多种不同的效果。
当前现状是,影楼只有一个实地的照片背景,那么如何满足顾客要求呢?没错,有请我们的P图大神,从各个不同的角度给顾客P图。
那么P出来的效果是什么呢?
效果就是照片看起来更加丰富,顾客很满意,可以乖乖掏钱了。。。
那么这个漫画和数据增强有啥关系呢?我们接着往下看:
(他们的共同点都是数据(图像)不足,同时又想得到多样化的数据效果)
那么我们在机器学习中,为何要进行数据增强呢?
在深度学习中,一般要求样本的数量要充足,样本数量越多,训练出来的模型效果越好,模型的泛化能力越强。但是实际中,样本数量不足或者样本质量不够好,这就要对样本做数据增强,来提高样本质量。
关于数据增强的作用总结如下:
1,增加训练的数据量,提高模型的泛化能力
2,增加噪声数据,提升模型的鲁棒性
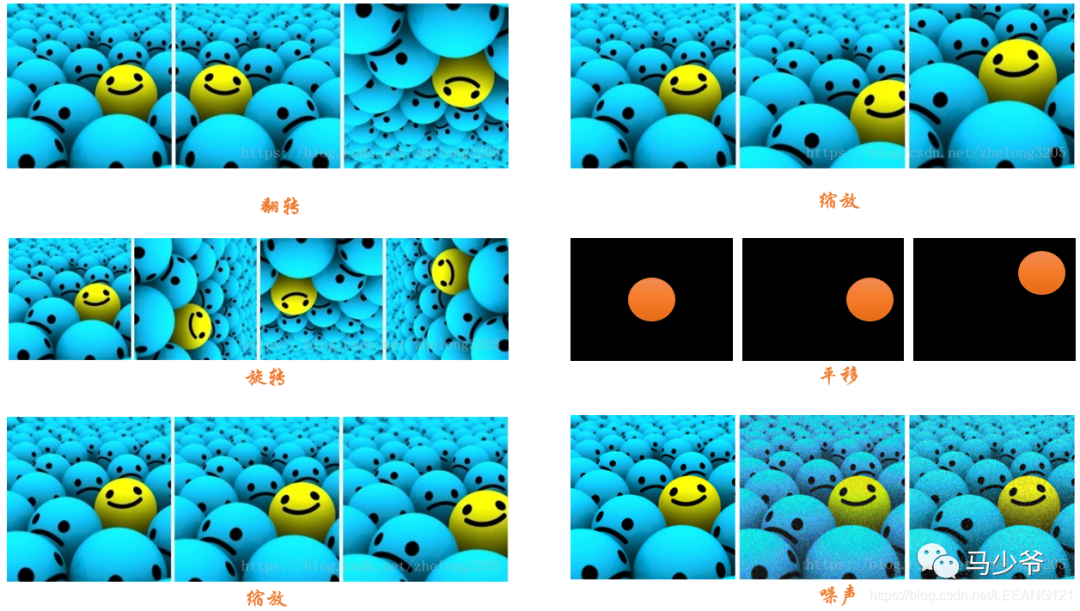
数据增强的方法(我们以图像数据为例):
1,数据翻转:数据翻转是一种常用的数据增强方法,这种方法不同于旋转 180 °。这种方法是做一种类似于镜面的翻折。
2,数据旋转:旋转就是顺时针或者逆时针的旋转,注意在旋转的时候, 最好旋转 90 - 180 度否则会出现尺度的问题
3,图像缩放:图像可以被放大或缩小。放大时,放大后的图像尺寸会大于原始尺寸。大多数图像处理架构会按照原始尺寸对放大后的图像进行裁切而图像缩小会减小图像尺寸,这使我们不得不对图像边界之外的东西做出假设。
4,图像剪裁:这种方法更流行的叫法是随机裁剪,我们随机从图像中选择一部分,然后降这部分图像裁剪出来,然后调整为原图像的大小
5,图像平移:平移是将图像沿着 x 或者 y 方向 (或者两个方向) 移动。我们在平移的时候需对背景进行假设,比如说假设为黑色等等,因为平移的时候有一部分图像是空的,由于图片中的物体可能出现在任意的位置,所以说平移增强方法十分有用。
6,添加噪声:过拟合通常发生在神经网络学习高频特征的时候 (因为低频特征神经网络很容易就可以学到,而高频特征只有在最后的时候才可以学到) 而这些特征对于神经网络所做的任务可能没有帮助,而且会对低频特征产生影响,为了消除高频特征我们随机加入噪声数据来消除这些特征。
以下是上述方式的图像示例:
二、Mosaic数据增强
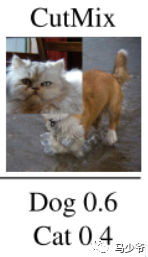
Yolov4的mosaic数据增强参考了CutMix数据增强方式,理论上具有一定的相似性!
CutMix数据增强方式利用两张图片进行拼接。
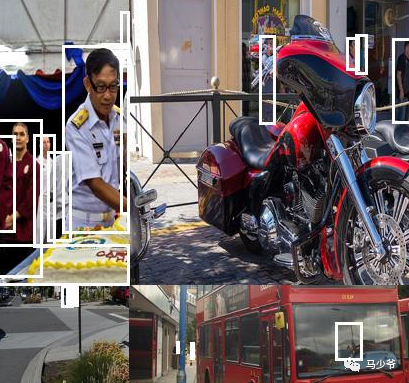
但是mosaic利用了四张图片,根据论文所说其拥有一个巨大的优点是丰富检测物体的背景!且在BN计算的时候一下子会计算四张图片的数据!
就像下图这样:
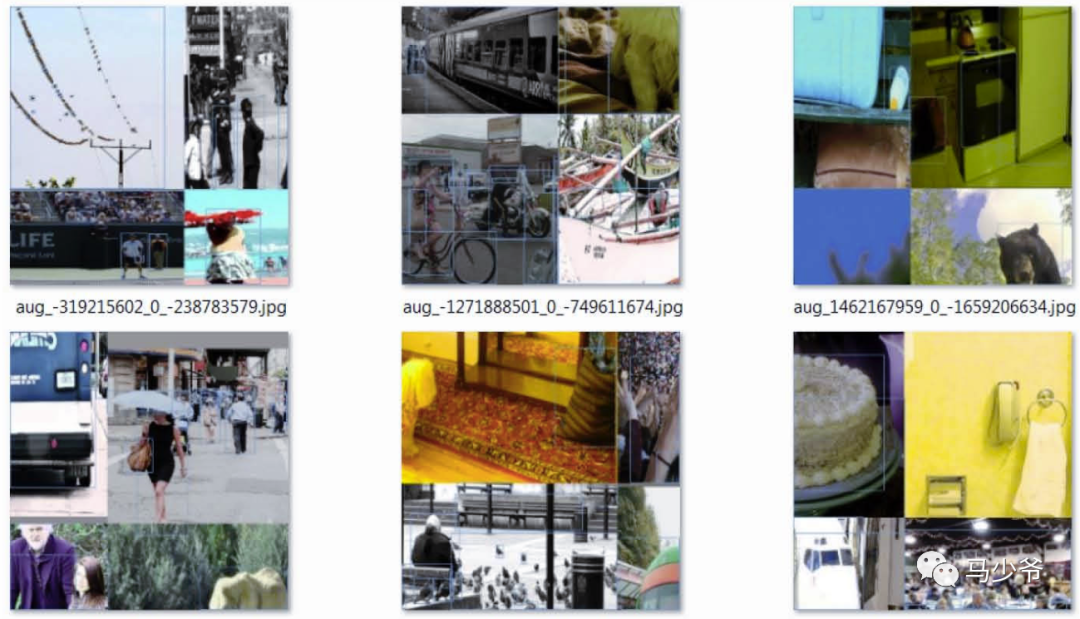
1、每次读取四张图片。
2、分别对四张图片进行翻转、缩放、色域变化等,并且按照四个方向位置摆好。
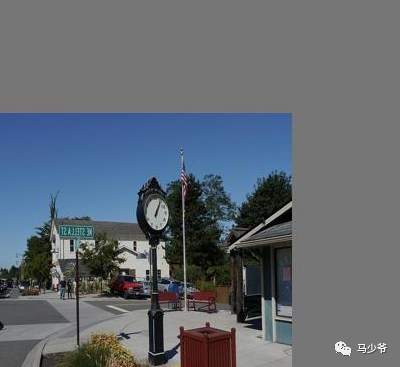
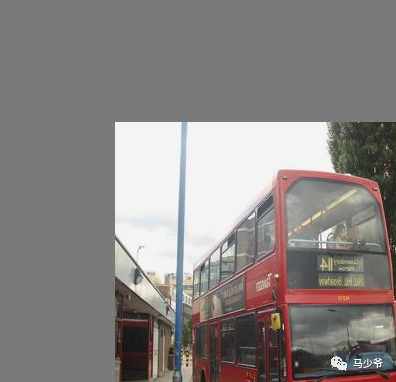

3、进行图片的组合和框的组合
全部代码构成如下:
from PIL import Image, ImageDrawimport numpy as npfrom matplotlib.colors import rgb_to_hsv, hsv_to_rgbimport mathdef rand(a=0, b=1):return np.random.rand()*(b-a) + a
def merge_bboxes(bboxes, cutx, cuty):
merge_bbox = []for i in range(len(bboxes)):for box in bboxes[i]: tmp_box = [] x1,y1,x2,y2 = box[0], box[1], box[2], box[3]
if i == 0:if y1 > cuty or x1 > cutx:continueif y2 >= cuty and y1 <= cuty: y2 = cutyif y2-y1 < 5:continueif x2 >= cutx and x1 <= cutx: x2 = cutxif x2-x1 < 5:continue
if i == 1:if y2 < cuty or x1 > cutx:continue
if y2 >= cuty and y1 <= cuty: y1 = cutyif y2-y1 < 5:continue
if x2 >= cutx and x1 <= cutx: x2 = cutxif x2-x1 < 5:continue
if i == 2:if y2 < cuty or x2 < cutx:continue
if y2 >= cuty and y1 <= cuty: y1 = cutyif y2-y1 < 5:continue
if x2 >= cutx and x1 <= cutx: x1 = cutxif x2-x1 < 5:continue
if i == 3:if y1 > cuty or x2 < cutx:continue
if y2 >= cuty and y1 <= cuty: y2 = cutyif y2-y1 < 5:continue
if x2 >= cutx and x1 <= cutx: x1 = cutxif x2-x1 < 5:continue
tmp_box.append(x1) tmp_box.append(y1) tmp_box.append(x2) tmp_box.append(y2) tmp_box.append(box[-1]) merge_bbox.append(tmp_box)return merge_bbox
def get_random_data(annotation_line, input_shape, random=True, hue=.1, sat=1.5, val=1.5, proc_img=True):'''random preprocessing for real-time data augmentation''' h, w = input_shape min_offset_x = 0.4 min_offset_y = 0.4 scale_low = 1-min(min_offset_x,min_offset_y) scale_high = scale_low+0.2
image_datas = [] box_datas = [] index = 0
place_x = [0,0,int(w*min_offset_x),int(w*min_offset_x)] place_y = [0,int(h*min_offset_y),int(w*min_offset_y),0]for line in annotation_line:# 每一行进行分割 line_content = line.split()# 打开图片 image = Image.open(line_content[0]) image = image.convert("RGB") # 图片的大小 iw, ih = image.size# 保存框的位置 box = np.array([np.array(list(map(int,box.split(',')))) for box in line_content[1:]])
# image.save(str(index)+".jpg")# 是否翻转图片 flip = rand()<.5>if flip and len(box)>0:
image = image.transpose(Image.FLIP_LEFT_RIGHT) box[:, [0,2]] = iw - box[:, [2,0]]
# 对输入进来的图片进行缩放 new_ar = w/h scale = rand(scale_low, scale_high)if new_ar < 1: nh = int(scale*h) nw = int(nh*new_ar)else: nw = int(scale*w) nh = int(nw/new_ar) image = image.resize((nw,nh), Image.BICUBIC)
# 进行色域变换 hue = rand(-hue, hue) sat = rand(1, sat) if rand()<.5 else sat> val = rand(1, val) if rand()<.5 else val> x = rgb_to_hsv(np.array(image)/255.) x[..., 0] += hue x[..., 0][x[..., 0]>1] -= 1 x[..., 0][x[..., 0]<0] += 1 x[..., 1] *= sat x[..., 2] *= val x[x>1] = 1 x[x<0] = 0 image = hsv_to_rgb(x)
image = Image.fromarray((image*255).astype(np.uint8))# 将图片进行放置,分别对应四张分割图片的位置 dx = place_x[index] dy = place_y[index] new_image = Image.new('RGB', (w,h), (128,128,128)) new_image.paste(image, (dx, dy)) image_data = np.array(new_image)/255
# Image.fromarray((image_data*255).astype(np.uint8)).save(str(index)+"distort.jpg")
index = index + 1 box_data = []# 对box进行重新处理if len(box)>0: np.random.shuffle(box) box[:, [0,2]] = box[:, [0,2]]*nw/iw + dx box[:, [1,3]] = box[:, [1,3]]*nh/ih + dy box[:, 0:2][box[:, 0:2]<0] = 0 box[:, 2][box[:, 2]>w] = w box[:, 3][box[:, 3]>h] = h box_w = box[:, 2] - box[:, 0] box_h = box[:, 3] - box[:, 1] box = box[np.logical_and(box_w>1, box_h>1)] box_data = np.zeros((len(box),5)) box_data[:len(box)] = box
image_datas.append(image_data) box_datas.append(box_data)
img = Image.fromarray((image_data*255).astype(np.uint8))for j in range(len(box_data)): thickness = 3 left, top, right, bottom = box_data[j][0:4] draw = ImageDraw.Draw(img)for i in range(thickness): draw.rectangle([left + i, top + i, right - i, bottom - i],outline=(255,255,255)) img.show()
# 将图片分割,放在一起 cutx = np.random.randint(int(w*min_offset_x), int(w*(1 - min_offset_x))) cuty = np.random.randint(int(h*min_offset_y), int(h*(1 - min_offset_y)))
new_image = np.zeros([h,w,3]) new_image[:cuty, :cutx, :] = image_datas[0][:cuty, :cutx, :] new_image[cuty:, :cutx, :] = image_datas[1][cuty:, :cutx, :] new_image[cuty:, cutx:, :] = image_datas[2][cuty:, cutx:, :] new_image[:cuty, cutx:, :] = image_datas[3][:cuty, cutx:, :]
# 对框进行进一步的处理 new_boxes = merge_bboxes(box_datas, cutx, cuty)
return new_image, new_boxes
def normal_(annotation_line, input_shape):'''random preprocessing for real-time data augmentation''' line = annotation_line.split() image = Image.open(line[0]) box = np.array([np.array(list(map(int,box.split(',')))) for box in line[1:]])
iw, ih = image.size image = image.transpose(Image.FLIP_LEFT_RIGHT) box[:, [0,2]] = iw - box[:, [2,0]]
return image, box
if __name__ == "__main__":with open("2007_train.txt") as f: lines = f.readlines() a = np.random.randint(0,len(lines))# index = 0# line_all = lines[a:a+4]# for line in line_all:# image_data, box_data = normal_(line,[416,416])# img = image_data# for j in range(len(box_data)):# thickness = 3# left, top, right, bottom = box_data[j][0:4]# draw = ImageDraw.Draw(img)# for i in range(thickness):# draw.rectangle([left + i, top + i, right - i, bottom - i],outline=(255,255,255))# img.show()# # img.save(str(index)+"box.jpg")# index = index+1
line = lines[a:a+4]
image_data, box_data = get_random_data(line,[416,416]) img = Image.fromarray((image_data*255).astype(np.uint8))for j in range(len(box_data)): thickness = 3 left, top, right, bottom = box_data[j][0:4] draw = ImageDraw.Draw(img)for i in range(thickness): draw.rectangle([left + i, top + i, right - i, bottom - i],outline=(255,255,255)) img.show() # img.save("box_all.jpg")
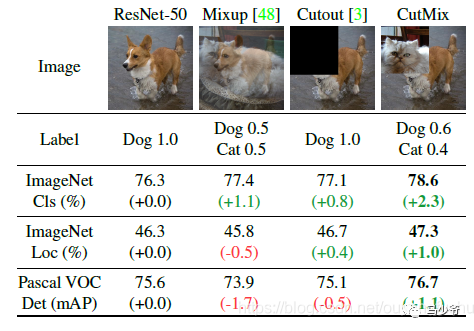
三、CutMix数据增强
之前有一篇博客学习了mixup数据增强,对于提升模型的性能非常显著。长江后浪推前浪,这一篇CutMix数据增强居然将其推在沙滩上。简单回顾下mixup数据增强:从训练样本中随机抽取两个样本进行简单的随机加权求和,同时样本的标签也对应加权求和,然后预测结果与加权求和之后的标签求损失,在反向求导更新参数。
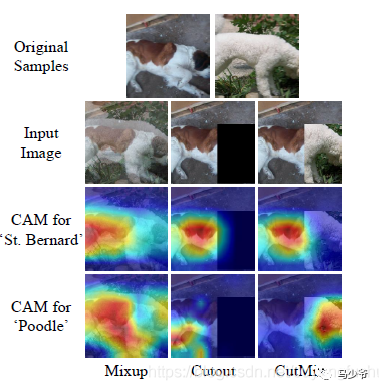
CutMix的处理方式也比较简单,同样也是对一对图片做操作,简单讲就是随机生成一个裁剪框Box,裁剪掉A图的相应位置,然后用B图片相应位置的ROI放到A图中被裁剪的区域形成新的样本,计算损失时同样采用加权求和的方式进行求解,最后作者对比了mixup、cutout和baseline,数据上看似乎也是小小地吊打的节奏。
为什么会这样呢,论文的意思我姑且这样描述,mixup是直接求和两张图,如同附身,鬼影一样,模型很难学到准确的特征图响应分布。而cutmix相当于换某个零件,模型更容易区分异类。
算法的核心过程在论文中这样描述:
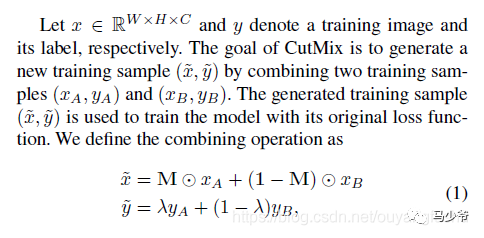
M是一个与图像尺寸一致的由0和1标记的掩码矩阵,实际就是标记需要裁剪的区域和保留的区域,裁剪的区域值均为0,其余位置为1,图像A和B组合得到新样本,最后两个图的标签也对应求加权和(其实这个公式想要表达的是再求接损失时,二者的loss求加权和,这样说更准确)。那么问题来了这个裁剪区域的box是如何得到,加权的系数如何确定?
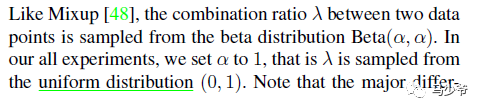
权值同mixup一样是采用bata分布随机得到,alpha的值为论文中取值为1,这样加权系数[0-1]就服从beta分布,实际上从论文的代码实现上看,beta分布真正的用途是为了生成裁剪区域。论文这样描述:

裁剪框box的左上角坐标采集服从宽高(W和H)的均匀分布,及随其采点,box的宽高计算则需要用到beta分布产生的加权系数纳闷哒(懒得打公式了),这样裁剪区box的面积与图像面积之比为1-纳闷哒。这样损失的加权和(公式(1))说采用的纳闷哒就与面积比相对应。这里我对代码进行了简答整理,以便更好地嵌入自己的框架:
def rand_bbox(size, lam):W = size[2]H = size[3]cut_rat = np.sqrt(1. - lam)cut_w = np.int(W * cut_rat)cut_h = np.int(H * cut_rat) # uniformcx = np.random.randint(W)cy = np.random.randint(H)bbx1 = np.clip(cx - cut_w // 2, 0, W)bby1 = np.clip(cy - cut_h // 2, 0, H)bbx2 = np.clip(cx + cut_w // 2, 0, W)bby2 = np.clip(cy + cut_h // 2, 0, H)return bbx1, bby1, bbx2, bby2def cutmix_data(x, y, alpha=1., use_cuda=True):if alpha > 0.:lam = np.random.beta(alpha, alpha)else:lam = 1.batch_size = x.size()[0]if use_cuda:index = torch.randperm(batch_size).cuda()else:index = torch.randperm(batch_size)size=x.size()bbx1, bby1, bbx2, bby2=rand_bbox(size,lam)x[:, :, bbx1:bbx2, bby1:bby2] = x[index, :, bbx1:bbx2, bby1:bby2] # adjust lambda to exactly match pixel ratiolam = 1 - ((bbx2 - bbx1) * (bby2 - bby1) / (x.size()[-1] *x.size()[-2]))y_a, y_b = y, y[index]return x, y_a, y_b, lam
严格的讲,生成的box可能超出图像边界而被裁减,所以再代码中最终的加权系数重新计算了一下:
lam = 1 - ((bbx2 - bbx1) * (bby2 - bby1) / (x.size()[-1] *x.size()[-2]))
训练过程完整的使用代码如下:
if mixType=='mixup': inputs, targets_a, targets_b, lam = mixup_data(inputs, targets, args.alpha, use_cuda)elif mixType=='cutmix': inputs, targets_a, targets_b, lam = cutmix_data(inputs, targets, args.alpha, use_cuda) optimizer.zero_grad()inputs, targets_a, targets_b = Variable(inputs), Variable(targets_a), Variable(targets_b)outputs = net(inputs)loss = criterion(outputs, target_a) * lam + criterion(outputs, target_b) * (1. -lam)
我在最近工作中的私有数据集中进行了试验,同样的数据,其他参数一致,仅仅更换mixup为cutmix,模型性能确有提升。对于困难样本的效果有很好的提升。同时心中有一个疑问,如果在mini-batch中随机采样中,样本对组合新数据时,图像A和B在裁剪区域均为背景区域,且背景区域几乎相似,而非目标所在区域,这样训练强制模型拟合,是否合理,还是会引入噪声样?
参考链接:
https://blog.csdn.net/weixin_44791964/article/details/105996954
https://blog.csdn.net/ouyangfushu/article/details/105575258
—版权声明—
仅用于学术分享,版权属于原作者。
若有侵权,请联系微信号:yiyang-sy 删除或修改!


