背景
NGINX 是一个通用且流行的应用程序。也是最流行的 Web 服务器,它可用于提供静态文件内容,但也通常与其他服务一起用作分布式系统中的组件,在其中它用作反向代理、负载均衡 或 API 网关。
分布式追踪 distributed tracing 是一种可用于分析与监控应用程序的机制,将追踪在从源到目的的整个过程中的单个请求,这与仅通过单个应用程序域来追踪请求的形式不同。
换句话说,我们可以说分布式追踪是对跨多个系统的多个请求的拼接。拼接通常由一个或多个相关 ID 完成,并且跟踪通常是一组记录的、跨所有系统的结构化日志事件,存储在一个中心位置。
在这种背景的情况下, OpenTracing 应运而生。OpenTracing 是一个与应用供应商无关的 API,它可帮助开发人员轻松地跟踪单一请求的域。目前有多种开源产品都支持 OpenTracing(例如,Jaeger, skywalking 等),并将其作为一种检测分布式追踪的标准化方法。
本文将围绕,从 0 到 1 实现在 nginx 配置分布式追踪的架构的简单实例说明。本文实例使用的组件为
- jaeger-all-in-on[2] v1.38
- nginx-opentracing[3] v1.22
- jaeger-client-cpp[4] v0.9
源码构建 nginx-opentracing
准备 nginx-opentracing
nginx-opentracing[5] 仓库中可以看到,官方为每个 nginx 版本都提供了一个编译好的动态库(Nginx1.19.13+),我们可以直接拿来使用这个动态库,如果你想将这个利用 Nginx 提供的编译参数 --add-module=/path/to/module 构建为 nginx 的内置功能的话,可能会出现一些问题,例如下面的一些错误:
ngx_http_opentracing_module.so/config was found
 /root/nginx-opentracing-0.25.0/opentracing//src/ngx_http_opentracing_module.cpp
In file included from /root/nginx-opentracing-0.25.0/opentracing//src/ngx_http_opentracing_module.cpp:1:0:
/root/nginx-opentracing-0.25.0/opentracing//src/load_tracer.h:3:38: fatal error: opentracing/dynamic_load.h: No such file or directory
根据 issue[6] 中查询得知 nginx-opentracing 需要嵌入到 nginx 中,是需要一些 opentracing-cpp[7] 因为对 c++不熟,尝试调试很久还是上面的错误,故直接使用了官方提供的动态库。
准备 jaeger-client-cpp
根据 nginx-opentracing 中提到的,还需要一个 jaeger-client-cpp[8] 的 tracer 才可以正常运行(这也是作为 jaeger 架构中的角色)
来到 jaeger-client-cpp 看到 Release 提供的编译好的动态库已经很久了,而最新版都没有提供相应编译的版本,需要我们自己编译
说明:编译依赖 CMake 3.3+,gcc 4.9.2+
我们的编译环境使用 CentOS 7 默认 gcc 与 CMake 都符合要求需要自行编译两个的版本。
编译 gcc
gcc 下载地址:
https://ftp.gnu.org/gnu/gcc/[9]
cd gcc-5.4.0
./contrib/download_prerequisites

mkdir gcc-build-5.4.0
cd gcc-build-5.4.0

/usr/local/src/gcc-5.4.0/configure \
 --enable-checking=release \
 --enable-languages=c,c++ \
 --disable-multilib

make && make install
参考这篇文章:升级 GCC[10]
cd
/usr/bin/
mv gcc gcc_back
mv g++ g++_back
ln -s /usr/local/bin/gcc gcc
ln -s /usr/local/bin/g++ g++
编译时遇到几个问题
/lib64/libstdc++.so.6: version GLIBCXX_3.4.20' not found
gcc 编译,libgcc动态库有改动,恢复原状即可
configure: error: C++ compiler missing or inoperational

make[2]: \*** [configure-stage1-libcpp] Error 1
make[2]: Leaving directory `/home/clay/programming/C++/gcc-4.8.1'
make[1]: \*** [stage1-bubble] Error 2
make[1]: Leaving directory `/home/clay/programming/C++/gcc-4.8.1'
make: \*** [all] Error 2
编译 cmake
./configure --prefix=/path/to/app

make
make install
这里遇到一个小问题 编译过程中遇到 [libstdc++.so.6: version GLIBCXX_3.4.20 not found
因为这里使用了自己编译的 gcc 版本,需要指定下动态库的路径[11]
LD_LIBRARY_PATH=/usr/local/lib64 ./configure --prefix=/usr/local/cmake
编译 jaeger-client-cpp
这里根据官方提供的步骤操作即可
cd jaeger-client-cpp-0.9.0/
mkdir build
cd build
# 这里建议使用下特色上网,编译过程中会使用Hunter自动下载所需的依赖项
ALL_PROXY=http://x.0.0.x:10811 /usr/local/cmake/bin/cmake ..
make
注:依赖项挺大的,下载时间可能很长,会 hang 主,只需等待结束即可
编译完成后 libjaegertracing.so.0.9.0 则是我们需要的
编译 nginx
./configure \
 --user=web_www \
 --group=web_www \
 --with-pcre \
 --with-compat \
 --with-http_ssl_module  \
 --with-http_gzip_static_module \
 --prefix=/root/nginx  \
 --with-http_stub_status_module
--with-compat 必须加上,表面允许使用动态库,否则编译完在启动时会报下面的错误
nginx: [emerg] module "/root/nginx/conf/ngx_http_opentracing_module.so" is not binary compatible in /root/nginx/conf/nginx.conf:1
遇到的问题,cc nou found,这里只需将 gcc 软连接一份为 cc 即可
配置 nginx
准备 jaeger-client 的配置
jaeger.json,参数的说明可以参考configuration[12]
{
"service_name": "nginx", // 服务名
"sampler": {
"type": "const",
"param": 1
},
"reporter": {
"localAgentHostPort": "jaeger:6831" // jaeger agent的地址
},
"headers": { // jaeger的默认的jaeger Baggage头设置
"jaegerDebugHeader": "jaeger-debug-id",
"jaegerBaggageHeader"
: "jaeger-baggage",
"traceBaggageHeaderPrefix": "uberctx-"
},
"baggage_restrictions": {
"denyBaggageOnInitializationFailure": false,
"hostPort": ""
}
}
在 nginx 中开启 opentracing
对于更多的 nginx-opentracing 的配置说明参数可以参考 Reference.md[13]
# 加载 OpenTracing 动态模块。
load_module conf/ngx_http_opentracing_module.so;
worker_processes  1;
user root root;

events {
    worker_connections  1024;
}
http {
    log_format opentracing '{"timestamp":"$time_iso8601",'
                       '"source":"$server_addr",'
                       '"hostname":"$hostname",'
                       '"ip":"$http_x_forwarded_for",'
                       '"traceID":"$opentracing_context_uber_trace_id",'
                       '"client":"$remote_addr",'
                       '"request_method":"$request_method",'
                       '"scheme":"$scheme",'
                       '"domain":"$server_name",'
                       '"referer":"$http_referer",'
                       '"request":"$request_uri",'
                       '"args":"$args",'
                       '"size":$body_bytes_sent,'
                       '"status": $status,'
                       '"responsetime":$request_time,'
                       '"upstreamtime":"$upstream_response_time",'
                       '"upstreamaddr":"$upstream_addr",'
                       '"http_user_agent":"$http_user_agent",'
                       '"https":"$https"'
                       '}';
 # 加载 tracer,这里使用的jaeger,需要传递配置文件
    opentracing_load_tracer conf/libjaegertracing.so conf/jaeger.json;
    # 启用 tracing
    opentracing on;
    # 设置tag,可选参数
    opentracing_tag http_user_agent $http_user_agent;
    include       mime.types;
    default_type  application/octet-stream;
    sendfile        on;
    keepalive_timeout  65;
    server {
        listen       80;
        server_name  localhost;
        location / {
            opentracing_operation_name $uri;
     opentracing_propagate_context;
            root   html;
            index  index.html index.htm;
        }
 access_log logs/access.log opentracing;
        error_page   500 502 503 504  /50x.html;
        location = /50x.html {
            root   html;
        }
    }
}
注:这里使用的 opentracing-nginx 的动态库为 ot16 ,linux-amd64-nginx-1.22.0-ot16-ngx_http_module.so.tgz ,另外一个版本不兼容,-t 检查语法时会提示
配置说明
对于每一个 location 都可以对其设置别名,这个就是 opentracing_operation_name 与 opentracing_location_operation_name 的区别
http {
...
    location = /upload/animal {
      opentracing_location_operation_name upload;
    ...
更多的配置说明可以参考 Tutorial.md[14]
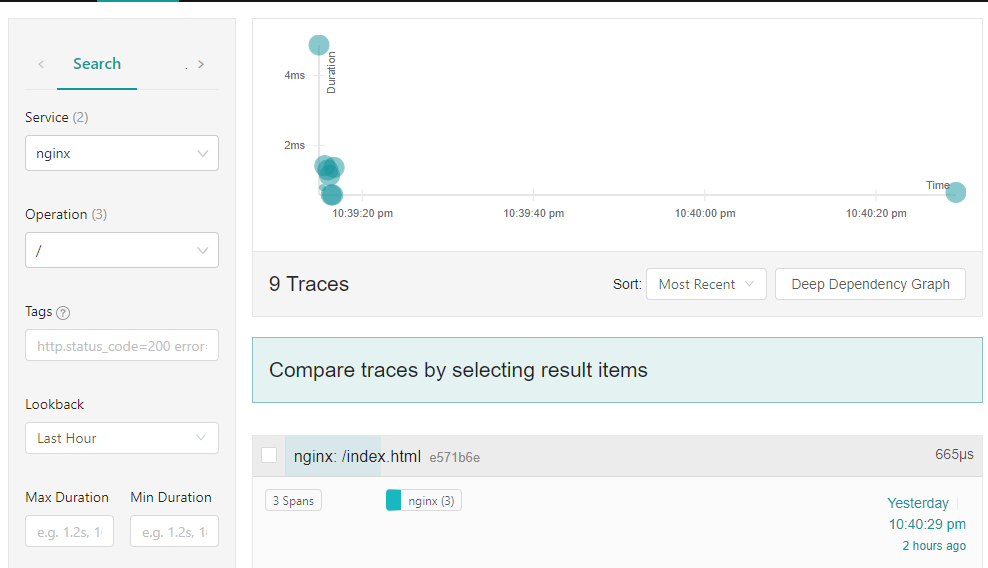
此时我们可以在 jaeger 上查看,可以看到 NGINX 的 span(因为这里只配置了 NGINX,没有配置更多的后端)。


参考资料
[1]nginx: https://nginx.org/en/download.html
[2]jaeger-all-in-on: https://www.jaegertracing.io/docs/1.35/getting-started/
[3]nginx-opentracing: https://github.com/opentracing-contrib/nginx-opentracing
[4]jaeger-client-cpp: https://github.com/jaegertracing/jaeger-client-cpp
[5]nginx-opentracing: https://github.com/opentracing-contrib/nginx-opentracing
[6]issue: https://github.com/opentracing-contrib/nginx-opentracing/issues/120
[7]opentracing-cpp: https://github.com/opentracing/opentracing-cpp
[8]jaeger-client-cpp: https://github.com/jaegertracing/jaeger-client-cpp
[9]https://ftp.gnu.org/gnu/gcc/: https://ftp.gnu.org/gnu/gcc/
[10]升级 GCC: https://www.jianshu.com/p/8ce98a06492f
[11]动态库的路径: https://stackoverflow.com/questions/53592796/libstdc-so-6-version-glibcxx-3-4-20-not-found
[12]configuration: https://github.com/jaegertracing/jaeger-client-cpp#configuration-via-environment
[13]Reference.md: https://github.com/opentracing-contrib/nginx-opentracing/blob/master/doc/Reference.md
[14]Tutorial.md: https://github.com/opentracing-contrib/nginx-opentracing/blob/master/doc/Tutorial.md
链接:https://blog.csdn.net/sinat_24092079/article/details/125592060
(版权归原作者所有,侵删)
