
本文为看雪论坛优秀文章
看雪论坛作者ID:singhost
一直想分享些 idapython 的内容,网上现在的内容太少,都只是教了一些基础的用法,官方的文档和例子又比较散。希望我的分享能让大家更加快乐的逆向!
这是这个系列的第一篇,分享一下如何用IDAPython 画出两个函数之间的交叉引用图,可视化一直是我很喜欢的一个东西,逆向的目的就是理解代码嘛,可视化是理解代码的一个很重要的工具。
开发环境:
此外,本教程的实现还依赖了几个 Python 包:
本教程安排如下:
① 定义递归函数 find_cross_refs
② IDAPython Action 概念介绍
③ 添加我们的 Action
④ 最终效果
一、定义递归函数 find_cross_refs
在这里,我们定义了一个名为 find_cross_refs 的递归函数,用于查找两个函数之间的交叉引用关系。该函数包含以下参数:
- func: sark.Function 类型,表示要查找交叉引用关系的起始函数对象。
- target_func: sark.Function 类型,表示要查找交叉引用关系的目标函数对象。
- G: networkx.DiGraph 类型,表示用于存储函数之间引用关系的有向图对象。
- max_depth: int 类型,表示查找引用关系的最大深度。
- include_data_xref: bool 类型,表示在查找引用关系时是否要包含数据引用关系。
函数中主要分为以下几个步骤:
① 首先判断查找引用关系的深度是否达到最大深度,如果达到最大深度就直接返回 False。② 然后根据 include_data_xref 的设置,获取该函数中所有的引用 refes。如果 include_data_xref 为 True,则获取所有数据引用关系,否则获取所有函数调用引用关系。③ 遍历函数的所有引用 ref,如果该引用 ref 指向目标函数,则在有向图 G 中通过 add_edge 函数添加一条从当前函数到目标函数的边,并返回 True。④ 如果引用指向另一个函数,则递归调用 find_cross_refs 函数查找两个函数之间的交叉引用关系。⑤ 如果所有引用遍历完,仍然没有找到交叉引用,则返回 False。
下面是 find_cross_refs 函数的详细实现代码:
MAX_SEARCH_DEPTH = 10def find_cross_refs(func: sark.Function, target_func, G, max_depth, include_data_xref): if max_depth == 0: return False max_depth -= 1
if include_data_xref: refs = list(func.xrefs_from) else: refs = list(func.calls_from) for ref in refs: ref_addr = ref.to if ref_addr == target_func.start_ea: G.add_edge(func.ea, target_func.ea) return True seg = sark.Segment(ea=ref_addr) if seg.name != "__text": continue else: try: ref_func = sark.Function(ea=ref_addr) except Exception as e: print(e) continue if find_cross_refs(ref_func, target_func, G, max_depth, include_data_xref): G.add_edge(func.ea, ref_func.ea) return True return False
二、IDApython Action 概念介绍
第二步,我们要向 IDA 中添加 action,通过 action 来执行我们的 find_cross_refs函数,首先我们了解一下 IDA 中 action 的概念:
1、action 首先需要被注册。一旦被注册,action 可以用快捷键触发(如果指定了的话),但是 action 还没法在 UI 中看到。
2、action 被注册之后,我们可以将 action attach 到以下三个地方:
3、同一个 action 可以在不同的地方被使用。
4、一个 action 有一个 handler,是一个结构体带有以下两个 callback。
① activate callback,当 action 触发时调用。② update callback,声明 action 是否 enabled。
给一段代码,看一下如何注册一个 Action。
class MyHandler(idaapi.action_handler_t): def __init__(self): idaapi.action_handler_t.__init__(self) def activate(self, ctx): print "Hello!" return 1 def update
(self, ctx): return idaapi.AST_ENABLE_ALWAYS action_desc = idaapi.action_desc_t( 'my:action', 'Say hello!', MyHandler(), 'Ctrl+H', 'Says hello', 199) idaapi.register_action(action_desc)
然后是将 action 放到 UI 上的代码。
idaapi.attach_action_to_menu( 'Edit/Other/Manual instruction...', 'my:action', idaapi.SETMENU_APP) idaapi.attach_action_to_toolbar( "AnalysisToolBar", 'my:action') form = idaapi.get_current_tform() idaapi.attach_action_to_popup(form, None, "my:action", None)
了解完这些我们就可以写自己的 Action 了,为了方便我对官方的 Action api 做了一些封装, 下面是我自己的 action.py 文件。
import idaapi from .hookers import global_hooker_managerfrom typing import Optional class ActionManager(object): def __init__(self): self.__actions = [] def register(self, action): self.__actions.append(action) idaapi.register_action( idaapi.action_desc_t(action.name, action.description, action, action.hotkey) ) if isinstance(action, HexRaysPopupAction): global_hooker_manager.register(HexRaysPopupRequestHandler(action)) def initialize(self): pass def finalize(self): for action in self.__actions: idaapi.unregister_action(action.name) action_manager = ActionManager() class Action(idaapi.action_handler_t): """ Convenience wrapper with name property allowing to be registered in IDA using ActionManager """ description: Optional[str] = None hotkey: Optional[str] = None def __init__(self): super(Action, self).__init__() @property
def name(self): return "HexRaysPyTools:" + type(self).__name__ def activate(self, ctx: idaapi.action_ctx_base_t): raise NotImplementedError def update(self, ctx: idaapi.action_ctx_base_t): raise NotImplementedError class HexRaysPopupAction(Action): """ Wrapper around Action. Represents Action which can be added to menu after right-clicking in Decompile window. Has `check` method that should tell whether Action should be added to popup menu when different items are right-clicked. Children of this class can also be fired by hot-key without right-clicking if one provided in `hotkey` static member. """ def __init__(self): super(HexRaysPopupAction, self).__init__() def activate(self, ctx: idaapi.action_ctx_base_t): raise NotImplementedError def check(self, hx_view): raise NotImplementedError def update(self, ctx: idaapi.action_ctx_base_t): if ctx.widget_type == idaapi.BWN_PSEUDOCODE: return idaapi.AST_ENABLE_FOR_WIDGET return idaapi.AST_DISABLE_FOR_WIDGET class HexRaysPopupRequestHandler(idaapi.Hexrays_Hooks): def __init__(self, action): super().__init__() self.__action = action def populating_popup(self, widget, popup_handle, vu): if self.__action.check(vu): idaapi.attach_action_to_popup(widget, popup_handle, self.__action.name, None) return 0
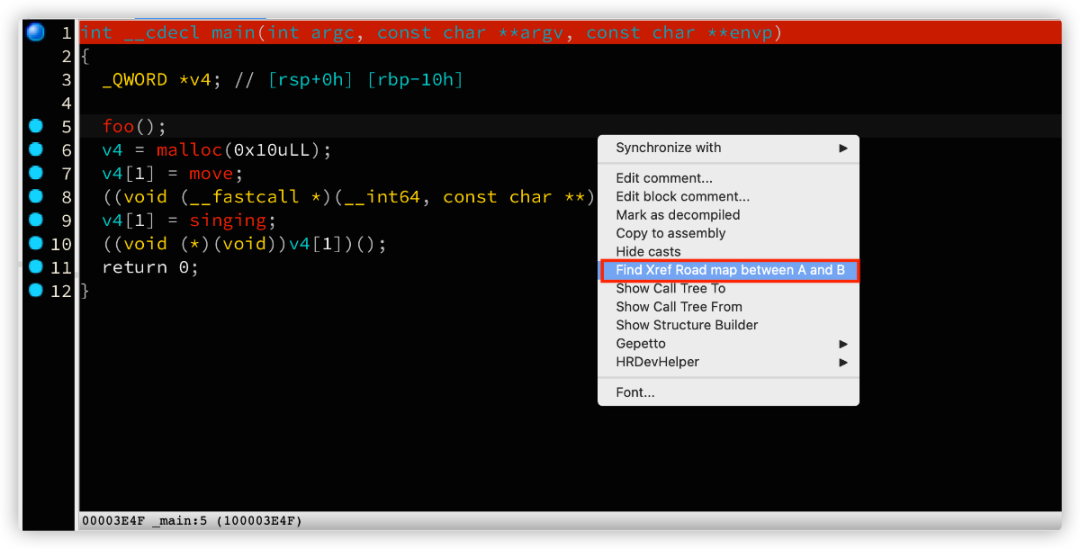
三、添加我们的 Action
然后我们开始定义显示交叉引用图的 Action,我把它叫做 XrefRoadMapAction。
具体来说,该类包含以下方法:
- check 方法:返回 True 表示该操作可用。
- activate 方法:执行实际的操作,该方法获取当前函数地址,获取用户输入的目标函数地址,并创建一个有向图进行处理。
- update 方法:更新当前操作的 UI(例如菜单项)的图形状态。
可以看出,该类实现的核心是 activate 方法。其主要流程如下:
- 根据用户设置调用 find_cross_refs 函数搜索从当前函数到目标函数的交叉引用路径;
-
如果在搜索结果中找到了交叉引用路径,则在 G 中添加表示函数之间引用关系的边,然后使用 sark.ui.NXGraph 绘制有向图;
下面是 XrefRoadMapAction 类的详细实现代码:
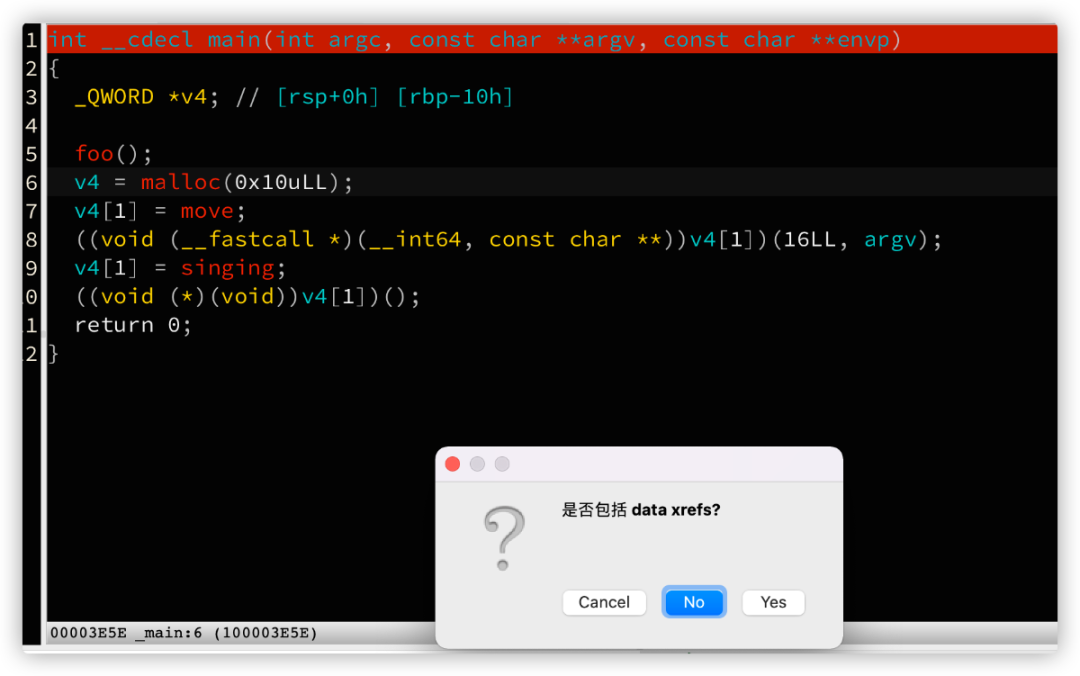
class XrefRoadMapAction(HexRaysPopupAction): """ Convenience wrapper with name property allowing to be registered in IDA using ActionManager """ description: Optional[str] = "Find Xref Road map between A and B" hotkey: Optional[str] = "Alt-F3" def __init__(self): super(Action, self).__init__() def check(self, hx_view: idaapi.vdui_t) -> bool: return True def activate(self, ctx: idaapi.action_ctx_base_t): cur_ea = idaapi.get_screen_ea() try: cur_func = sark.Function(ea=cur_ea) except Exception as e: traceback.print_exc() print("Error: cursor is not in a function!") return target_func_addr = idaapi.ask_addr(defval=0, format="Enter target function address:") if target_func_addr == idaapi.BADADDR or target_func_addr is None: print("Error: invalid target function address!") return try: s = sark.Segment(ea=target_func_addr) if s.name == "UNDEF": target_func = sark.ExternFunction(ea=target_func_addr) else: target_func = sark.Function(ea=target_func_addr) except Exception as e: traceback.print_exc() print("Error: target function does not exist!") return import networkx as nx G = nx.DiGraph() print(f"find a path between func {cur_func.demangled} and {target_func.demangled}, max search depth is {MAX_SEARCH_DEPTH}") btn_selected = idaapi.ask_yn(idaapi.ASKBTN_NO, "是否包括 data xrefs?") if btn_selected == idaapi.ASKBTN_CANCEL: return ret = find_cross_refs(cur_func, target_func, G, MAX_SEARCH_DEPTH, include_data_xref=True if btn_selected == idaapi.ASKBTN_YES else False) if ret == False: assert len(G.nodes()) == 0, "find_cross_refs 返回 False,但是 G 中有节点" if len(G.nodes()) > 0: G.nodes[cur_func.ea][sark.ui.NXGraph.BG_COLOR] = 0x80 title =
f"Path from `{cur_func.demangled}` to `{target_func.demangled}`" viewer = sark.ui.NXGraph(G, handler=sark.ui.AddressNodeHandler(), title=title) viewer.Show() else: idaapi.warning("Cannot find a path!!!") def update(self, ctx: idaapi.action_ctx_base_t): widget_type = ctx.widget_type if widget_type == idaapi.BWN_DISASM or widget_type == idaapi.BWN_PSEUDOCODE: return idaapi.AST_ENABLE_FOR_WIDGET else: return idaapi.AST_DISABLE_FOR_WIDGET
代码里面其实还用了很多 sark 库的函数,大家可以自己学习其用法,这个库是专门对 idapython 的 api 做封装的,比较 pythonic,非常好用,我自己也给这个库添加了很多新的功能。
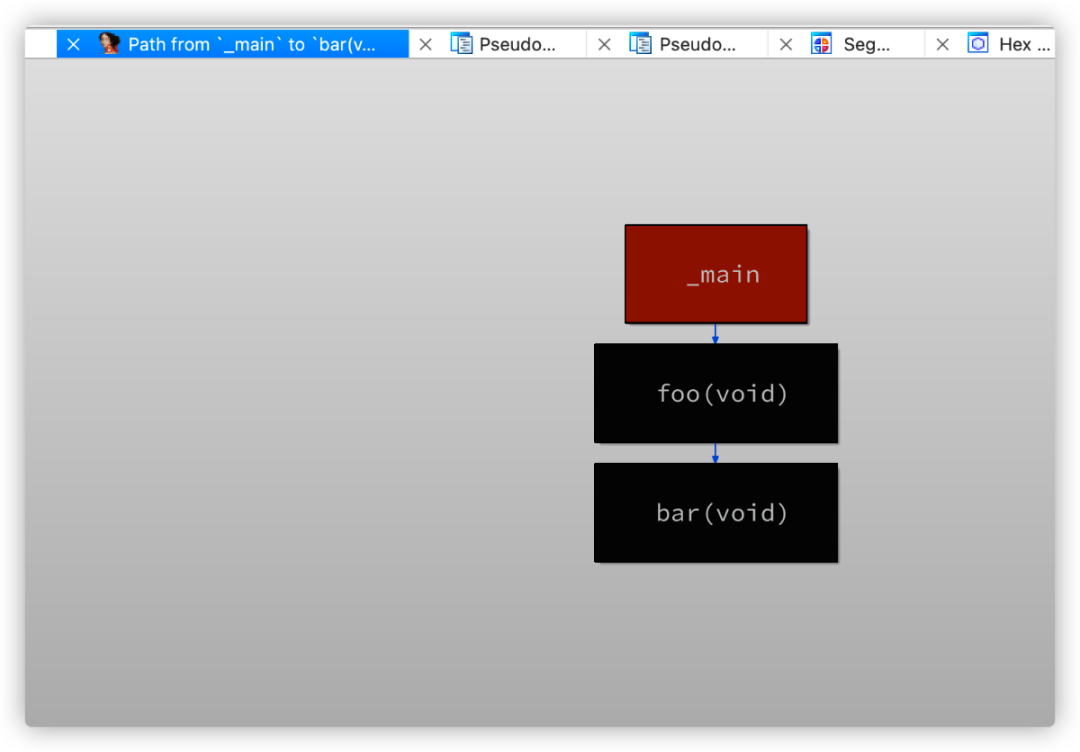
四、最终效果
如下所示:
看雪ID:singhost
https://bbs.kanxue.com/user-home-669610.htm
*本文由看雪论坛 singhost 原创,转载请注明来自看雪社区


