一、图像处理
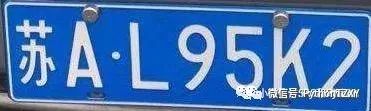
当汽车进入停车场地需要经过牌照识别,这图来源下载
1. 读取图像
这里主要使用openCV进行图像处理。
读取图像:
私信小编007即可获取数十套PDF以及大量的学习资料教程哦!
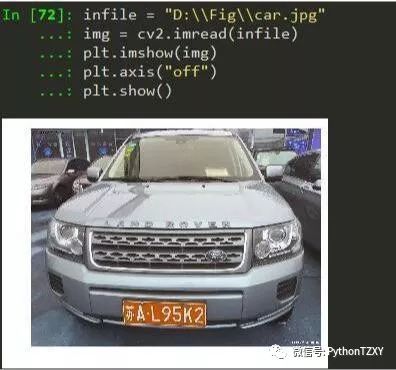
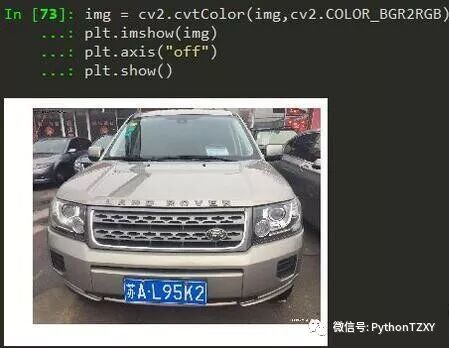
# opencv默认的imread是以BGR的方式进行存储的, 而matplotlib的imshow默认则是以RGB格式展示
2. 图像降噪

3. 边缘检测
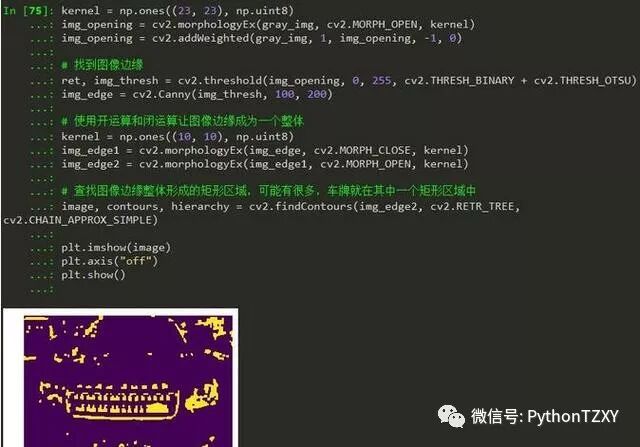
4.轮廓寻找
(这里主要用形态学矩形算法寻找,这里直接给出结果)
5.字符分割
这里字符分割主要用到聚类算法,比如光谱聚类,Python有专门的模块可以处理。
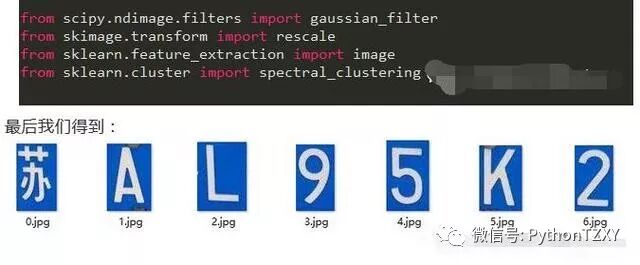
这里有七张图片,每张图片是汽车牌照的每一个字符。
二、深度学习
接下来我们开始训练深度学习模型,进行识别。
import os
from PIL import Image
import numpy as np
import matplotlib.pyplot as plt
plt.rcParams['font.sans-serif'] = ['SimHei']
import tensorflow as tf
from tensorflow import keras
from sklearn.model_selection import train_test_split
###############################################################################
# 汽车图片
rootpath = 'D:\car_img\charSamples\'
try:
os.makedirs('D:\car_img\img\')
except FileExistsError:
pass
# 文件目录列表
file_list1 = []
for root, dirs, files in os.walk(rootpath):
for file in files:
if os.path.splitext(file)[1] == ".png":
file_list1.append(os.path.join(root, file))
len(file_list1)
#批量改变图片像素, 并重命名图片名称为1-1700
num = 0
for filename in file_list1:
im = Image.open(filename)
new_im =im.resize((12, 12))
new_im.save('D:/car_img/img/{}.png'.format(str(num).zfill(4)))
num += 1
rootpath2 = 'D:\car_img\img\'
file_list2 = []
for root, dirs, files in os.walk(rootpath2):
for file in files:
if os.path.splitext(file)[1] == ".png":
file_list2.append(os.path.join(root, file))
M = []
for filename in file_list2:
im = Image.open(filename)
width,height = im.size
im_L = im.convert("L")
Core = im_L.getdata()
arr1 = np.array(Core,dtype='float32') / 255.0
list_img = arr1.tolist()
M.extend(list_img)
X = np.array(M).reshape(len(file_list2),width,height)
X.shape
# 这里训练的数据主要是数字和字母,由于没有各省简称的图片,这里就没训练了。
class_names = ['0', '1', '2', '3', '4', '5', '6', '7', '8', '9', 'A', 'B', 'C',
'D', 'E' ,'F', 'G', 'H', 'J', 'K', 'L', 'M', 'N', 'P', 'Q', 'R',
'S', 'T', 'U', 'V', 'W', 'X', 'Y', 'Z']
class_names[30]
#用字典储存图像信息
index = list(range(34))
dict_label = dict(zip(index, class_names))
#用列表输入标签
label = index*50
label.sort()
len(label)
y = np.array(label)
#按照4:1的比例将数据划分训练集和测试集
train_images, test_images, train_labels, test_labels = train_test_split(
X, y, test_size=0.2, random_state=0)
###############################################################################
plt.figure()
plt.imshow(train_images[2])
plt.colorbar()
plt.grid(False)
###############################################################################
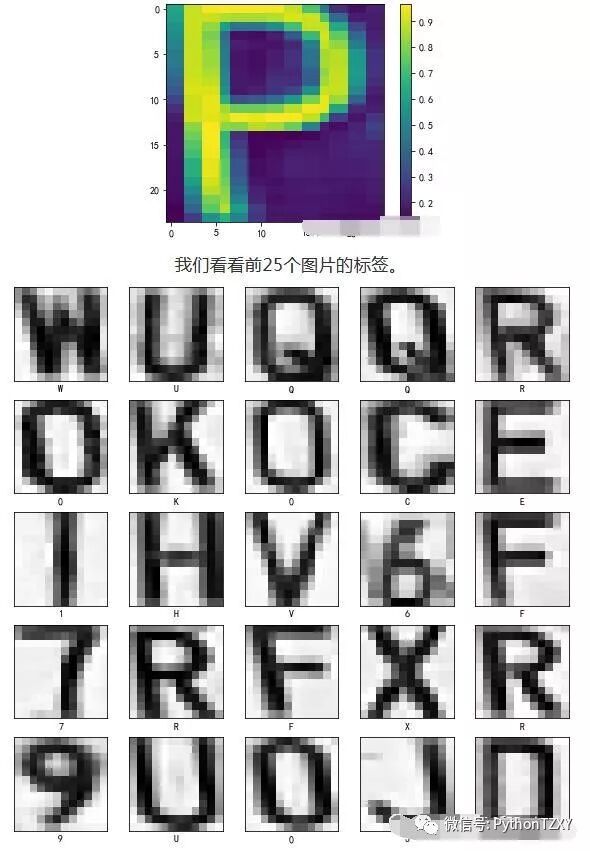
#显示来自训练集的前25个图像,并在每个图像下面显示类名。
#验证数据的格式是否正确,准备构建神经网络
plt.figure(figsize=(10,10))
for i in range(25):
plt.subplot(5,5,i+1)
plt.xticks([])
plt.yticks([])
plt.grid(False)
plt.imshow(train_images[i], cmap=plt.cm.binary)
plt.xlabel(class_names[train_labels[i]])
训练模型:
###############################################################################
#第一个输入层有12个节点(或神经元)。
#第二个(也是最后一个)层是34个节点(类别)的softmax层————返回一个2个概率分数的数组,其和为1。
#每个节点包含一个分数,表示当前图像属于两个类别的概率
model = keras.Sequential([
keras.layers.Flatten(input_shape=(12, 12)),
keras.layers.Dense(2**10, activation=tf.nn.relu),
keras.layers.Dense(len(class_names), activation=tf.nn.softmax)
])
###############################################################################
# 模型拟合
model.compile(optimizer=tf.train.AdamOptimizer(),
loss='sparse_categorical_crossentropy',
metrics=['accuracy'])
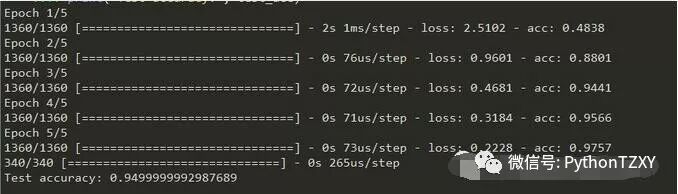
model.fit(train_images, train_labels, epochs=5)
test_loss, test_acc = model.evaluate(test_images, test_labels)
print('Test accuracy:', test_acc)
###############################################################################
# prediction
predictions = model.predict(test_images)
predictions[0]
np.argmax(predictions[0])
dict_label[np.argmax(predictions[0])]
###############################################################################
# 定义画图函数
def plot_image(i, predictions_array, true_label, img):
 predictions_array, true_label, img = predictions_array[i], true_label[i], img[i]
 plt.grid(False)
 plt.xticks([])
 plt.yticks([])

 plt.imshow(img, cmap=plt.cm.binary)
 predicted_label = np.argmax(predictions_array)
 if predicted_label == true_label:
 color = '#00bc57'
 else:
 color = 'red'

 plt.xlabel("{} {:2.0f}% ({})".format(class_names[predicted_label],
 100*np.max(predictions_array),
 class_names[true_label]),
 color=color)
###############################################################################
def plot_value_array(i, predictions_array, true_label):
 predictions_array, true_label = predictions_array[i], true_label[i]
 plt.grid(False)
 plt.xticks([])
 plt.yticks([])
 thisplot = plt.bar(range(len(class_names)), predictions_array,
 color="#FF7F0E", width=0.5)
 plt.ylim([0, 1])
 predicted_label = np.argmax(predictions_array)

 thisplot[predicted_label].set_color('red')
 thisplot[true_label].set_color('#00bc57')
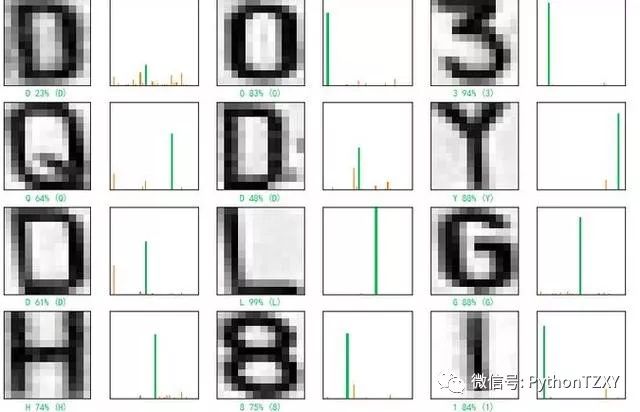
我们看看测试第一张图片,预测准确,并且预测为‘D’的概率最大23%
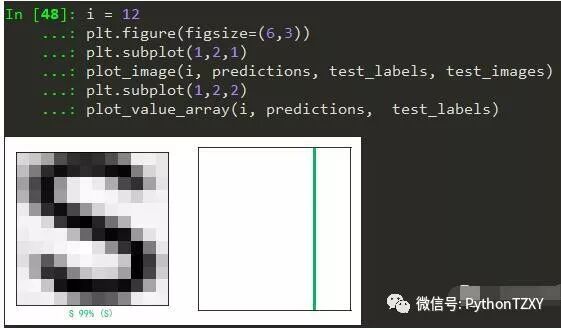
我们再看看测试第12张图片,预测准确,并且预测为‘S’的概率为99%。
我们再看看预测的15张图片,识别都准确。
#绘制预测标签和真实标签以及预测概率柱状图
#正确的预测用绿色表示,错误的预测用红色表示
num_rows = 5
num_cols = 3
num_images = num_rows*num_cols
plt.figure(figsize=(2*2*num_cols, 2*num_rows))
for i in range(num_images):
 plt.subplot(num_rows, 2*num_cols, 2*i+1)
 plot_image(i, predictions, test_labels, test_images)
 plt.subplot(num_rows, 2*num_cols, 2*i+2)
 plot_value_array(i, predictions, test_labels)
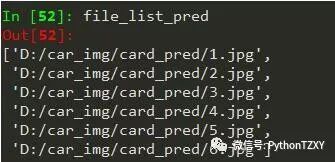
导入外部图像
#从外部获取未知图像
filedir = 'D:/car_img/card/'
file_list_pred = []
for root, dirs, files in os.walk(filedir):
for file in files:
if os.path.splitext(file)[1] == ".jpg":
file_list_pred.append(os.path.join(root, file))
#批量改变未知图片像素
num = 0
for filename in file_list_pred:
im = Image.open(filename)
new_im =im.resize((12, 12))
new_im.save('D:/car_img/card_pred/{}.jpg'.format(num))
num += 1
# 获取未知图片列表
filedir = 'D:/car_img/card_pred/'
file_list_pred = []
for root, dirs, files in os.walk(filedir):
for file in files:
if os.path.splitext(file)[1] == ".jpg":
file_list_pred.append(os.path.join(root, file))
file_list_pred.pop(0)
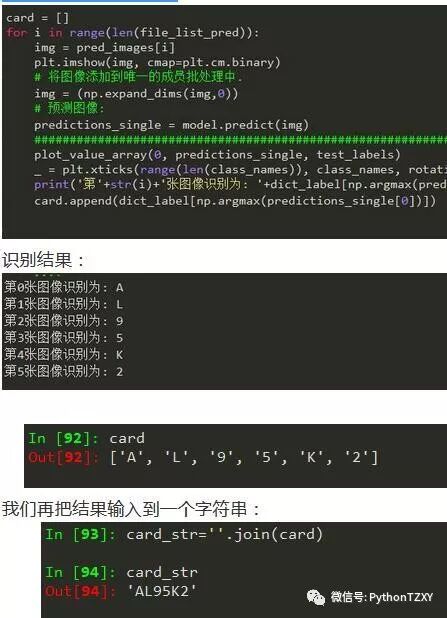
这里由于没有收集到各省的简称图像数据,没有进行训练,机器也没有学习,所以这次只是别字母和数字。机器就像人一样,将字母和数字的数据给他学习,他就会判断识
# 对于多个图像
N = []
for filename in file_list_pred:
 im = Image.open(filename)
 width,height = im.size
 im_L = im.convert("L")
 Core = im_L.getdata()
 arr1 = np.array(Core,dtype='float')/255.0
 arr1.shape
 list_img = arr1.tolist()
 N.extend(list_img)
pred_images = np.array(N).reshape(len(file_list_pred),width,height)
# prediction
predictions = model.predict(pred_images)
card = []
for i in range(len(file_list_pred)):
 img = pred_images[i]
 plt.imshow(img, cmap=plt.cm.binary)
 # 将图像添加到唯一的成员批处理中.
 img = (np.expand_dims(img,0))
 # 预测图像:
 predictions_single = model.predict(img)
 ###############################################################################
 plot_value_array(0, predictions_single, test_labels)
 _ = plt.xticks(range(len(class_names)), class_names, rotation=45)
 print('第'+str(i)+'张图像识别为: '+dict_label[np.argmax(predictions_single[0])])
 card.append(dict_label[np.argmax(predictions_single[0])])
card_str=', '.join(card)
进行最后的图像识别:
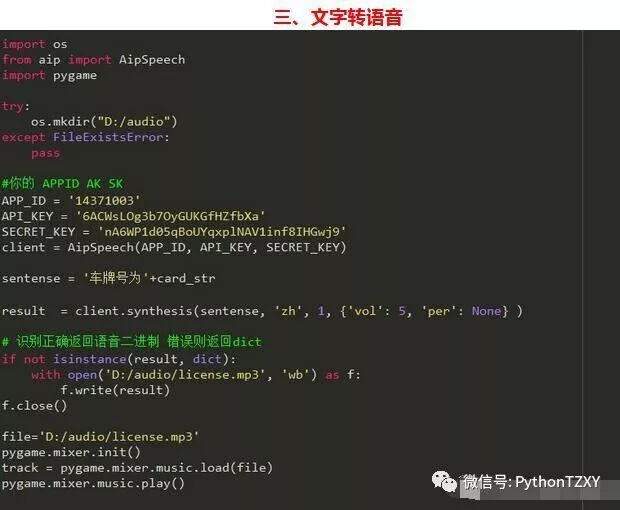
我们将识别的文字结果转换为语音播报出来:
至此,由由openCV的图形处理,Python的深度学习模型,和借助百度API文字转语音,来完成整个汽车牌照识别已经基本完成。让人来识别这几个字母和数字可能很简单,那是因为我们从小就在学习数字和字母,机器也一样,只要给他大量的数据进行训练,他就会识别这些图片文字。背后运用的算法主要是些分类算法,聚类算法,还有一些统计学方法。当我们给机器训练的数据量越小,识别的误差越大。因此,为了有效更准确的的识别图片文字,我们需要有大量的数据作为训练集,还有要比较好的算法。人对于真实世界的视觉和认识,正如计算机对真实世界的视觉和算法。人看图片是各种颜色和形态,计算机看图片是RGB数字和几何。人对图像的识别靠后天学习和经验,计算机对图像的识别靠机器学习和算法。


