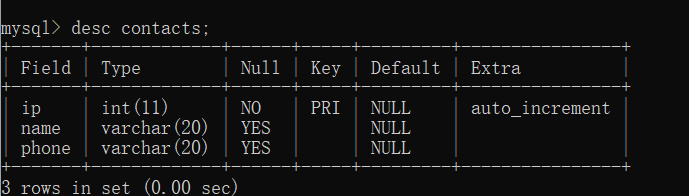
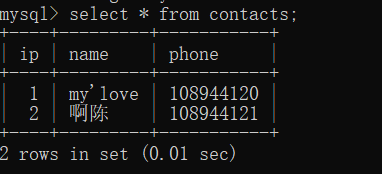
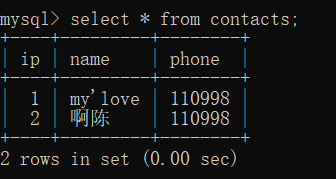
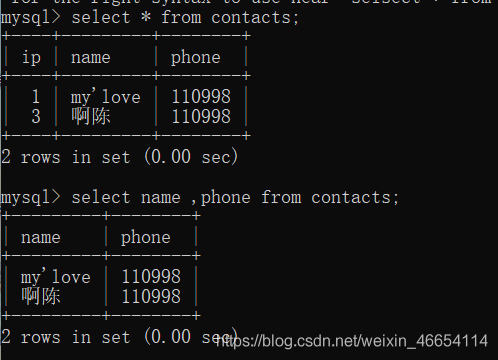
mysql>select * from contacts;
mysql>select name ,phone from contacts;
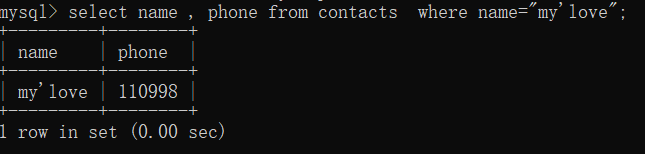
mysql>select name , phone from contacts where name="my'love";
1
2
3
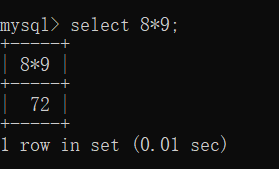
也可以当成计算器使用
4.2 where条件查询
create table employee(id int not null auto_increment primary key,
name varchar(30) comment '姓名',
sex varchar(1) comment '性别',
salary int comment '薪资(元)');
insert into employee(name, sex, salary) values('张三', '男', 5500);
insert into employee(name, sex, salary) values('李洁', '女', 4500);
insert into employee(name, sex, salary) values('李小梅', '女', 4200);
insert into employee(name, sex, salary) values('欧阳辉', '男', 7500);
insert into employee(name, sex, salary) values('李芳', '女', 8500);
insert into employee(name, sex, salary) values('张江', '男', 6800);
insert into employee(name, sex, salary) values('李四', '男', 12000);
insert into employee(name, sex, salary) values('王五', '男', 3500);
insert into employee(name, sex, salary) values('马小龙', '男', 6000);
insert into employee(name, sex, salary) values('龙五', '男', 8000);
insert into employee(name, sex, salary) values('冯小芳', '女', 10000);
insert into employee(name, sex, salary) values('马小花', '女', 4000);
1
2
3
4
5
6
7
8
9
10
11
12
13
14
15
16
17
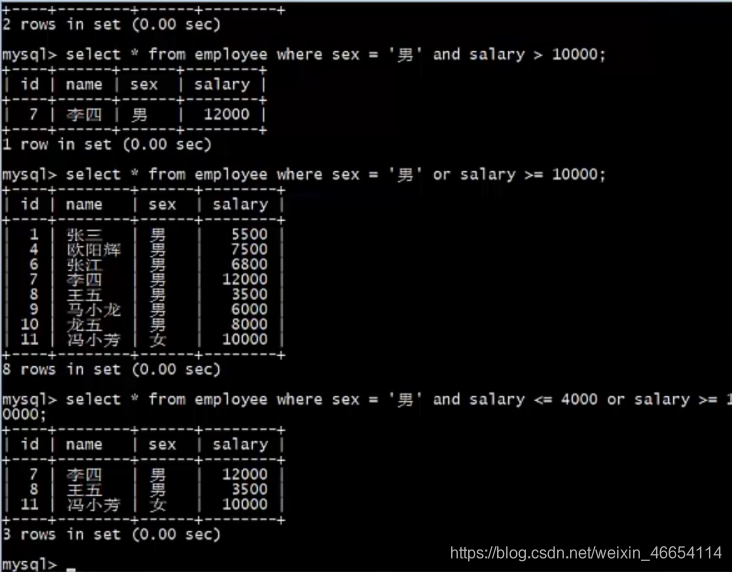
select * from employee where sex ='男' and salary >= 10000;select * from employee where sex ='男' or salary >= 10000;select * from employee where sex ='男' and salary <= 4000 or salary >=10000;
1
2
3
4
5
4.2.1 in的用法
select * from employee where id=1 or id=2 or id=3;select * from employee where id in(1,2,3,4);
1
2
4.2.2 like用法
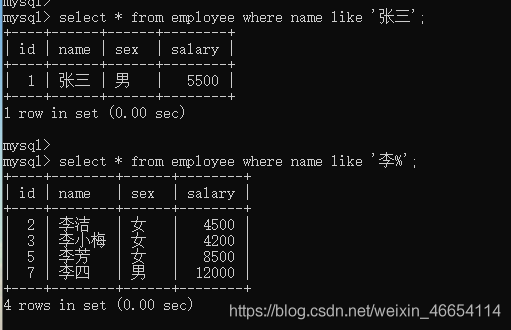
select * from employee where name like '张三';select * from employee where name like '李%';
1
2
3
4.3 函数
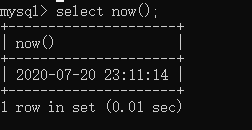
mysql>select now();
1
4.3.1 聚合函数
mysql>select count(*) from employee;
mysql>select count(*) from employee where sex ='男';
mysql>select count(*) from employee where sex ='女';
mysql>select sum(salary) from employee;
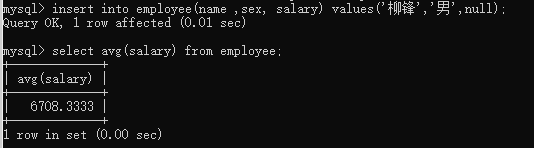
mysql>select avg(salary) from employee;
mysql>select max(salary) from employee;
mysql>select min(salary) from employee;
1
2
3
4
5
6
7
为什么会忽略空值,十三个员工平均值不变,会跳过这个员工
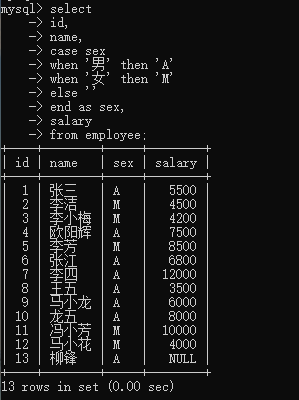
4.3.2 case when判断条件语句
select
id,
name,
case sex
when '男'then'A'
when '女'then'M'else''
end as sex,
salary
from employee;
1
2
3
4
5
6
7
8
9
10
11
4.4 查询结果排序与分页
按某数值排序,从高到低,从大到小等等
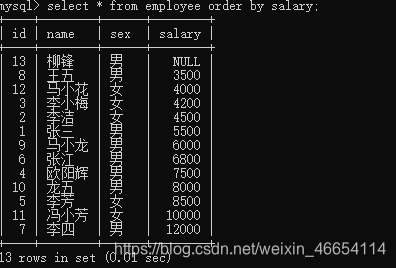
4.4.1 order by 排序
实例:
薪资排序:salary,降序后面加desc
mysql>select * from employee order by salary;
1
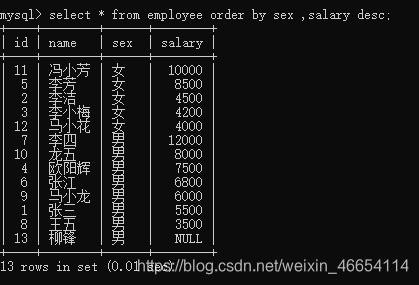
按照sex性别排序后薪资salary排序
select * from employee order by sex ,salary desc;
1
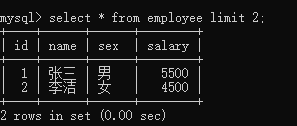
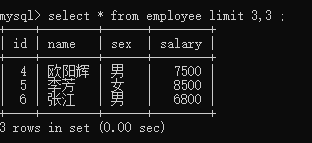
4.4.2 limit 分页查询
获取记录:
mysql>select * from employee limit 2;
1
分页:
mysql>select * from employee limit 3,3 ;
1
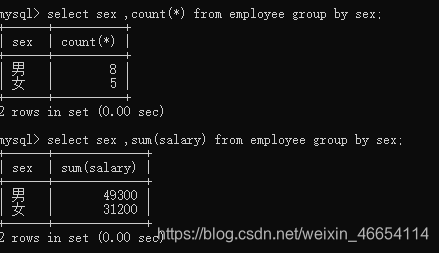
4.5 数据的分组和筛选
4.5.1 group by——分组
4.5 数据的分组和筛选
4.5.1 group by——分组
select sex ,count(*) from employee group by sex;select sex ,sum(salary) from employee group by sex;
1
2
3
4.5.2 having——筛选各组数据
having小于等于五的用法
mysql>select sex , count(*) from employee group by sex having count(*)<=5;
1
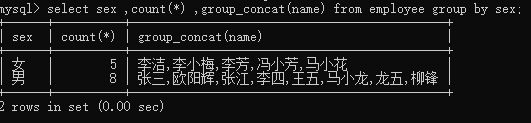
4.5.3 group_concat——显示统计数量列表
mysql>select sex ,count(*) ,group_concat(name) from
employee group by sex;
1
2
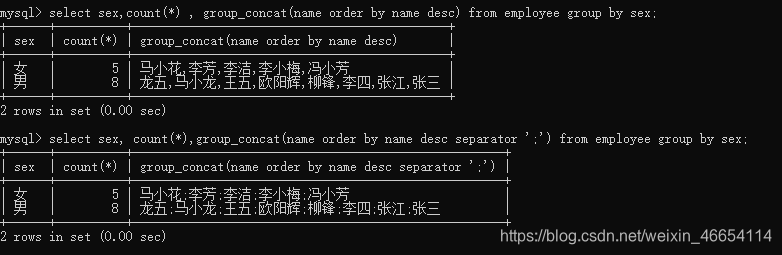
select sex,count(*) , group_concat(name order by name desc) from employee group by sex;select sex, count(*),group_concat(name order by name desc separator ';') from employee group by sex;
1
2
3
4
4.6 去除重复数据——distinct
数据表
create table footprint(id int not null auto_increment primary key,
username varchar(30) comment '用户名',
city varchar(30) comment '城市',
visit_date varchar(10) comment '到访日期');
insert into footprint(username, city, visit_date) values('liufeng', '贵阳', '2019-12-05');
insert into footprint(username, city, visit_date) values('liufeng', '贵阳', '2020-01-15');
insert into footprint(username, city, visit_date) values('liufeng', '北京', '2018-10-10');
insert into footprint(username, city, visit_date) values('zhangsan', '上海', '2020-01-01');
insert into footprint(username, city, visit_date) values('zhangsan', '上海', '2020-02-02');
insert into footprint(username, city, visit_date) values('lisi', '拉萨', '2016-12-20');
1
2
3
4
5
6
7
8
9
10
11
12
13
14
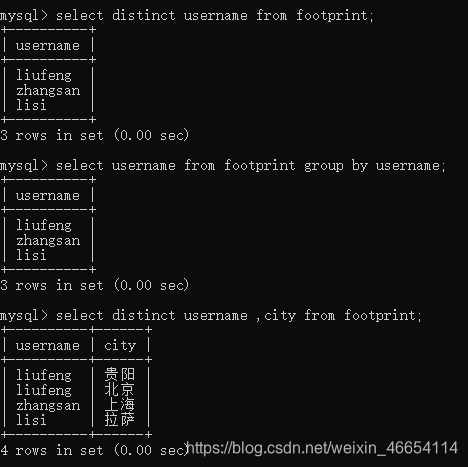
//看用户distinct
mysql>select distinct username from footprint;
//group by也可以去重,不过它做的是分组统计的,distinct只做去重
mysql>select username from footprint group by username;
//每一个用户去过的城市
mysql>select distinct username ,city from footprint;
1
2
3
4
5
6
4.7 表连接(内连接、外连接、自连接)
多张表,表连接
主要学习内连接和左连接
drop table if exists score;//数据表
drop table if exists student;//学生表
create table student(
stu_no varchar(20) not null primary key comment '学号',
name varchar(30) comment '姓名',
address varchar(150) comment '地址');
insert into student(stu_no, name, address) values('2016001', '张三', '贵州贵阳');
insert into student(stu_no, name, address) values('2016002', '李芳', '陕西兴平');
insert into student(stu_no, name, address) values('2016003', '张晓燕', '江西南昌');
create table score(id int not null auto_increment primary key,
course varchar(50) comment '科目',
stu_no varchar(20) comment '学号',
score int comment '分数',
foreign key(stu_no) references student(stu_no));
insert into score(course, stu_no, score) values('计算机', '2016001', 99);
insert into score(course, stu_no, score) values('离散数学', '2016001', 85);
insert into score(course, stu_no, score) values('计算机', '2016002', 78);
1
2
3
4
5
6
7
8
9
10
11
12
13
14
15
16
17
18
19
20
21
22
23
24
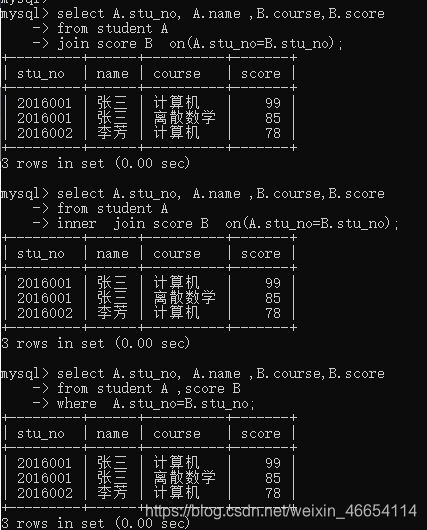
4.7.1 内连接
//内连接 joinselect A.stu_no, A.name ,B.course,B.score
from student A join score B on(A.stu_no=B.stu_no);
// inner joinselect A.stu_no, A.name ,B.course,B.score
from student A inner join score B on(A.stu_no=B.stu_no);
// where
select A.stu_no, A.name ,B.course,B.score
from student A ,score B where A.stu_no=B.stu_no;
1
2
3
4
5
6
7
8
9
10
11
12
4.7.2 左连接
//左连接
select A.stu_no, A.name ,B.course,B.score
from student A
left  join score B  on(A.stu_no=B.stu_no);

// 交叉连接:没有按照学号进行关联(没啥用)
select A.stu_no, A.name ,B.course,B.score
from student A ,score B;
1
2
3
4
5
6
7
8
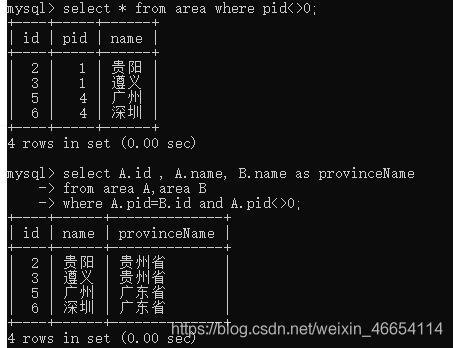
4.7.3 自连接
自连接:有层次结构的表
drop table if exists area;
drop table if exists area;
create table area(id int not null auto_increment primary key comment '区域id',
pid int not null comment '父id(0-省份)',
name varchar(30) comment '区域名称');
insert into area(id, pid, name) values(1, 0, '贵州省');
insert into area(id, pid, name) values(2, 1, '贵阳');
insert into area(id, pid, name) values(3, 1, '遵义');
insert into area(id, pid, name) values(4, 0, '广东省');
insert into area(id, pid, name) values(5, 4, '广州');
insert into area(id, pid, name) values(6, 4, '深圳');
1
2
3
4
5
6
7
8
9
10
11
12
13
14
15
// 父类不等于0的子类
mysql>select * from area where pid<>0;
// 父类和子类的连接
mysql>select A.id , A.name, B.name as provinceName
-> from area A,area B
-> where A.pid=B.id and A.pid<>0;
1
2
3
4
5
6
7
8
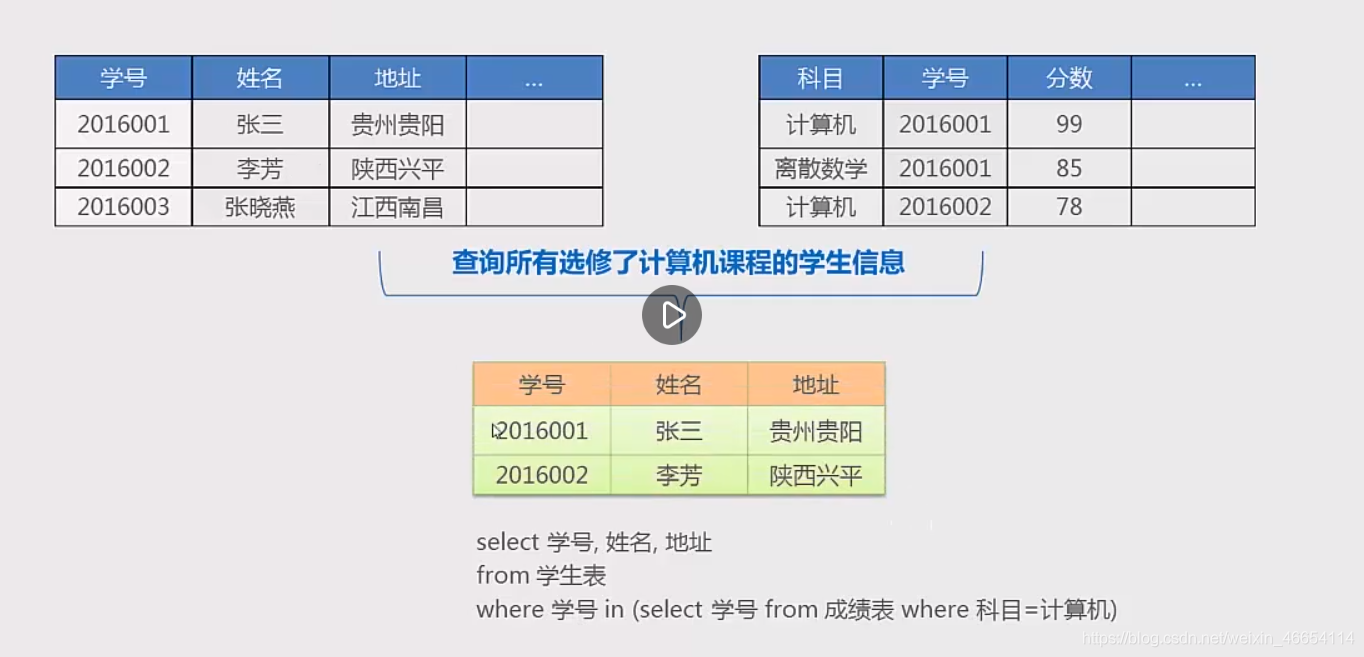
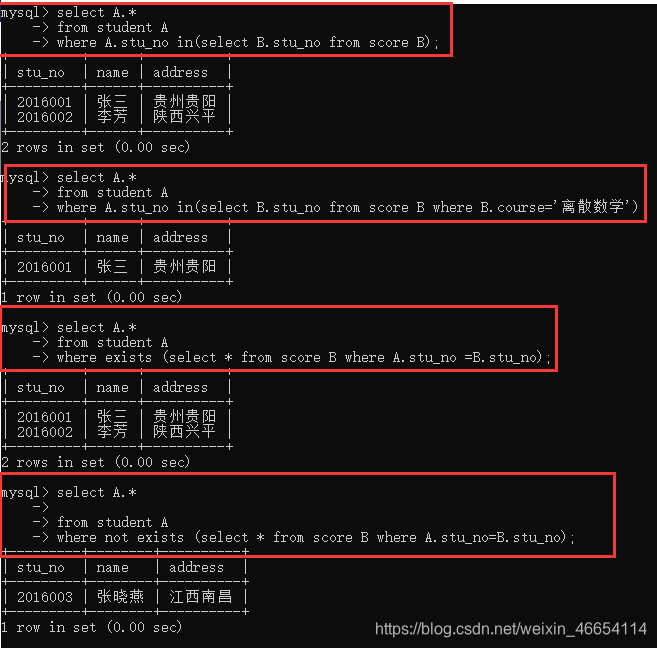
4.8 子查询EXISTS和IN的使用
子查询 in ,exists场景不一样好处不一样
以下用的数据表是上面创建的学生表和数据表
查询所有选修课程的学生
select A.*
from student A
where A.stu_no in(select B.stu_no from score B);

查询选修了离散数学的学生
select A.*
from student A
where A.stu_no in(select B.stu_no from score B where B.course='离散数学');

查询所有选修了课程的学生
select A.*
from student A
where exists (select * from score B where A.stu_no =B.stu_no);

查询所有未选修课程的学生
select A.*
from student A
where not exists (select * from score B where A.stu_no=B.stu_no);
1
2
3
4
5
6
7
8
9
10
11
12
13
14
15
16
17
18
19
20
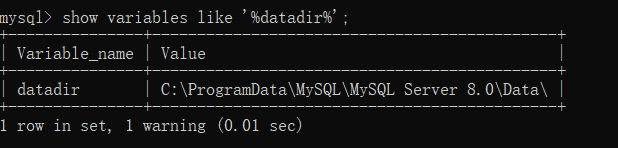
小知识
查看数据目录
列:
mysql> show variables like '%datadir%';
1
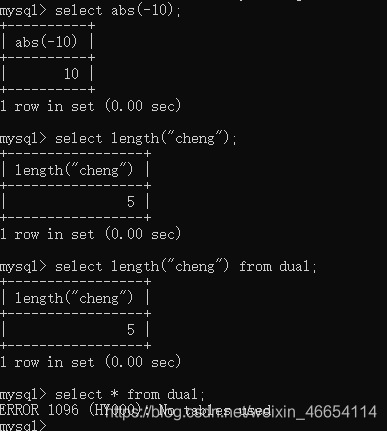
//select abs(-10);绝对值
select abs(-10);
//求字符串长度
select length("cheng");select length("cheng") from dual;select * from dual;