点击上方“编程派”,选择设为“设为星标”
优质文章,第一时间送达!

在本教程的这里,我将向您展示如何在Django REST框架中使用Swagger API。Swagger API为REST API端点提供了结构良好的文档,因此新手可以说如何在不了解其内部实现的情况下测试REST API。
本质上,Swagger做的是简单但非常强大的事情:通过添加一些附加注释,它会生成REST API描述,例如HTTP方法,路径/查询/表单参数,响应,HTTP错误代码等),甚至提供了一个简单的Web UI来对您的API的REST调用。
Swagger规范是描述RESTful API的强大定义格式,它创建RESTful接口,通过有效地映射与之关联的所有资源和操作来轻松开发和使用API。它易于学习,与语言无关,并且可以人工和机器可读。
先决条件
Python 3.8.5,Django 3.0.8,REST框架(pip install djangorestframework),Swagger(pip install django-rest-swagger)
假定您已经在系统上安装并配置了Python。
下一个任务是安装Django。首选方法是使用命令pip install Django进行安装。您可以阅读有关Django安装的更多详细信息。
我们将使用MySQL数据库服务器作为存储数据的持久系统,因此您需要阅读教程,了解如何使用django设置MySQL以执行SQL语句。
另外,您需要使用命令pip install django-rest-swagger安装Swagger模块。
我建议您先阅读Django MySQL REST CRUD API示例教程,然后再继续学习。因为此示例恰好遵循该教程。在此示例中,除了REST API CRUD示例之外,我还添加了Swagger API。
在本示例中,我将不展示项目的每个部分,因为我将与现有项目一起工作,但是我将介绍重要的更改。您以后总是可以从本教程底部的链接从我的Github帐户下载完整的项目。
项目设置
我们需要做的第一件事是创建项目目录。项目名称为djangomysqlrestcrudswagger,我们将使用以下命令创建该项目。
"code-snippet_outer">django-admin startproject djangomysqlrestcrudswagger
下一步是在项目内部创建一个应用程序以执行CRUD操作。使用以下命令创建一个名为restcrudswagger的应用程序。
"code-snippet_outer">django-admin startapp restcrudswagger
现在,我们需要将此restcrudswagger应用程序添加到项目中。因此,编辑文件djangomysqlrestcrudswagger / djangomysqlrestcrudswagger / settings.py并将以下行添加到INSTALLED_APPS部分:
"code-snippet_outer">"code-snippet__attribute">INSTALLED_APPS = ["code-snippet_outer"> ..."code-snippet_outer"> "code-snippet__string">'rest_framework_swagger',"code-snippet_outer"> "code-snippet__string">'restcrudswagger.apps.RestcrudswaggerConfig',"code-snippet_outer">]
上一行是使用文件djangomysqlrestcrudswagger / restcrudswagger / apps.py构成的。您将在此文件中看到名为=’restcrudswagger’的RestcrudswaggerConfig类。
您需要将以下行添加到上述文件(settings.py)中,否则您将看到错误“ /’AutoSchema’对象的AttributeError没有属性’get_link’”。
"code-snippet_outer">"code-snippet__attr">REST_FRAMEWORK = { "code-snippet__string"
>'DEFAULT_SCHEMA_CLASS': "code-snippet__string">'rest_framework.schemas.coreapi.AutoSchema' }
URLS
接下来,我将更改URL方案以添加用于REST文档的Swagger API。将以下代码写入文件
djangomysqlrestcrudswagger /
djangomysqlrestcrudswagger / urls.py中。
"code-snippet_outer">"code-snippet__keyword">from rest_framework_swagger.views "code-snippet__keyword">import get_swagger_view"code-snippet_outer">"code-snippet_outer">schema_view = get_swagger_view(title="code-snippet__string">'User API')"code-snippet_outer">"code-snippet_outer">urlpatterns = ["code-snippet_outer"> url("code-snippet__string">'^$', schema_view)"code-snippet_outer">]
带有源代码的整个文件如下:
"code-snippet_outer">"code-snippet__keyword">from django.urls "code-snippet__keyword">import include, path"code-snippet_outer">"code-snippet__keyword">from rest_framework "code-snippet__keyword">import routers"code-snippet_outer">"code-snippet__keyword">from restcrudswagger "code-snippet__keyword">import views"code-snippet_outer">"code-snippet__keyword">from django.conf.urls "code-snippet__keyword">import url"code-snippet_outer">"code-snippet__keyword">from rest_framework_swagger.views "code-snippet__keyword">import get_swagger_view"code-snippet_outer">"code-snippet_outer">router = routers.DefaultRouter()"code-snippet_outer">router.register("code-snippet__string">r'users', views.UserViewSet)"code-snippet_outer">"code-snippet_outer">schema_view = get_swagger_view(title="code-snippet__string">'User API')"code-snippet_outer">"code-snippet_outer">urlpatterns = ["code-snippet_outer"> url("code-snippet__string">'^$', schema_view),"code-snippet_outer"> url("code-snippet__string">r'^', include(router.urls))"code-snippet_outer">]
Swagger UI Template
接下来,您需要创建Swagger模板文件,该文件将在您访问URL时呈现。
以下内容被写入djangomysqlrestcrudswagger / restcrudswagger / templates / rest_framework_swagger / index.html。
"code-snippet_outer">"code-snippet__meta">html>"code-snippet_outer">"code-snippet__tag"><"code-snippet__name">html>"code-snippet_outer"> "code-snippet__tag"><"code-snippet__name">head>"code-snippet_outer"> "code-snippet__tag"><"code-snippet__name">title>Swagger"code-snippet__tag">"code-snippet__name">title>"code-snippet_outer"> "code-snippet__tag"><"code-snippet__name">meta "code-snippet__attr"
>charset="code-snippet__string">"utf-8"/>"code-snippet_outer"> "code-snippet__tag"><"code-snippet__name">meta "code-snippet__attr">name="code-snippet__string">"viewport" "code-snippet__attr">content="code-snippet__string">"width=device-width, initial-scale=1">"code-snippet_outer"> "code-snippet__tag"><"code-snippet__name">link "code-snippet__attr">rel="code-snippet__string">"stylesheet" "code-snippet__attr">type="code-snippet__string">"text/css" "code-snippet__attr">href="code-snippet__string">"//unpkg.com/swagger-ui-dist@3/swagger-ui.css" />"code-snippet_outer"> "code-snippet__tag">"code-snippet__name">head>"code-snippet_outer"> "code-snippet__tag"><"code-snippet__name">body>"code-snippet_outer"> "code-snippet__tag"><"code-snippet__name">div "code-snippet__attr">id="code-snippet__string">"swagger-ui">"code-snippet__tag">"code-snippet__name">div>"code-snippet_outer"> "code-snippet__tag"><"code-snippet__name">script "code-snippet__attr">src="code-snippet__string">"//unpkg.com/swagger-ui-dist@3/swagger-ui-bundle.js">"code-snippet__tag">"code-snippet__name">script>"code-snippet_outer"> "code-snippet__tag"><"code-snippet__name">script>"code-snippet_outer"> "code-snippet__keyword">const ui = SwaggerUIBundle({"code-snippet_outer"> "code-snippet__attr">url: "code-snippet__string">"{% url schema_url %}","code-snippet_outer"> "code-snippet__attr">dom_id: "code-snippet__string">'#swagger-ui',"code-snippet_outer"> "code-snippet__attr">presets: ["code-snippet_outer"> SwaggerUIBundle.presets.apis,"code-snippet_outer"> SwaggerUIBundle.SwaggerUIStandalonePreset"code-snippet_outer"> ],"code-snippet_outer"> "code-snippet__attr">layout: "code-snippet__string">"BaseLayout""code-snippet_outer"> })"code-snippet_outer">"code-snippet__tag">"code-snippet__name">script>"code-snippet_outer"> "code-snippet__tag">"code-snippet__name">body>"code-snippet_outer">"code-snippet__tag">"code-snippet__name">html>
已知问题
如果在访问URL http:// localhost:8000时看到以下错误,则可以编辑路径中提到的以下文件,如下图所示:
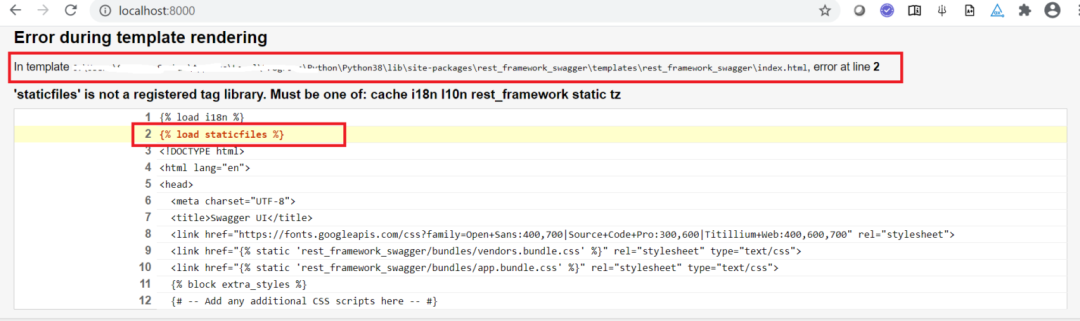
Replace the line {% load staticfiles %} by {% load static %} at line 2.
部署应用
现在,我准备测试构建的API。让我们使用manage.py runserver从命令行启动服务器。该应用程序将在默认端口8000上运行。如果要更改服务器的默认主机/端口,则可以在此处阅读教程。
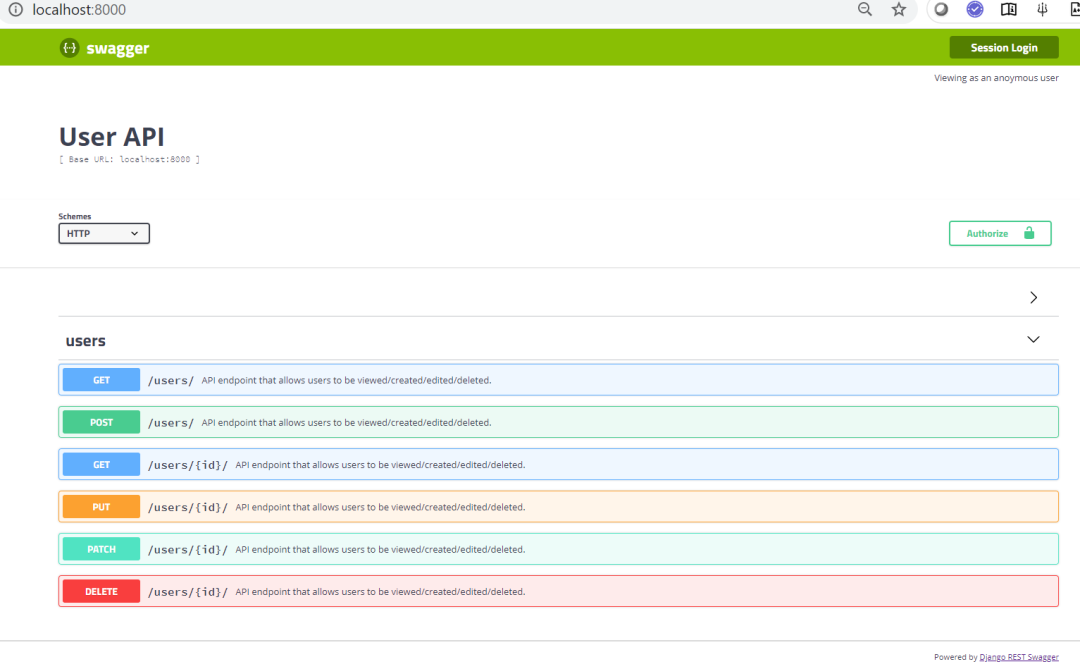
测试应用
现在,如果您正确地遵循了教程,那么在访问URL http:// localhost:8000时,您将在浏览器上看到以下屏幕:
来源:https://www.roytuts.com/how-to-use-swagger-with-python-based-django-rest-apis/
回复下方「关键词」,获取优质资源
回复关键词「 pybook03」,立即获取主页君与小伙伴一起翻译的《Think Python 2e》电子版
回复关键词「入门资料」,立即获取主页君整理的 10 本 Python 入门书的电子版
回复关键词「m」,立即获取Python精选优质文章合集
回复关键词「book 数字」,将数字替换成 0 及以上数字,有惊喜好礼哦~
推荐阅读
题图:pexels,CC0 授权。