pytest是python的单元测试框架,简单易用,在很多知名项目中应用。requests是python知名的http爬虫库,同样简单易用,是python开源项目的TOP10。关于这2个项目,之前都有过介绍,本文主要介绍requests项目如何使用pytest进行单元测试,希望达到下面3个目标:熟练pytest的使用
学习如何对项目进行单元测试
深入requests的一些实现细节
本文分如下几个部分:
requests项目单元测试状况
简单工具类如何测试
request-api如何测试
底层API测试
# requests项目单元测试状况
requests的单元测试代码全部在 tests 目录,使用 pytest.ini 进行配置。测试除pytest外,还需要安装:
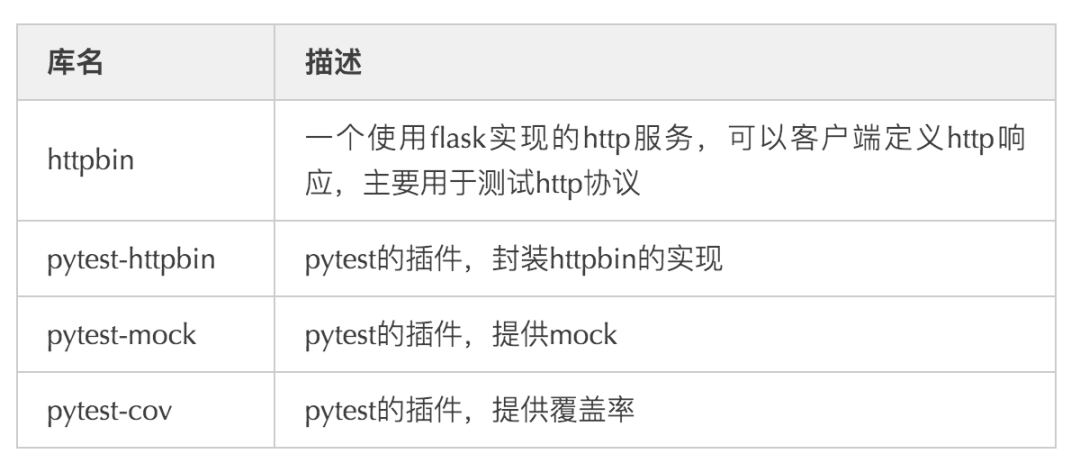
上述依赖 master 版本在requirement-dev文件中定义;2.24.0版本会在pipenv中定义。
测试用例使用make命令,子命令在Makefile中定义, 使用make ci运行所有单元测试结果如下:
$ make ci
pytest tests --junitxml=report.xml
======================================================================================================= test session starts =======================================================================================================
platform linux -- Python 3.6.8, pytest-3.10.1, py-1.10.0, pluggy-0.13.1
rootdir: /home/work6/project/requests, inifile: pytest.ini
plugins: mock-2.0.0, httpbin-1.0.0, cov-2.9.0
collected 552 items
tests/test_help.py ... [ 0%]
tests/test_hooks.py ... [ 1%]
tests/test_lowlevel.py ............... [ 3%]
tests/test_packages.py ... [
4%]
tests/test_requests.py .................................................................................................................................................................................................... [ 39%]
127.0.0.1 - - [10/Aug/2021 08:41:53] "GET /stream/4 HTTP/1.1" 200 756
.127.0.0.1 - - [10/Aug/2021 08:41:53] "GET /stream/4 HTTP/1.1" 500 59
----------------------------------------
Exception happened during processing of request from ('127.0.0.1', 46048)
Traceback (most recent call last):
File "/usr/lib64/python3.6/wsgiref/handlers.py", line 138, in run
self.finish_response()
x......................................................................................... [ 56%]
tests/test_structures.py .................... [ 59%]
tests/test_testserver.py ......s.... [ 61%]
tests/test_utils.py ..s................................................................................................................................................................................................ssss [ 98%]
ssssss..... [100%]
----------------------------------------------------------------------------------- generated xml file: /home/work6/project/requests/report.xml -----------------------------------------------------------------------------------
======================================================================================= 539 passed, 12 skipped, 1 xfailed in 64.16 seconds ========================================================================================
可以看到requests在1分钟内,总共通过了539个测试用例,效果还是不错。使用 make coverage 查看单元测试覆盖率:
$ make coverage
----------- coverage: platform linux, python 3.6.8-final-0 -----------
Name Stmts Miss Cover
-------------------------------------------------
requests/__init__.py 71 71 0%
requests/__version__.py 10 10 0%
requests/_internal_utils.py 16 5 69%
requests/adapters.py 222 67 70%
requests/api.py 20 13 35%
requests/auth.py 174 54 69%
requests/certs.py 4 4 0%
requests/compat.py 47 47 0%
requests/cookies.py 238 115 52%
requests/exceptions.py 35 29 17%
requests/help.py 63 19 70%
requests/hooks.py 15 4 73%
requests/models.py 455 119 74%
requests/packages.py 16 16 0%
requests/sessions.py 283 67 76%
requests/status_codes.py 15 15 0%
requests/structures.py 40 19 52%
requests/utils.py 465 170 63%
-------------------------------------------------
TOTAL 2189 844 61%
Coverage XML written to file coverage.xml
结果显示requests项目总体覆盖率61%,每个模块的覆盖率也清晰可见。
单元测试覆盖率使用代码行数进行判断,Stmts显示模块的有效行数,Miss显示未执行到的行。如果生成html的报告,还可以定位到具体未覆盖到的行;pycharm的coverage也有类似功能。
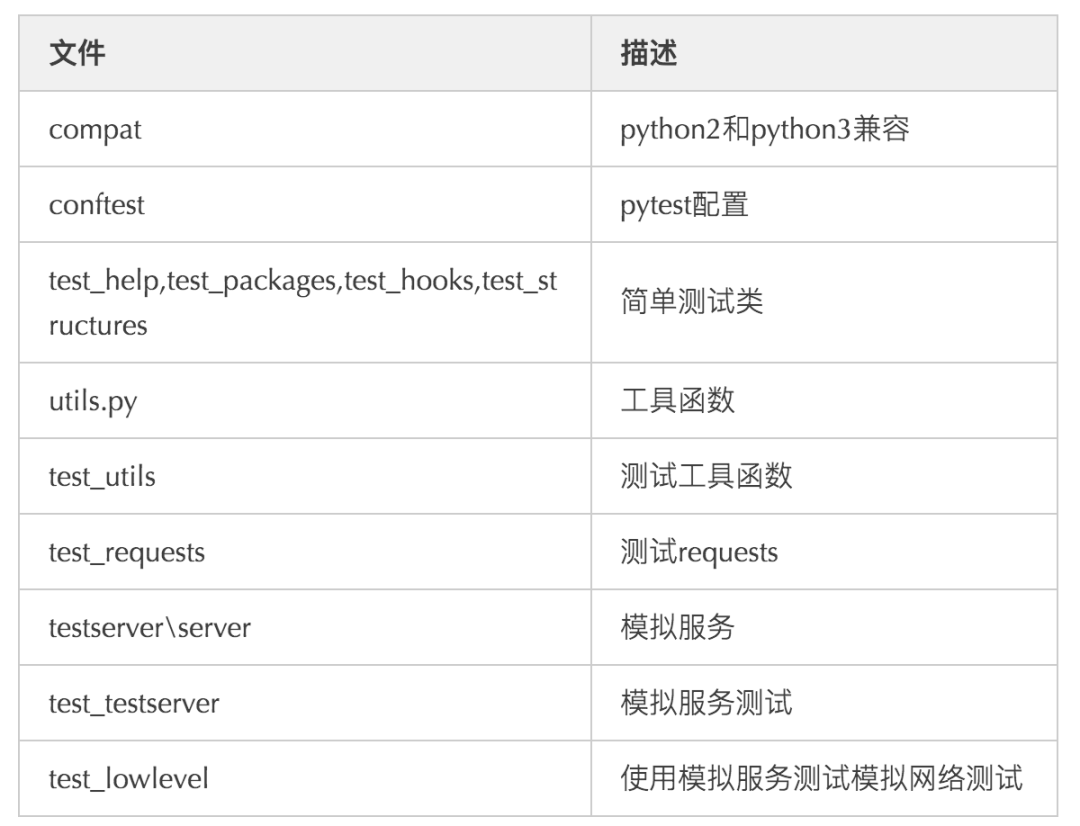
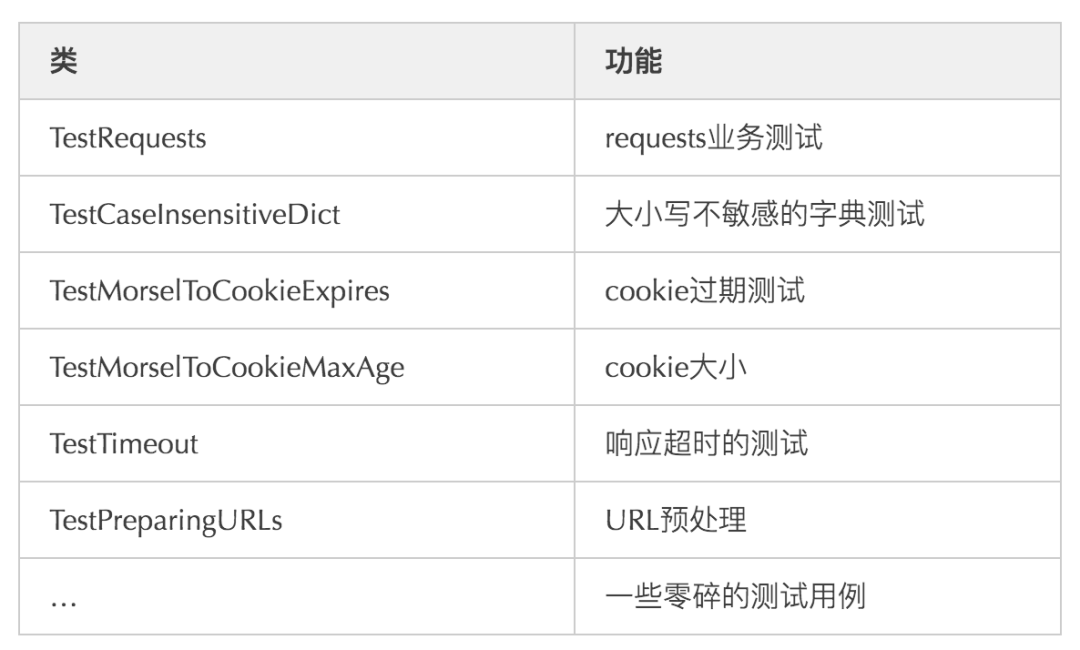
tests下的文件及测试类如下表:
# 简单工具类如何测试
test_help 实现分析
先从最简单的test_help上手,测试类和被测试对象命名是对应的。先看看被测试的模块help.py。这个模块主要是2个函数 info 和 _implementation:
import idna
def _implementation():
...
def
info():
...
system_ssl = ssl.OPENSSL_VERSION_NUMBER
system_ssl_info = {
'version': '%x' % system_ssl if system_ssl is not None else ''
}
idna_info = {
'version': getattr(idna, '__version__', ''),
}
...
return {
'platform': platform_info,
'implementation': implementation_info,
'system_ssl': system_ssl_info,
'using_pyopenssl': pyopenssl is not None,
'pyOpenSSL': pyopenssl_info,
'urllib3': urllib3_info,
'chardet': chardet_info,
'cryptography': cryptography_info,
'idna': idna_info,
'requests': {
'version': requests_version,
},
}
info提供系统环境的信息,_implementation是其内部实现,以下划线 `_开头。再看测试类test_help:
from requests.help import info
def test_system_ssl():
"""Verify we're actually setting system_ssl when it should be available."""
assert info()['system_ssl']['version'] != ''
class VersionedPackage(object):
def __init__(self, version):
self.__version__ = version
def test_idna_without_version_attribute(mocker):
"""Older versions of IDNA don't provide a __version__ attribute, verify
that if we have such a package, we don't blow up.
"""
mocker.patch('requests.help.idna', new=None)
assert info()['idna'] == {'version': ''}
def test_idna_with_version_attribute(mocker):
"""Verify we're actually setting idna version when it should be available."""
mocker.patch('requests.help.idna', new=VersionedPackage('2.6'))
assert info()['idna'] == {'version': '2.6'}
首先从头部的导入信息可以看到,仅仅对info函数进行测试,这个容易理解。info测试通过,自然覆盖到_implementation这个内部函数。这里可以得到单元测试的第 1个技巧: 仅对public的接口进行测试
test_idna_without_version_attribute和test_idna_with_version_attribute均有一个mocker参数,这是pytest-mock提供的功能,会自动注入一个mock实现。使用这个mock对idna模块进行模拟
# 模拟空实现
mocker.patch('requests.help.idna', new=None)
# 模拟版本2.6
mocker.patch('requests.help.idna', new=VersionedPackage('2.6'))
可能大家会比较奇怪,这里patch模拟的是 requests.help.idna , 而我们在help中导入的是 inda 模块。这是因为在requests.packages中对inda进行了模块名重定向:
for package in ('urllib3', 'idna', 'chardet'):
locals()[package] = __import__(package)
# This traversal is apparently necessary such that the identities are
# preserved (requests.packages.urllib3.* is urllib3.*)
for mod in list(sys.modules):
if mod == package or mod.startswith(package
+ '.'):
sys.modules['requests.packages.' + mod] = sys.modules[mod]
使用mocker后,idna的version信息就可以进行控制,这样info中的idna结果也就可以预期。那么可以得到第2个技巧: 使用mock辅助单元测试
test_hooks 实现分析
我们继续查看hooks如何进行测试:
from requests import hooks

def hook(value):
    return value[1:]

@pytest.mark.parametrize(
    'hooks_list, result', (
        (hook, 'ata'),
        ([hook, lambda x: None, hook], 'ta'),
    )
)
def test_hooks(hooks_list, result):
    assert hooks.dispatch_hook('response', {'response': hooks_list}, 'Data') == result

def test_default_hooks():
    assert hooks.default_hooks() == {'response': []}
hooks模块的2个接口default_hooks和dispatch_hook都进行了测试。其中default_hooks是纯函数,无参数有返回值,这种函数最容易测试,仅仅检查返回值是否符合预期即可。dispatch_hook会复杂一些,还涉及对回调函数(hook函数)的调用:
def dispatch_hook(key, hooks, hook_data, **kwargs):
"""Dispatches a hook dictionary on a given piece of data."""
hooks = hooks or {}
hooks = hooks.get(key)
if hooks:
# 判断钩子函数
if hasattr(hooks, '__call__'):
hooks = [hooks]
for hook in hooks:
_hook_data = hook(hook_data, **kwargs)
if _hook_data is not
None:
hook_data = _hook_data
return hook_data
pytest.mark.parametrize提供了2组参数进行测试。第一组参数hook和ata很简单,hook是一个函数,会对参数裁剪,去掉首位,ata是期望的返回值。test_hooks的response的参数是Data,所以结果应该是ata。第二组参数中的第一个参数会复杂一些,变成了一个数组,首位还是hook函数,中间使用一个匿名函数,匿名函数没有返回值,这样覆盖到 if _hook_data is not None: 的旁路分支。执行过程如下:
hook函数裁剪Data首位,剩余ata
匿名函数不对结果修改,剩余ata
hook函数继续裁剪ata首位,剩余ta
经过测试可以发现dispatch_hook的设计十分巧妙,使用pipeline模式,将所有的钩子串起来,这是和事件机制不一样的地方。细心的话,我们可以发现 if hooks: 并未进行旁路测试,这个不够严谨,有违我们的第3个技巧: 测试尽可能覆盖目标函数的所有分支
test_structures 实现分析
LookupDict的测试用例如下:
class TestLookupDict:

    @pytest.fixture(autouse=True)
    def setup(self):
        """LookupDict instance with "bad_gateway" attribute."""
        self.lookup_dict = LookupDict('test')
        self.lookup_dict.bad_gateway = 502

    def test_repr(self):
        assert repr(self.lookup_dict) == ""

    get_item_parameters = pytest.mark.parametrize(
        'key, value', (
            ('bad_gateway', 502),
            ('not_a_key', None)
        )
    )

    @get_item_parameters
    def test_getitem(self, key, value):
        assert self.lookup_dict[key] == value

    @get_item_parameters
    def test_get(self, key, value):
        assert self.lookup_dict.get(key) == value
可以发现使用setup方法配合@pytest.fixture,给所有测试用例初始化了一个lookup_dict对象;同时pytest.mark.parametrize可以在不同的测试用例之间复用的,我们可以得到第4个技巧: 使用pytest.fixture复用被测试对象,使用pytest.mark.parametriz复用测试参数
通过TestLookupDict的test_getitem和test_get可以更直观的了解LookupDict的get和__getitem__方法的作用:
class LookupDict(dict):
    ...
    def __getitem__(self, key):
        # We allow fall-through here, so values default to None
        return self.__dict__.get(key, None)

    def get(self, key, default=None):
        return self.__dict__.get(key, default)
CaseInsensitiveDict的测试用例在test_structures和test_requests中都有测试,前者主要是基础测试,后者偏向业务使用层面,我们可以看到这两种差异:
class TestCaseInsensitiveDict:
# 类测试
def test_repr(self):
assert repr(self.case_insensitive_dict) == "{'Accept': 'application/json'}"
def test_copy(self):
copy = self.case_insensitive_dict.copy()
assert copy is not self.case_insensitive_dict
assert copy == self.case_insensitive_dict
class TestCaseInsensitiveDict:
# 使用方法测试
def test_delitem(self):
cid = CaseInsensitiveDict()
cid['Spam'] = 'someval'
del cid['sPam']
assert 'spam' not in cid
assert len(cid) == 0
def test_contains(self):
cid = CaseInsensitiveDict()
cid['Spam'] = 'someval'
assert 'Spam' in cid
assert 'spam' in cid
assert 'SPAM' in cid
assert 'sPam' in cid
assert 'notspam' not in cid
借鉴上面的测试方法,不难得出第5个技巧: 可以从不同的层面对同一个对象进行单元测试
后面的test_lowlevel和test_requests也应用了这种技巧
utils.py
utils中构建了一个可以写入env的生成器(由yield关键字提供),可以当上下文装饰器使用:
import contextlib
import os
@contextlib.contextmanager
def override_environ(**kwargs):
save_env = dict(os.environ)
for key, value in kwargs.items():
if value is None:
del os.environ[key]
else:
os.environ[key] = value
try:
yield
finally:
os.environ.clear()
os.environ.update(save_env)
下面是使用方法示例:
# test_requests.py

kwargs = {
    var: proxy
}
# 模拟控制proxy环境变量
with override_environ(**kwargs):
    proxies = session.rebuild_proxies(prep, {})

def rebuild_proxies(self, prepared_request, proxies):
    bypass_proxy = should_bypass_proxies(url, no_proxy=no_proxy)

def should_bypass_proxies(url, no_proxy):
    ...
    get_proxy = lambda k: os.environ.get(k) or os.environ.get(k.upper())
    ...
因此第 6 个技巧:涉及环境变量的地方,可以使用上下文装饰器进行模拟多种环境变量
utils测试用例
utils的测试用例较多,我们选择部分进行分析。先看to_key_val_list函数:
# 对象转列表
def to_key_val_list(value):
    if value is None:
        return None

    if isinstance(value, (str, bytes, bool, int)):
        raise ValueError('cannot encode objects that are not 2-tuples')

    if isinstance(value, Mapping):
        value = value.items()

    return list(value)
对应的测试用例TestToKeyValList:
class TestToKeyValList:
@pytest.mark.parametrize(
'value, expected', (
([('key', 'val'
)], [('key', 'val')]),
((('key', 'val'), ), [('key', 'val')]),
({'key': 'val'}, [('key', 'val')]),
(None, None)
))
def test_valid(self, value, expected):
assert to_key_val_list(value) == expected
def test_invalid(self):
with pytest.raises(ValueError):
to_key_val_list('string')
重点是test_invalid中使用pytest.raise对异常的处理: 使用pytest.raises对异常进行捕获处理
TestSuperLen介绍了几种进行IO模拟测试的方法:
class TestSuperLen:
@pytest.mark.parametrize(
'stream, value', (
(StringIO.StringIO, 'Test'),
(BytesIO, b'Test'),
pytest.param(cStringIO, 'Test',
marks=pytest.mark.skipif('cStringIO is None')),
))
def test_io_streams(self, stream, value):
"""Ensures that we properly deal with different kinds of IO streams."""
assert super_len(stream()) == 0
assert super_len(stream(value)) == 4
def test_super_len_correctly_calculates_len_of_partially_read_file(self):
"""Ensure that we handle partially consumed file like objects."""
s = StringIO.StringIO()
s.write('foobarbogus')
assert super_len(s) == 0
@pytest.mark.parametrize(
'mode, warnings_num', (
('r', 1),
('rb', 0),
))
def test_file(self, tmpdir, mode, warnings_num, recwarn):
file_obj = tmpdir.join('test.txt')
file_obj.write('Test')
with file_obj.open(mode) as fd:
assert super_len(fd) == 4
assert len(recwarn) == warnings_num
def test_super_len_with_tell(self):
foo = StringIO.StringIO('12345')
assert super_len(foo) == 5
foo.read(2)
assert super_len(foo) == 3
def test_super_len_with_fileno(self):
with open(__file__, 'rb') as f:
length = super_len(f)
file_data = f.read()
assert length == len(file_data)
使用StringIO来模拟IO操作,可以配置各种IO的测试。当然也可以使用BytesIO/cStringIO, 不过单元测试用例一般不关注性能,StringIO简单够用。
pytest提供tmpdir的fixture,可以进行文件读写操作测试
可以使用file__来进行文件的只读测试,__file表示当前文件,不会产生副作用。
得出第 8 个技巧:使用IO模拟配合进行单元测试
# request-api如何测试
requests的测试需要httpbin和pytest-httpbin,前者会启动一个本地服务,后者会安装一个pytest插件,测试用例中可以得到httpbin的fixture,用来操作这个服务的URL。
坦率的讲:这个测试用例内容庞大,达到2500行。看起来是针对各种业务的零散case,我并没有完全理顺其组织逻辑。我选择一些感兴趣的业务进行介绍, 先看TimeOut的测试:
TARPIT = 'http://10.255.255.1'
class TestTimeout:
def test_stream_timeout(self, httpbin):
try:
requests.get(httpbin('delay/10'), timeout=2.0)
except
requests.exceptions.Timeout as e:
assert 'Read timed out' in e.args[0].args[0]
@pytest.mark.parametrize(
'timeout', (
(0.1, None),
Urllib3Timeout(connect=0.1, read=None)
))
def test_connect_timeout(self, timeout):
try:
requests.get(TARPIT, timeout=timeout)
pytest.fail('The connect() request should time out.')
except ConnectTimeout as e:
assert isinstance(e, ConnectionError)
assert isinstance(e, Timeout)
test_stream_timeout利用httpbin创建了一个延迟10s响应的接口,然后请求本身设置成2s,这样可以收到一个本地timeout的错误。test_connect_timeout则是访问一个不存在的服务,捕获连接超时的错误。
TestRequests都是对requests的业务进程测试,可以看到至少是2种:
class TestRequests:

    def test_basic_building(self):
        req = requests.Request()
        req.url = 'http://kennethreitz.org/'
        req.data = {'life': '42'}

        pr = req.prepare()
        assert pr.url == req.url
        assert pr.body == 'life=42'

    def test_path_is_not_double_encoded(self):
        request = requests.Request('GET', "http://0.0.0.0/get/test case").prepare()

        assert request.path_url == '/get/test%20case

    ...

    def test_HTTP_200_OK_GET_ALTERNATIVE(self, httpbin):
        r = requests.Request('GET', httpbin('get'))
        s = requests.Session()
        s.proxies = getproxies()

        r = s.send(r.prepare())

        assert r.status_code == 200

    ef test_set_cookie_on_301(self, httpbin):
        s = requests.session()
        url = httpbin('cookies/set?foo=bar')
        s.get(url)
        assert s.cookies['foo'] == 'bar'
# 底层API测试
testserver构建一个简单的基于线程的tcp服务,这个tcp服务具有__enter__和__exit__方法,还可以当一个上下文环境使用。
class TestTestServer:

    def test_basic(self):
        """messages are sent and received properly"""
        question = b"success?"
        answer = b"yeah, success"

        def handler(sock):
            text = sock.recv(1000)
            assert text == question
            sock.sendall(answer)

        with Server(handler) as (host, port):
            sock = socket.socket()
            sock.connect((host, port))
            sock.sendall(question)
            text = sock.recv(1000)
            assert text == answer
            sock.close()

    def test_text_response(self):
        """the text_response_server sends the given text"""
        server = Server.text_response_server(
            "HTTP/1.1 200 OK\r\n" +
            "Content-Length: 6\r\n" +
            "\r\nroflol"
        )

        with server as (host, port):
            r = requests.get('http://{}:{}'.format(host, port))

            assert r.status_code == 200
            assert r.text == u'roflol'
            assert r.headers['Content-Length'] == '6'
test_basic方法对Server进行基础校验,确保收发双方可以正确的发送和接收数据。先是客户端的sock发送question,然后服务端在handler中判断收到的数据是question,确认后返回answer,最后客户端再确认可以正确收到answer响应。test_text_response方法则不完整的测试了http协议。按照http协议的规范发送了http请求,Server.text_response_server会回显请求。下面是模拟浏览器的锚点定位不会经过网络传输的testcase:
def test_fragment_not_sent_with_request():
"""Verify that the fragment portion of a URI isn't sent to the server."""
def response_handler(sock):
req = consume_socket_content(sock, timeout=0.5)
sock.send(
b'HTTP/1.1 200 OK\r\n'
b'Content-Length: '+bytes(len(req))+b'\r\n'
b'\r\n'+req
)
close_server = threading.Event()
server = Server(response_handler, wait_to_close_event=close_server)
with server as (host, port):
url = 'http://{}:{}/path/to/thing/#view=edit&token=hunter2'.format(host, port)
r = requests.get(url)
raw_request = r.content
assert r.status_code == 200
headers, body = raw_request.split(b'\r\n\r\n', 1)
status_line, headers = headers.split(b'\r\n', 1)
assert status_line == b'GET /path/to/thing/ HTTP/1.1'
for frag in (b'view', b'edit', b'token', b'hunter2'):
assert frag not in headers
assert frag not in body
close_server.set()
可以看到请求的path是 /path/to/thing/#view=edit&token=hunter2,其中 # 后面的部分是本地锚点,不应该进行网络传输。上面测试用例中,对接收到的响应进行判断,鉴别响应头和响应body中不包含这些关键字。
结合requests的两个层面的测试,我们可以得出第9个技巧: 构造模拟服务配合测试
# 小结
简单小结一下,从requests的单元测试实践中,可以得到下面9个技巧:
仅对public的接口进行测试
使用mock辅助单元测试
测试尽可能覆盖目标函数的所有分支
使用pytest.fixture复用被测试对象,使用pytest.mark.parametriz复用测试参数
可以从不同的层面对同一个对象进行单元测试
涉及环境变量的地方,可以使用上下文装饰器进行模拟多种环境变量
使用pytest.raises对异常进行捕获处理
使用IO模拟配合进行单元测试
构造模拟服务配合测试
# 参考链接


