以后我会在公众号分享一些关于算法的应用(美颜相关的),工作之后,发现更重要的能力如何理解业务并将算法应用其中创造价值,以及如何落地 。
今天要分享的是人像分割相关的内容,如果你喜欢的话,欢迎三连哦
主要内容
人像分割的相关应用非常广,例如基于人像分割可以实现背景的替换做出各种非常酷炫的效果。我们将训练数据扩充到人体分割,那么我们就是对人体做美颜特效处理,同时对背景做其他的特效处理,这样整张画面就会变得更加有趣,更加提高颜值了,这里我们对人体前景做美颜调色处理,对背景做了以下特效:
例子:
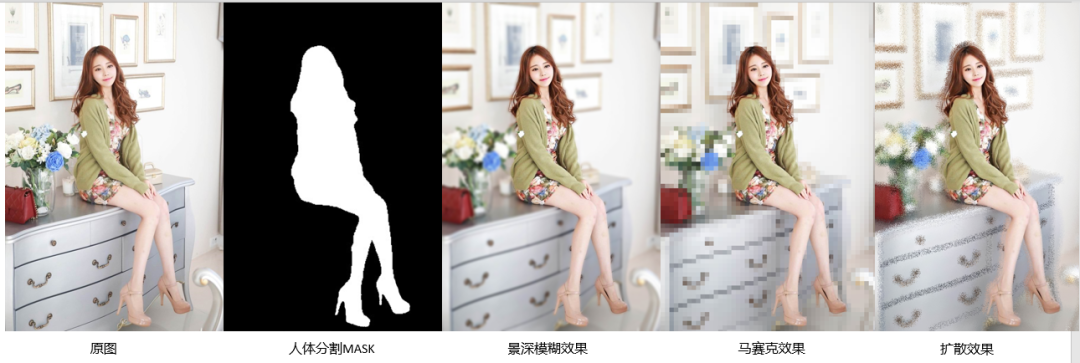

例子来源:https://blog.csdn.net/Trent1985/article/details/80578841
https://zhuanlan.zhihu.com/p/48080465 (实现背景灰化)
而在在实现这些效果之前,所需要的一步操作都是需要将人像抠出来。今天的主要内容是要介绍如何使用UNet实现人像分割。
UNet的结构非常简单,广泛应用于医学图像分割,2015年发表在 MICCAI,谷歌学术上目前引用量8894,可以看出来其影响力。
UNet的结构,有两个最大的特点,U型结构和skip-connection(如下图)。
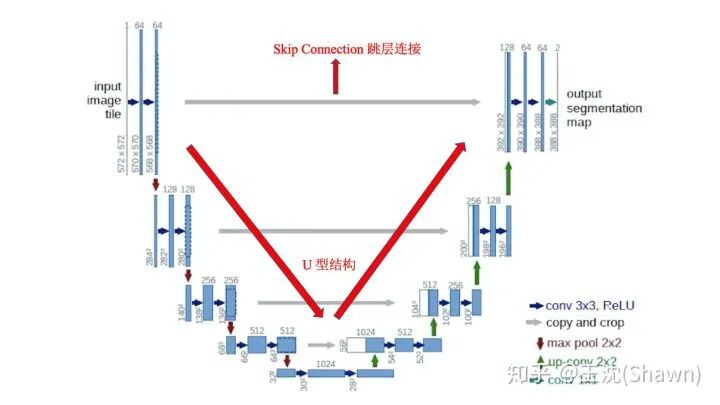
UNet网络,类型于一个U字母:首先进行Conv(两次)+Pooling下采样;然后Deconv反卷积进行上采样(部分采用resize+线性插值上采样),crop之前的低层feature map,进行融合;然后再次上采样。重复这个过程,直到获得输出388x388x2的feature map,最后经过softmax获得output segment map。总体来说与FCN思路非常类似。
U-Net采用了与FCN完全不同的特征融合方式:拼接!
参考资料:https://zhuanlan.zhihu.com/p/57437131
https://www.zhihu.com/question/269914775/answer/586501606
https://www.zhihu.com/people/george-zhang-84/posts
该项目是基于 https://github.com/milesial/Pytorch-UNet (2.6k star 车辆分割)修改的,并提供人像分割的数据集(1.15G)。
人像分割项目链接:https://github.com/leijue222/portrait-matting-unet-flask
官方下载链接:http://www.cse.cuhk.edu.hk/leojia/projects/automatting/index.html
或者:
百度网盘:http://pan.baidu.com/s/1dE14537
密码:ndg8
该项目已经提供了预训练模型,如果你不想重新训练,可以自己clone下来,按照下面的操作一步一步运行即可。
环境配置
Python 3.6
PyTorch >= 1.1.0
Torchvision >= 0.3.0
Flask 1.1.1
future 0.18.2
matplotlib 3.1.3
numpy 1.16.0
Pillow 6.2.0
protobuf 3.11.3
tensorboard 1.14.0
tqdm==4.42.1
git clone https://github.com/leijue222/portrait-matting-unet-flask.git
cd portrait-matting-unet-flask/
python predict.py -i image.jpg -o output.jpg
作者提供的测试demo
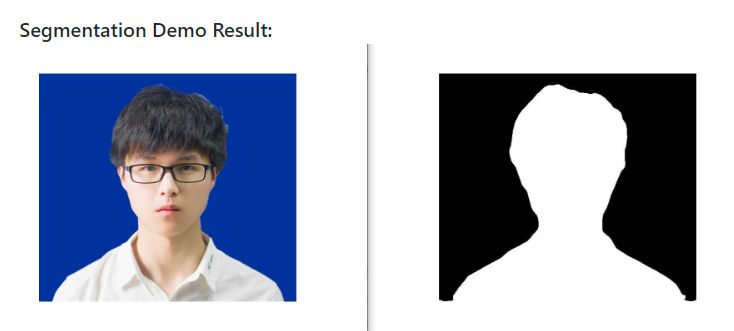
如果你想重新训练的话,也很容易,根据上面提供的数据集,将原图和mask分别
放置在 文件夹 data/imgs和 data/masks 路径下即可
然后运行下面的代码
python train.py -e 200 -b 1 -l 0.1 -s 0.5 -v 15.0
各个参数的含义
-e 表示 epoch 数
-b 表示 batch size
-l 表示学习率
-s 表示 scale
-v 表示 验证集所占的百分比
最后我们在看一下 UNet 网络的核心代码
定义UNet 需要用的主要模块
class DoubleConv(nn.Module): """(convolution => [BN] => ReLU) * 2""" def __init__(self, in_channels, out_channels): super().__init__() self.double_conv = nn.Sequential( nn.Conv2d(in_channels, out_channels, kernel_size=3, padding=1), nn.BatchNorm2d(out_channels), nn.ReLU(inplace=True), nn.Conv2d(out_channels, out_channels, kernel_size=3, padding=1), nn.BatchNorm2d(out_channels), nn.ReLU(inplace=True) ) def forward(self, x): return self.double_conv(x)
class Down(nn.Module): """Downscaling with maxpool then double conv"""
def __init__(self, in_channels, out_channels): super().__init__() self.maxpool_conv = nn.Sequential( nn.MaxPool2d(2), DoubleConv(in_channels, out_channels) ) def forward(self, x): return self.maxpool_conv(x)
class Up(nn.Module): """Upscaling then double conv""" def __init__(self, in_channels, out_channels, bilinear=True): super().__init__() if bilinear: self.up = nn.Upsample(scale_factor=2, mode='bilinear', align_corners=True) else: self.up = nn.ConvTranspose2d(in_channels // 2, in_channels // 2, kernel_size=2, stride=2)
self.conv = DoubleConv(in_channels, out_channels)
def forward(self, x1, x2): x1 = self.up(x1) diffY = torch.tensor([x2.size()[2] - x1.size()[2]]) diffX = torch.tensor([x2.size()[3] - x1.size()[3]])
x1 = F.pad(x1, [diffX // 2, diffX - diffX // 2, diffY // 2, diffY - diffY // 2]) x = torch.cat([x2, x1], dim=1) return self.conv(x)
class OutConv(nn.Module): def __init__(self, in_channels, out_channels): super(OutConv, self).__init__() self.conv = nn.Conv2d(in_channels, out_channels, kernel_size=1)
def forward(self, x): return self.conv(x)
利用上面定义好的模块,轻松的实现UNet网络
class UNet(nn.Module): def __init__(self, n_channels, n_classes, bilinear=True): super(UNet, self).__init__() self.n_channels = n_channels self.n_classes = n_classes self.bilinear = bilinear
self.inc = DoubleConv(n_channels, 64) self.down1 = Down(64, 128) self.down2 = Down(128, 256) self.down3 = Down(256, 512) self.down4 = Down(512, 512) self.up1 = Up(1024, 256, bilinear) self.up2 = Up(512, 128, bilinear) self.up3 = Up(256, 64, bilinear) self.up4 = Up(128, 64, bilinear) self
.outc = OutConv(64, n_classes)
def forward(self, x): x1 = self.inc(x) x2 = self.down1(x1) x3 = self.down2(x2) x4 = self.down3(x3) x5 = self.down4(x4) x = self.up1(x5, x4) x = self.up2(x, x3) x = self.up3(x, x2) x = self.up4(x, x1) logits = self.outc(x) return logits
人像分割项目链接:https://github.com/leijue222/portrait-matting-unet-flask
数据集下载
百度网盘:http://pan.baidu.com/s/1dE14537
密码:ndg8
官方下载链接:http://www.cse.cuhk.edu.hk/leojia/projects/automatting/index.html
UNet相关知识点参考资料:
https://zhuanlan.zhihu.com/p/57437131
https://www.zhihu.com/question/269914775/answer/586501606
https://www.zhihu.com/people/george-zhang-84/posts