MySQL基础知识—第四天
1. JDBC介绍
我们之前学习MYSQL时,为了使用MYSQL服务,我们通常要使用客户端与MYSQL服务进行连接,然后才能输入SQL语句进行数据库的各种操作。客户端有命令行与图形界面2种。
但是在更多的环境下,由我们人直接操作数据是很低效的,比如双11这种业务场景下,一秒中往往要在库中生成上千万甚至几亿条数据,靠人来手工操作是不现实的,只能依赖于程序进行这种高并发的操作。
程序语言有多种,比如Java、Python、C/C++等,程序语言如果想执行SQL语句,也必须要先与数据库进行连接,数据库也有多种,比如MySQL、Oracle、SQL Server等。
不同的程序语言去连接不同的数据库,如果没有一个统一的标准或者规范,肯定是相当混乱的。Java语言对此的解决方案就是JDBC。
JDBC定义了一套规范标准,它对应的是各种接口与抽象类(通常对应java.sql包下面的各种类与接口),具体实现交给各数据库厂商去完成, MySQL的有自己的实现类并打成jar包发布,供程序开发人员使用;Oracle也有自己的实现jar包。
我们开发人员在使用的时候,要根据连接数据库的不同,去对应的官网上下载对应数据库版本与程序语言的数据库驱动(Java语言对应的是一个jar包)。(比如我们使用MySQL 5.1,就要去MySQL官网下载Java语言对应的jar包)
JDBC : Java DataBase Connectivity (java数据库链接)
是让java链接数据库的API
API : Application Programming Intergace (应用程序接口)
就是函数库
所以
JDBC
就是提供java连接数据库的应用程序接口的,只是接口或者抽象类,而JDBC就是java中提供的一个规范,基本都是接口和抽象类作为父类,具体的实现,是数据库厂商去弄的,只不过这些厂商需要按照我的接口标准来实现
如果我们要想操作数据库,就需要把厂商开发的实现类,导入进来,然后在项目上
右键 -> Build Path -> Configure Build Path...,将之加入我们项目的CLASSPATH
2. JDBC使用步骤
第0步: 导包
第1步:注册驱动
第2步:建立连接(Connection)
第3步:创建运行SQL的语句(Statement)
第4步:运行语句
第5步:处理运行结果(ResultSet)
第6步:释放资源
其中 如果是添加,删除,更新操作,可以没有第5步,查询肯定会有第五步
导包

创建java项目
创建lib文件夹
把mysql-connector-java-5.1.38-bin.jar复制到lib中
右键 -> Build Path -> Add to Build Path

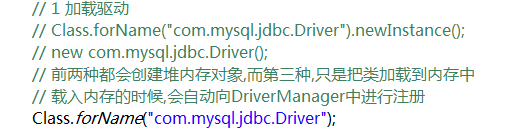
2.1 注冊驱动
创建java类 JDBC_01_Base_DQL
Class.forName(“com.mysql.jdbc.Driver”);
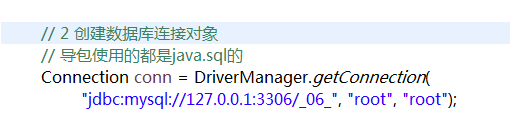
2.2 建立连接(Connection)
第一个参数是url :jdbc:mysql://IP:端口/数据库
第二个参数是数据库用户名
第三个参数是数据库密码
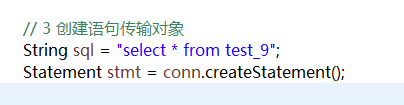
2.3 创建运行SQL的语句(Statement)
2.4 运行语句

2.5 处理运行结果(ResultSet)
while (rs.next()) {
System.out.print(rs.getInt("id") + " ");
System.out.print(rs.getInt(1) + " ");
System.out.print(rs.getString("id") + " ");
System.out.print(rs.getInt("name") +" ");
System.out.print(rs.getString("name") + " ");
System.out.print(rs.getString("course") + " ");
System.out.print(rs.getDouble("score")+" ");
System.out.println(rs.getString(3));
}
- 1
- 2
- 3
- 4
- 5
- 6
- 7
- 8
- 9
- 10
- 11
- 12
- 13
- 14
- 15
- 16
- 17
- 18
- 19
- 20
- 21
- 22
- 23
- 24
- 25
- 26
- 27
- 28
- 29
2.6 释放资源
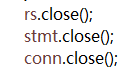
先打开的资源后关闭
3. 代码优化
上面程序中,有可能会导致释放资源出现问题
比如查询语句写错了等,这时候会抛出异常,那么关闭语句就不会执行
所以我们应该使用try…catch…finally来优化一下
以刚才的练习为例,对test_jdbc表的查询进行优化
Connection conn = null;
Statement stmt = null;
ResultSe rs = null ;
try {
Class.forName("com.mysql.jdbc.Driver");
conn =
DriverManager.getConnection(
"jdbc:mysql://127.0.0.1:3306/_06_", "root", "root");
String
sql = "select * from test_jdbc";
stmt = conn.createStatement();
rs = stmt.executeQuery(sql);
while (rs.next()) {
System.out.print(rs.getInt("id") + " ");
System.out.print(rs.getString("name") + " ");
System.out.println(rs.getDouble("money")+" ");
}
}
catch (Exception e) {
e.printStackTrace();
}finally{
try {
if (rs != null) {
rs.close();
}
if (stmt != null) {
stmt.close();
}
if (conn != null) {
conn.close();
}
}
catch (SQLException e) {
e.printStackTrace();
}
}
- 1
- 2
- 3
- 4
- 5
- 6
- 7
- 8
- 9
- 10
- 11
- 12
- 13
- 14
- 15
- 16
- 17
- 18
- 19
- 20
- 21
- 22
- 23
- 24
- 25
- 26
- 27
- 28
- 29
- 30
- 31
- 32
- 33
- 34
- 35
- 36
- 37
- 38
- 39
- 40
- 41
- 42
- 43
- 44
- 45
- 46
- 47
- 48
- 49
- 50
- 51
- 52
- 53
- 54
- 55
- 56
- 57
- 58
- 59
- 60
- 61
- 62
- 63
- 64
- 65
- 66
- 67
- 68
- 69
- 70
- 71
- 72
- 73
- 74
- 75
- 76
- 77
- 78
- 79
- 80
- 81
- 82
- 83
- 84
- 85
- 86
- 87
4. DML
Data Manipulation Language : 数据操作语言
涉及的关键字有 :
delete,update,insert
和查询的操作几乎一样,就是把第4步和第5步更改一下
Connection conn = null;
Statement stmt = null;
ResultSet rs = null;
try {
Class.forName("com.mysql.jdbc.Driver");
conn = DriverManager.getConnection(
"jdbc:mysql://127.0.0.1:3306/_06_", "root", "root");
stmt = conn.createStatement();
String
sql = "insert into test_jdbc
(id,name,money) values (4,'小小',999.9)";
test_jdbc set money=money+1000 where id=1 ";
// sql = "delete from
test_jdbc where id = 1";
// 如果是查询,就返回true,不是就返回false,价值不大,所以用的不多,添加,删除,更新都可以用这个方法
// stmt.execute(sql);
// 返回值是int,返回影响了几条数据(更改了几条/删除了几条/添加了几条),添加,删除,更新都可以用这个方法
int count = stmt.executeUpdate(sql);
System.out.println("影响了 " + count + " 条数据");
}
catch (Exception e) {
e.printStackTrace();
}
finally {
try {
if (rs != null) {
rs.close();
}
if (stmt != null) {
stmt.close();
}
if (conn != null) {
conn.close();
}
}
catch (Exception e2) {
e2.printStackTrace();
}
}
- 1
- 2
- 3
- 4
- 5
- 6
- 7
- 8
- 9
- 10
- 11
- 12
- 13
- 14
- 15
- 16
- 17
- 18
- 19
- 20
- 21
- 22
- 23
- 24
- 25
- 26
- 27
- 28
- 29
- 30
- 31
- 32
- 33
- 34
- 35
- 36
- 37
- 38
- 39
- 40
- 41
- 42
- 43
- 44
- 45
- 46
- 47
- 48
- 49
- 50
- 51
- 52
- 53
- 54
- 55
- 56
- 57
- 58
- 59
- 60
- 61
- 62
- 63
- 64
- 65
- 66
- 67
- 68
- 69
- 70
- 71
- 72
- 73
- 74
- 75
- 76
- 77
- 78
- 79
5. PreparedStatement
添加或者更新的时候,尽量使用 PreparedStatement ,而不是使用Statement
Statement 和 PreparedStatement 的区别
Statement用于执行静态SQL语句,在执行的时候,必须指定一个事先准备好的SQL语句,并且相对不安全,会有SQL注入的风险
PreparedStatement是预编译的SQL语句对象,sql语句被预编译并保存在对象中,
被封装的sql语句中可以使用动态包含的参数 ?
,在执行的时候,可以为?传递参数使用PreparedStatement对象执行sql的时候,sql被数据库进行预编译和预解析,然后被放到缓冲区,
每当执行同一个PreparedStatement对象时,他就会被解析一次,但不会被再次编译
可以重复使用,可以减少编译次数,提高数据库性能
并且能够避免SQL注入,相对安全(把’ 单引号 使用 \ 转义,避免SQL注入 )
5.1 DQL
使用PreparedStatement执行查询
public static void load(int id) {
Connection conn = null;
PreparedStatement prst = null;
ResultSet rs = null;
try {
Class.forName("com.mysql.jdbc.Driver");
conn = DriverManager.getConnection(
"jdbc:mysql://127.0.0.1:3306/_06_", "root", "root");
String
sql = "select * from test_jdbc
where id = ?";
prst = conn.prepareStatement(sql);
prst.setInt(1, id);
rs = prst.executeQuery();
while (rs.next()) {
System.out.print(rs.getInt("id") + " ");
System.out.print(rs.getString("name") + " ");
System.out.println(rs.getString("money") + " ");
}
}
catch (Exception e) {
e.printStackTrace();
}
finally {
try {
if (rs != null) {
rs.close();
}
if (prst != null) {
prst.close();
}
if (conn != null) {
conn.close();
}
}
catch (Exception e2) {
e2.printStackTrace();
}
}
}
- 1
- 2
- 3
- 4
- 5
- 6
- 7
- 8
- 9
- 10
-
11
- 12
- 13
- 14
- 15
- 16
- 17
- 18
- 19
- 20
- 21
- 22
- 23
- 24
- 25
- 26
- 27
- 28
- 29
- 30
- 31
- 32
- 33
- 34
- 35
- 36
- 37
- 38
- 39
- 40
- 41
- 42
- 43
- 44
- 45
- 46
- 47
- 48
- 49
- 50
- 51
- 52
- 53
- 54
- 55
- 56
- 57
- 58
- 59
- 60
- 61
- 62
- 63
- 64
- 65
- 66
- 67
- 68
- 69
- 70
- 71
- 72
- 73
- 74
- 75
- 76
- 77
- 78
- 79
- 80
- 81
- 82
- 83
- 84
- 85
- 86
- 87
- 88
- 89
- 90
5.2 DML
使用PreparedStatement执行增删改
以添加为例
public static void add(int id, String name, double money) {
Connection conn = null;
PreparedStatement prst = null;
try {
Class.forName("com.mysql.jdbc.Driver");
conn = DriverManager.getConnection(
"jdbc:mysql://127.0.0.1:3306/_06_", "root", "root");
String sql = "insert into test_jdbc (id,name,money) values (?,?,?)";
prst = conn.prepareStatement(sql);
prst.setInt(1, id);
prst.setString(2, name);
prst.setDouble(3, money);
int count = prst.executeUpdate();
System.out.println("影响了 "+count+" 条数据");
}
catch (Exception e) {
e.printStackTrace();
}
finally {
try {
if (prst != null) {
prst.close();
}
if (conn != null) {
conn.close();
}
}
catch (Exception e2) {
e2.printStackTrace();
}
}
}
- 1
- 2
- 3
- 4
- 5
- 6
- 7
- 8
- 9
- 10
- 11
- 12
- 13
- 14
- 15
- 16
- 17
- 18
- 19
- 20
- 21
- 22
- 23
- 24
- 25
- 26
- 27
- 28
- 29
- 30
- 31
- 32
- 33
- 34
- 35
- 36
- 37
- 38
- 39
- 40
- 41
- 42
- 43
- 44
- 45
- 46
- 47
- 48
- 49
- 50
- 51
- 52
- 53
- 54
- 55
- 56
- 57
- 58
- 59
- 60
- 61
- 62
- 63
- 64
- 65
- 66
- 67
- 68
- 69
- 70
- 71
- 72
- 73
- 74
- 75
- 76
- 77
- 78
6. 封装工具类
主要针对2个方面进行改进封装。
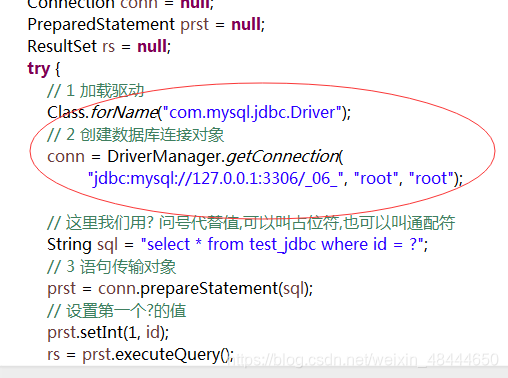
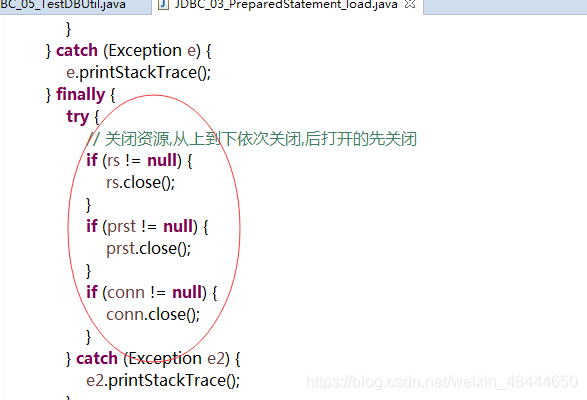
以下的代码我们每个方法中都会重复一次,这是没必要的,因为不同的方法其实只是具体执行的SQL语句的内容不同,对于获取连接与释放资源,对应的逻辑是相同的。我们完全可以把这一段逻辑抽取出来,形成独立的类与方法,再在实际应用时调用对应的类和方法就可以了。
1 创建连接这些
2 关闭资源这些
创建链接这些可以这样进行优化
   public static Connection getConnection() throws ClassNotFoundException,

           SQLException
{

       String
username = "root";

       String
password = "root";

       String
url = "jdbc:mysql://127.0.0.1:3306/_06_";


       Class.forName("com.mysql.jdbc.Driver");

       Connection
connection = DriverManager.getConnection(url, username,

              password);


       return connection;


    }
- 1
- 2
- 3
- 4
- 5
- 6
- 7
- 8
- 9
- 10
- 11
- 12
- 13
- 14
- 15
- 16
- 17
- 18
- 19
- 20
- 21
- 22
- 23
- 24
- 25
- 26
- 27
- 28
- 29
- 30
- 31
- 32
关闭资源这些可以这样进行优化
因为Connection和Statement/PreparedStatement以及ResultSet都实现了AutoCloseable接口
所以我们可以直接写AutoCloseable
   public static void close(AutoCloseable obj) {

       if (obj != null) {

           try {

              obj.close();

           }
catch (Exception e) {

              e.printStackTrace();

           }

       }

    }
- 1
- 2
- 3
- 4
- 5
- 6
- 7
- 8
- 9
- 10
- 11
- 12
- 13
- 14
- 15
- 16
- 17
- 18
- 19
- 20
- 21
7. Batch多语句操作
在一次任务中,执行多条数据
7.1 Statement实现
       Connection conn = null;

       Statement stmt = null;

       try {

           conn = DBUtil.getConnection();

           stmt = conn.createStatement();

           stmt.addBatch("insert into test_jdbc
(id,name,money) values(21,'stmt多条测试1',99.12)");

           stmt.addBatch("insert into test_jdbc
(id,name,money) values(22,'stmt多条测试2',99.22)");

           stmt.addBatch("insert into test_jdbc
(id,name,money) values(23,'stmt多条测试3',99.32)");

           stmt.addBatch("insert into test_jdbc
(id,name,money) values(24,'stmt多条测试4',99.42)");

           stmt.executeBatch();

           System.out.println("执行成功");

       }
catch (Exception e) {

           e.printStackTrace();

       }
finally {

           DBUtil.close(stmt);

           DBUtil.close(conn);

       }

    演示示例:JDBC_05_Batch_Statement
- 1
- 2
- 3
- 4
- 5
- 6
- 7
- 8
- 9
- 10
- 11
- 12
- 13
- 14
- 15
- 16
- 17
- 18
- 19
- 20
- 21
- 22
- 23
- 24
- 25
- 26
- 27
- 28
- 29
- 30
- 31
- 32
- 33
- 34
- 35
- 36
- 37
- 38
- 39
- 40
7.2 PreparedStatement实现
Connection conn = null;
PreparedStatement prst = null;
try {
conn = DBUtil.getConnection();
String sql = "insert into test_jdbc (id,name,money) values(?,?,?)";
prst = conn.prepareStatement(sql);
prst.setInt(1, 31);
prst.setString(2, "prst多条测试1");
prst.setDouble(3, 11.1);
prst.addBatch();
prst.setInt(1, 32);
prst.setString(2, "prst多条测试2");
prst.setDouble(3, 21.1);
prst.addBatch();
prst.setInt(1, 33);
prst.setString(2, "prst多条测试3");
prst.setDouble(3, 31.1);
prst.addBatch();
prst.executeBatch();
System.out.println("执行成功");
}
catch (Exception e) {
e.printStackTrace();
}
finally {
DBUtil.close(prst);
DBUtil.close(conn);
}
```
- 1
- 2
- 3
- 4
- 5
- 6
- 7
- 8
- 9
- 10
- 11
- 12
- 13
- 14
- 15
- 16
- 17
- 18
- 19
- 20
- 21
- 22
- 23
- 24
- 25
- 26
- 27
- 28
- 29
- 30
- 31
- 32
- 33
- 34
- 35
- 36
- 37
- 38
- 39
- 40
- 41
- 42
- 43
- 44
- 45
- 46
- 47
- 48
- 49
- 50
- 51
- 52
- 53
- 54