今天我们将使用 Pytorch 来继续实现 LeNet-5 模型,并用它来解决 CIFAR10 数据集的识别。
正文开始!
二、使用LeNet-5网络结构创建CIFAR-10识别分类器
LeNet-5 网络本是用来识别 MNIST 数据集的,下面我们来将 LeNet-5 应用到一个比较复杂的例子,识别 CIFAR-10 数据集。
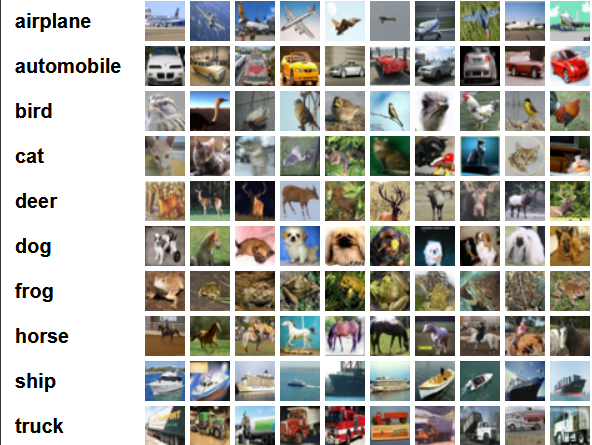
CIFAR-10 是由 Hinton 的学生 Alex Krizhevsky 和 Ilya Sutskever 整理的一个用于识别普适物体的小型数据集。一共包含 10 个类别的 RGB 彩色图 片:飞机( airlane )、汽车( automobile )、鸟类( bird )、猫( cat )、鹿( deer )、狗( dog )、蛙类( frog )、马( horse )、船( ship )和卡车( truck )。图片的尺寸为 32×32 ,数据集中一共有 50000 张训练圄片和 10000 张测试图片。
CIFAR-10 的图片样例如图所示。
2.1 下载并加载数据,并做出一定的预先处理
pipline_train = transforms.Compose([ transforms.RandomHorizontalFlip(), transforms.Resize((32,32)), transforms.ToTensor(), transforms.Normalize((0.5, 0.5, 0.5), (0.5, 0.5, 0.5))])pipline_test = transforms.Compose([ transforms.Resize((32,32)), transforms.ToTensor(), transforms.Normalize((0.5, 0.5, 0.5), (0.5, 0.5, 0.5))])train_set = datasets.CIFAR10(root="./data/CIFAR10", train=True, download=True, transform=pipline_train)test_set = datasets.CIFAR10(root="./data/CIFAR10", train=False, download=True, transform=pipline_test)trainloader = torch.utils.data.DataLoader(train_set, batch_size=64, shuffle=True)testloader = torch.utils.data.DataLoader(test_set, batch_size=32, shuffle=False)classes = ('plane', 'car', 'bird', 'cat','deer', 'dog', 'frog', 'horse', 'ship', 'truck')
2.2 搭建 LeNet-5 神经网络结构,并定义前向传播的过程
LeNet-5 网络上文已经搭建过了,由于 CIFAR10 数据集图像是 RGB 三通道的,因此 LeNet-5 网络 C1 层卷积选择的滤波器需要 3 通道,网络其它结构跟上文都是一样的。
class LeNetRGB(nn.Module):    def __init__(self):        super(LeNetRGB, self).__init__()        self.conv1 = nn.Conv2d(3, 6, 5)   # 3表示输入是3通道        self.relu = nn.ReLU()        self.maxpool1 = nn.MaxPool2d(2, 2)        self.conv2 = nn.Conv2d(6, 16, 5)        self.maxpool2 = nn.MaxPool2d(2, 2)
        self.fc1 = nn.Linear(16*5*5, 120)        self.fc2 = nn.Linear(120, 84)        self.fc3 = nn.Linear(84, 10)
    def forward(self, x):        x = self.conv1(x)        x = self.relu(x)        x = self.maxpool1(x)        x = self.conv2(x)        x = self.maxpool2(x)        x = x.view(-1, 16*5*5)        x = F.relu(self.fc1(x))        x = F.relu(self.fc2(x))        x = self.fc3(x)        output = F.log_softmax(x, dim=1)        return output
2.3 将定义好的网络结构搭载到 GPU/CPU,并定义优化器
使用 SGD(随机梯度下降)优化,学习率为 0.001,动量为 0.9。
#创建模型,部署gpu
device = torch.device("cuda" if torch.cuda.is_available() else "cpu")model = LeNetRGB().to(device)#定义优化器optimizer = optim.SGD(model.parameters(), lr=0.01, momentum=0.9)
2.4 定义训练过程
def train_runner(model, device, trainloader, optimizer, epoch):    #训练模型, 启用 BatchNormalization 和 Dropout, 将BatchNormalization和Dropout置为True    model.train()    total = 0    correct =0.0
    #enumerate迭代已加载的数据集,同时获取数据和数据下标    for i, data in enumerate(trainloader, 0):        inputs, labels = data        #把模型部署到device上        inputs, labels = inputs.to(device), labels.to(device)        #初始化梯度        optimizer.zero_grad()        #保存训练结果        outputs = model(inputs)        #计算损失和        #多分类情况通常使用cross_entropy(交叉熵损失函数), 而对于二分类问题, 通常使用sigmod        loss = F.cross_entropy(outputs, labels)        #获取最大概率的预测结果        #dim=1表示返回每一行的最大值对应的列下标        predict = outputs.argmax(dim=1)        total += labels.size(0)        correct += (predict == labels).sum().item()        #反向传播        loss.backward()        #更新参数        optimizer.step()        if i % 1000 == 0:            #loss.item()表示当前loss的数值            print("Train Epoch{} \t Loss: {:.6f}, accuracy: {:.6f}%".format(epoch, loss.item(), 100*(correct/total)))            Loss.append(loss.item())            Accuracy.append(correct/total)    return loss.item(), correct/total
2.5 定义测试过程
def test_runner(model, device, testloader): #模型验证, 必须要写, 否则只要有输入数据, 即使不训练, 它也会改变权值 #因为调用eval()将不启用 BatchNormalization 和 Dropout, BatchNormalization和Dropout置为False model.eval() #统计模型正确率, 设置初始值 correct = 0.0 test_loss = 0.0 total = 0 #torch.no_grad将不会计算梯度, 也不会进行反向传播 with torch.no_grad(): for data, label in testloader: data, label = data.to(device), label.to(device) output = model(data) test_loss += F.cross_entropy(output, label).item() predict = output.argmax(dim=1) #计算正确数量 total += label.size(0) correct += (predict == label).sum().item() #计算损失值 print("test_avarage_loss: {:.6f}, accuracy: {:.6f}%".format(test_loss/total, 100*(correct/total)))
2.6 运行
#调用epoch = 20Loss = []Accuracy = []for epoch in range(1, epoch+1):    print("start_time",time.strftime('%Y-%m-%d %H:%M:%S',time.localtime(time.time())))    loss, acc = train_runner(model, device, trainloader, optimizer, epoch)    Loss.append(loss)    Accuracy.append(acc)    test_runner(model, device, testloader)    print("end_time: ",time.strftime('%Y-%m-%d %H:%M:%S',time.localtime(time.time())),'\n')
print('Finished Training')plt.subplot(2,1,1)plt.plot(Loss)plt.title('Loss')plt.show()plt.subplot(2,1,2)plt.plot(Accuracy)plt.title('Accuracy')plt.show()
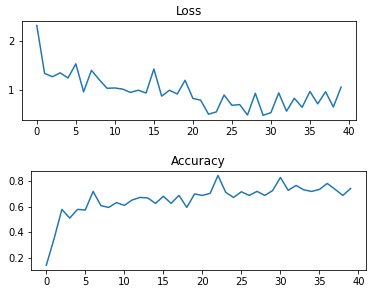
经历 20 次 epoch 迭代训练之后:
start_time 2021-11-27 22:29:09
Train Epoch20 Loss: 0.659028, accuracy: 68.750000%
test_avarage_loss: 0.030969, accuracy: 67.760000%
end_time: 2021-11-27 22:29:44
训练集的 loss 曲线和 Accuracy 曲线变化如下:
2.7 保存模型
print(model)torch.save(model, './models/model-cifar10.pth') #保存模型
LeNet-5 的模型会 print 出来,并将模型模型命令为 model-cifar10.pth 保存在固定目录下。
LeNetRGB(
  (conv1): Conv2d(3, 6, kernel_size=(5, 5), stride=(1, 1))
  (relu): ReLU()
  (maxpool1): MaxPool2d(kernel_size=2, stride=2, padding=0, dilation=1, ceil_mode=False)
  (conv2): Conv2d(6, 16, kernel_size=(5, 5), stride=(1, 1))
  (maxpool2): MaxPool2d(kernel_size=2, stride=2, padding=0, dilation=1, ceil_mode=False)
  (fc1): Linear(in_features=400, out_features=120, bias=True)
  (fc2): Linear(in_features=120, out_features=84, bias=True)
  (fc3): Linear(in_features=84, out_features=10, bias=True)
)
2.8 模型测试
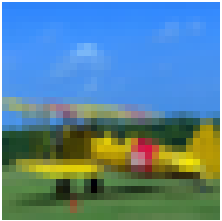
利用刚刚训练的模型进行 CIFAR10 类型图片的测试。
from PIL import Imageimport numpy as np
if __name__ == '__main__': device = torch.device('cuda' if torch.cuda.is_available() else 'cpu') model = torch.load('./models/model-cifar10.pth') model = model.to(device) model.eval() img = Image.open("./images/test_cifar10.png").convert('RGB') plt.imshow(img) plt.axis('off') plt.show() trans = transforms.Compose( [ transforms.Resize((32,32)), transforms.ToTensor(), transforms.Normalize((0.5, 0.5, 0.5), (0.5, 0.5, 0.5)) ]) img = trans(img) img = img.to(device) img = img.unsqueeze(0) classes = ('plane', 'car', 'bird', 'cat', 'deer', 'dog', 'frog', 'horse', 'ship', 'truck') output = model(img) prob = F.softmax(output,dim=1) print("概率:",prob) print(predict.item()) value, predicted = torch.max(output.data, 1) predict = output.argmax(dim=1) pred_class = classes[predicted.item()] print("预测类别:",pred_class)
输出:
概率:tensor([[7.6907e-01, 3.3997e-03, 4.8003e-03, 4.2978e-05, 1.2168e-02, 6.8751e-06, 3.2019e-06, 1.6024e-04, 1.2705e-01, 8.3300e-02]],
grad_fn=)
5
预测类别:plane
模型预测结果正确!
以上就是 PyTorch 构建 LeNet-5 卷积神经网络并用它来识别 CIFAR10 数据集的例子。全文的代码都是可以顺利运行的,建议大家自己跑一边。
值得一提的是,针对 MNIST 数据集和 CIFAR10 数据集,最大的不同就是 MNIST 是单通道的,CIFAR10 是三通道的,因此在构建 LeNet-5 网络的时候,C1层需要做不同的设置。至于输入图片尺寸不一样,我们可以使用 transforms.Resize 方法统一缩放到 32x32 的尺寸大小。
所有完整的代码我都放在 GitHub 上,GitHub地址为:
https://github.com/RedstoneWill/ObjectDetectionLearner/tree/main/LeNet-5
也可以点击
阅读原文进入~