转载自:Datawhale,作者:樊亮、黄星源、Datawhale优秀学习者
本文对图像数据读取及图像数据扩增方法进行了总结,并以阿里天池零基础入门CV赛事为实践,利用Pytorch对数据进行了读取和扩增讲解。
https://tianchi.aliyun.com/competition/entrance/531795/introduction(阿里天池-零基础入门CV赛事)
接下来将简单介绍五种目前较为主流的Python图像库的基本使用方法:matplotlib、PIL(pillow)、OpenCV、skimage、imageio。
1. matplotlib
matplotlib是Python的绘图库,与numpy一起使用可以算是一种matlab开源替代方案,在科学绘图领域被广泛使用。当然,用来读取图像自然不在话下。使用plt.imread()读取图片将其储存为一个RGB像素值矩阵,再进行处理。故其可以与opencv或pillow结合使用,只需要传入像素值矩阵,matplotlib便可以接手处理接下来想要完成的操作。import matplotlib.pyplot as plt #导入matplotlib库import numpy as np #导入numpy库
img = plt.imread('PicPath/PicName.jpg') # 读取图片print(img.shape) # 输出(高度h,宽度w,通道数c)print(img.size) # 输出像素总数目print(img.dtype) # 输出图片类型,uint8为[0-255]print(img) # 输出所有像素的RGB值,一个像素RGB为[0-255 0-255 0-255]plt.imshow(img) # 将图片img插入画布plt.axis('off') # 坐标轴刻度不显示plt.show() # 展示画布
imgR = image[:,:,0] # R通道,热量图plt.imshow(imgR) # 将热量图插入画布plt.show() # 展示画布
plt.imshow(imgR,cmap='Greys_r') # 将灰度图插入画布plt.show() # 展示画布
figure = plt.figure(figsize=(80,40)) # 调整显示画布宽80,高40/英寸img1 = plt.imread('PicPath/PicName1.jpg') # 读取图片1img2 = plt.imread('PicPath/PicName2.jpg') # 读取图片2
plt.axis("off") # 画布坐标轴刻度不显示ax = figure.add_subplot(121) # 画布以1行2列的形式显示,设置图片定位为序列1plt.axis('off') # 子图1坐标轴刻度不显示ax.imshow(img1) # 将图片1插入子图1ax.set_title('title1') # 给子图1加标题ax = figure.add_subplot(122) # 画布以1行2列的形式显示,设置图片定位为序列2plt.axis('off') # 子图2坐标轴刻度不显示ax.imshow(img2) # 将图片2插入子图2ax.set_title('title2') # 给子图2加标题plt.savefig('PicX.jpg') # 保存画布命名为PicX.jpgplt.show() # 展示画布
2. PIL(pillow)
PIL即Python Imaging Library,而pillow是PIL的一个分支。pillow提供了常见的图像读取和处理的操作,它比opencv更为轻巧,且可以与ipython notebook无缝集成。
使用Image.open()读取图片储存为一个对象,并非是numpy矩阵。
from PIL import Image # 导入PIL库import numpy as np # 导入numpy库
img = Image.open('PicPath/PicName.jpg') # 读取图片imgL = Image.open('PicName.jpg').convert('L') # 读取图片灰度图imgL.show() # 展示灰度图img1 = img.copy() # 复制图片print(img.format) # 输出图片格式print(img.size) # 输出图片(宽度w,高度h)print(img.mode) # 输出图片类型,L为灰度图,RGB为真彩色,RGBA为RGB+Alpha透明度im.show() # 展示画布
imgData = np.array(img) # 将对象img转化为RGB像素值矩阵print(imgData.shape) # 输出图片(宽度w,高度h,通道c)print(imgData.dtype) # 输出图片类型,uint8为[0-255]print(imgData) # 输出所有像素的RGB值imgN = Image.fromarray(imgData) # 将RGB像素值矩阵转化为对象imgNimgN.save('PicName.jpg') # 储存为文件PicName.jpg
r, g, b = img.split() # 分离通道img = Image.merge("RGB", (b, g, r)) # 合并通道
# ROI(region of interest),只对ROI区域操作roi = img.crop((0,0,300,300)) # (左上x,左上y,右下x,右下y)坐标roi.show() # 展示ROI区域
#捕捉异IOError,为读取图片失败try:    img = Image.open('PicName.jpg')except IOError:    print('image failed to load')
3. OpenCV
OpenCV是一个跨平台的计算机视觉库。其发展非常早,拥有众多的计算机视觉、数字图像处理和机器视觉等功能,OpenCV是今天介绍得所有图像库中最全面也最强大的库,学习成本也相对要高很多。
使用cv2.imread读取图片将其储存为一个BGR像素值矩阵,故若要结合使用matplotlib则要先进行转化。
import cv2 # 导入OpenCV库import numpy as np # 导入numpy库
img = cv2.imread('PicName.jpg',0) # 读取图片:灰度模式img = cv2.imread('PicName.jpg',-1) # 读取图片:BRGA模式(BRG+Alpha通道)img = cv2.imread('PicName.jpg',1) # 读取图片:BRG模式img = cv2.imread('PicName.jpg') # 读取图片:第二参数默认为1,BRG模式img = cv2.cvtColor(img,cv2.COLOR_BGR2RGB) # 将颜色通道从BRG转为RGBif img == None:  # 读取图片失败  print('image failed to load')cv2.imshow('src',img) # 图片源src为imgprint(img.shape) # 输出图片(高度h,宽度w,通道c)print(img.size) # 像素总数目print(img.dtype) # 输出图片类型,uint8为[0-255]print(img) # 输出所有像素的RGB值cv2.waitKey()  # 按键关闭窗口# waitKey(delay)函数的功能是不断刷新图像,频率时间为delay,单位为ms,返回值为当前键盘按键值# waitKey() 是在一个给定的时间内(单位ms)等待用户按键触发; 如果用户没有按下键,则接续等待(循环)
imgL = cv2.cvtColor(img,cv2.COLOR_BGR2GRAY) # 读取img灰度图cv2.imshow('gray',imgL) # 图片源gray为imgLcv2.imwrite('imgL.jpg',imgL) # 将imgL储存名为imgL.jpg的图片print(imgL.shape)  # 输出图片(高度h,宽度w)print(imgL.size) # 像素总数目print(imgL) # 输出所有像素的灰度值cv2.waitKey() # 按键关闭窗口
img = img.transpose(2,0,1) # 图片矩阵变换为(通道c,高度h,宽度w)img = np.expand_dims(img, axis=0) # 图片矩阵扩展维度添加在第一维print(img.shape) # (1,通道c,高度h,宽度w)
# 图片归一化处理img = cv2.imread('PicName.jpg')            img = img.astype("float") / 255.0  # 转化数据类型为float后进行归一化print(img.dtype) # 输出为:float64print(img) # 输出为[0-1 0-1 0-1]

print(img[10,10]) # 访问图片img像素[10,10],输出 [0-255 0-255 0-255]print(imgL[10,10]) # 访问灰色图片img像素[10,10],输出 0-255img[10,10] = [255,255,255]  # 修改图片img像素点[10,10]为[255,255,255]imgL[10,10] = 255 # 修改灰色图片img像素点[10,10]为255img[:,:,2] = 0 # 将R通道全部修改为0
roi = img[200:550,100:450,:]  # ROI操作,坐标(高度范围,宽度范围,通道范围)cv2.imshow('roi',roi) # 图片源roi为roicv2.waitKey()  # 按键关闭窗口
4. skimage
skimage包的全称是scikit-image SciKit (toolkit for SciPy) ,它对scipy.ndimage进行了扩展,提供了更多的图片处理功能。它是由python语言编写的,由scipy 社区开发和维护。skimage包由许多的子模块组成,各个子模块提供不同的功能。
使用io.imread()读取图片将其储存为一个RGB像素值矩阵。
from skimage import io #导入skimage库from skimage import colorimport numpy as np #导入numpy库
img = io.imread('PicName.jpg') #读取图片imgL = io.imread('PicName.jpg',as_grey=True) #读取图片:灰度模式print(img.shape) #输出图片img(高度h,宽度w,通道c)print(imgL.shape) #输出图片imgL(高度h,宽度w)print(img.size) #img像素总数目print(img.dtype) #输出img图片类型,uint8为[0-255]print(imgL.dtype) #输出imgL图片类型,float64为[0-1],已经被归一化print(img) #输出img所有像素的RGB值print(imgL) #输出imgL所有灰度值,长度为imgL.size的numpy数组io.imsave('img.png',img) #将img储存名为img.png的图片io.imshow(img) #图片img插入画板io.show() #展示画板
imgl = io.imread('PicName.jpg') #读取图片imgl = color.rgb2grey(imgl) #转换为灰度模式print(imgl.dtype) #以下数据同imgLprint(imgl.size)print(imgl.shape)io.imshow(imgl)io.show()
'''skimage.color.rgb2grey(rgb)skimage.color.rgb2hsv(rgb)skimage.color.rgb2lab(rgb)skimage.color.gray2rgb(image)skimage.color.hsv2rgb(hsv)skimage.color.lab2rgb(lab)'''
5. imageio
Imageio是一个Python库,提供了一个简单的接口用于读取和写入各种图像数据,包括动画图像,视频,体积数据和科学格式。
使用io.imread()读取图片将其储存为一个RGB像素值矩阵。
import imageio #导入imageio库img = imageio.imread('PicName.jpg') # 读取图片imageio.imsave('img.png',img)# 将img储存名为img.png的文件print(img.shape) # 输出图片img(高度h,宽度w,通道c)print(img.size) # img像素总数目print(img.dtype) # 输出img图片类型,uint8为[0-255]print(img) # 输出img所有像素的RGB值plt.imshow(img) # 图片img插入画板plt.show() #展示画板
6. 总结
其他图像库读取彩色图片都以RGB形式储存,而OpenCV则是以BGR形式存储。其他图像库读取图片都以numpy十六进制彩色值形式储存,而PIL读取图片是以对象形式储存。
为了增加数据量、丰富数据多样性、提高模型的泛化能力,同时也可以有效缓解模型过拟合的情况,给模型带来的更强的泛化能力。我们可以不实际增加原始数据,只是对原始数据做一些变换,从而创造出更多的数据。我们只需要对现有数据集进行微小改动,例如裁剪或灰度变换或翻转(数字6与9翻转会发生交换) 。无论如何,我们的神经网络会认为这些是不同的图像。从而完成数据扩增(Data Augmentation)操作。
1. 数据扩增为什么有用?
在深度学习模型的训练过程中,数据扩增是必不可少的环节。现有深度学习的参数非常多,一般的模型可训练的参数量基本上都是万到百万级别,而训练集样本的数量很难有这么多。
其次数据扩增可以扩展样本空间,假设现在的分类模型需要对汽车进行分类,左边的是汽车A,右边为汽车B。如果不使用任何数据扩增方法,深度学习模型会从汽车车头的角度来进行判别,而不是汽车具体的区别。
2. 有哪些数据扩增方法?
数据扩增方法有很多:从颜色空间、尺度空间到样本空间,同时根据不同任务数据扩增都有相应的区别。对于图像分类,数据扩增一般不会改变标签;对于物体检测,数据扩增会改变物体坐标位置;对于图像分割,数据扩增会改变像素标签。
以torchvision.transforms为例,首先整体了解数据扩增的方法,包括:
2.1 裁剪
中心裁剪:transforms.CenterCrop;
随机裁剪:transforms.RandomCrop;
随机长宽比裁剪:transforms.RandomResizedCrop;
上下左右中心裁剪:transforms.FiveCrop;
上下左右中心裁剪后翻转: transforms.TenCrop。
2.2 翻转和旋转
依概率p水平翻转:transforms.RandomHorizontalFlip(p=0.5);
依概率p垂直翻转:transforms.RandomVerticalFlip(p=0.5);
随机旋转:transforms.RandomRotation。
2.3 随机遮挡
2.4 图像变换
尺寸变换:transforms.Resize;
标准化:transforms.Normalize;
填充:transforms.Pad;
修改亮度、对比度和饱和度:transforms.ColorJitter;
转灰度图:transforms.Grayscale;
依概率p转为灰度图:transforms.RandomGrayscale;
线性变换:transforms.LinearTransformation();
仿射变换:transforms.RandomAffine;
将数据转换为PILImage:transforms.ToPILImage;
转为tensor,并归一化至[0-1]:transforms.ToTensor;
用户自定义方法:transforms.Lambda。
2.5 对transforms操作,使数据增强更灵活
transforms.RandomChoice(transforms): 从给定的一系列transforms中选一个进行操作;
transforms.RandomApply(transforms, p=0.5): 给一个transform加上概率,依概率进行操作;
transforms.RandomOrder: 将transforms中的操作随机打乱。
3. 常用的数据扩增库?
pytorch官方提供的数据扩增库,提供了基本的数据扩增方法,可以无缝与torch进行集成;但数据扩增方法种类较少,且速度中等;
链接:https://github.com/pytorch/vision
imgaug是常用的第三方数据扩增库,提供了多样的数据扩增方法,且组合起来非常方便,速度较快;
链接:https://github.com/aleju/imgaug
是常用的第三方数据扩增库,提供了多样的数据扩增方法,对图像分类、语义分割、物体检测和关键点检测都支持,速度较快。
链接:https://albumentations.readthedocs.io
由于本次赛题我们使用Pytorch框架讲解具体的解决方案,接下来将是解决赛题的第一步使用Pytorch读取赛题数据。
在Pytorch中数据是通过Dataset进行封装,并通过DataLoder进行并行读取。所以我们只需要重载一下数据读取的逻辑就可以完成数据的读取。
import os, sys, glob, shutil, jsonimport cv2from PIL import Imageimport numpy as npimport torchfrom torch.utils.data.dataset import Datasetimport torchvision.transforms as transforms
class SVHNDataset(Dataset):
def __init__(self, img_path, img_label, transform=None): self.img_path = img_path self.img_label = img_label if transform is not None: self.transform = transform else: self.transform = None
def __getitem__(self, index): img = Image.open(self.img_path[index]).convert('RGB') if self.transform is not None: img = self.transform(img) # 原始SVHN中类别10为数字0 lbl = np.array(self.img_label[index], dtype=np.int) lbl = list(lbl) + (5 - len(lbl)) * [10] return img, torch.from_numpy(np.array(lbl[:5]))
def __len__(self): return len(self.img_path)
train_path = glob.glob('input/train/*.png')train_path.sort()train_json = json.load(open('input/train.json'))train_label = [train_json[x]['label'] for x in train_json]
data = SVHNDataset(train_path, train_label, transforms.Compose([ # 缩放到固定尺寸 transforms.Resize((64, 128)), # 随机颜色变换 transforms.ColorJitter(0.2, 0.2, 0.2), # 加入随机旋转 transforms.RandomRotation(5), # 将图片转换为pytorch 的tesntor
# transforms.ToTensor(), # 对图像像素进行归一化 # transforms.Normalize([0.485,0.456,0.406],[0.229,0.224,0.225]) ]))
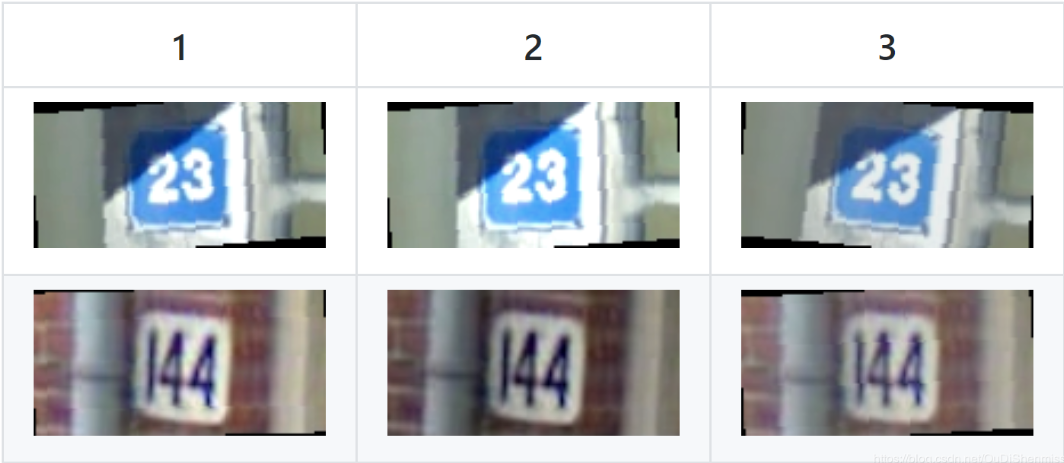
通过上述代码,可以将赛题的图像数据和对应标签进行读取,在读取过程中的进行数据扩增,效果如下所示:

接下来我们将在定义好的Dataset基础上构建DataLoder,你可以会问有了Dataset为什么还要有DataLoder?其实这两个是两个不同的概念,是为了实现不同的功能。
加入DataLoder后,数据读取代码改为如下:
import os, sys, glob, shutil, jsonimport cv2from PIL import Imageimport numpy as npimport torchfrom torch.utils.data.dataset import Datasetimport torchvision.transforms as transforms
class SVHNDataset(Dataset):
    def __init__(self, img_path, img_label, transform=None):        self.img_path = img_path        self.img_label = img_label         if transform is not None:            self.transform = transform        else:            self.transform = None
    def __getitem__(self, index):        img = Image.open(self.img_path[index]).convert('RGB')        if self.transform is not None:            img = self.transform(img)                # 原始SVHN中类别10为数字0        lbl = np.array(self.img_label[index], dtype=np.int)        lbl = list(lbl)  + (5 - len(lbl)) * [10]               return img, torch.from_numpy(np.array(lbl[:5]))
    def __len__(self):        return len(self.img_path)train_path = glob.glob('input/train/*.png')train_path.sort()train_json = json.load(open('input/train.json'))train_label = [train_json[x]['label'] for x in train_json]train_loader = torch.utils.data.DataLoader(        SVHNDataset(train_path, train_label,                   transforms.Compose([                       transforms.Resize((64, 128)),                       transforms.ColorJitter(0.3, 0.3, 0.2),                       transforms.RandomRotation(5),                       transforms.ToTensor(),                       transforms.Normalize([0.485, 0.456, 0.406], [0.229, 0.224, 0.225])            ])),     batch_size=10, # 每批样本个数    shuffle=False, # 是否打乱顺序    num_workers=10, # 读取的线程个数)for data in train_loader:    break
在加入DataLoder后,数据按照批次获取,每批次调用Dataset读取单个样本进行拼接。此时data的格式为:
torch.Size([10, 3, 64, 128]), torch.Size([10, 6])
前者为图像文件,为batchsize * chanel * height * width次序;后者为字符标签。
声明:部分内容来源于网络,仅供读者学术交流之目的。文章版权归原作者所有。如有不妥,请联系删除。
- 机器学习交流qq群955171419,加入微信群请扫码
