点击关注后,你不仅获得一个找资源的工具,更获得一个有趣的灵魂 ▶ ▶ ▶
来源:https://blog.csdn.net/jxjdhdnd
Nginx 是一款高性能的 Web 服务器,支持多种虚拟主机配置方式,能够根据域名、IP 或端口区分不同的站点。这种灵活性让 Nginx 成为搭建多站点服务的首选工具。
本文将带你一步步实现三种常见的虚拟主机配置方法:基于域名、基于 IP 和基于端口
的虚拟主机。无论你是初学者还是有经验的运维人员,这篇教程都能帮助你快速掌握虚拟主机的配置技巧。
以下案例演示 是基于源码包安装的nignx (如果你是rpm包 也差不多 只用把路径改为你nginx的路径即可 其他没什么大的变化,如果你是小白请绕道!)
1. 基于域名的虚拟主机
步骤 1:准备网站根目录
为每个域名创建独立的子目录,并添加测试页面:
[root@localhost ~]# mkdir -p /usr/local/nginx/html/site1
[root@localhost ~]# mkdir -p /usr/local/nginx/html/site2

[root@localhost ~]# echo "Welcome to Site 1" > /usr/local/nginx/html/site1/index.html
[root@localhost ~]# echo "Welcome to Site 2" > /usr/local/nginx/html/site2/index.html
步骤 2:修改 Nginx 配置文件
打开 Nginx 的配置文件:
[root@localhost ~]# vim /usr/local/nginx/conf/nginx.conf
在 http 配置段中添加以下内容:
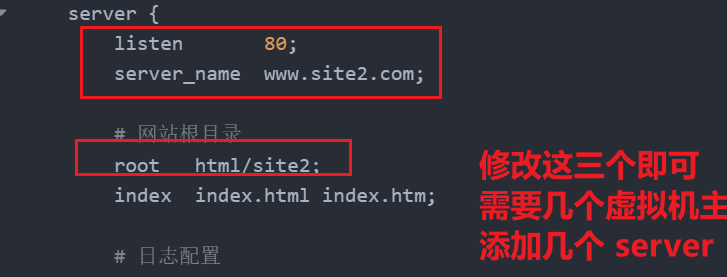
注释:如果需要两个虚拟主机 只用将再额外添加一个server即可
# 全局配置
user nobody;
worker_processes 1;
events {
worker_connections 1024;
}
http {
include mime.types;
default_type application/octet-stream;
sendfile on;
keepalive_timeout 65;
# 基于域名的虚拟主机配置
server {
listen 80;
server_name www.site1.com;
# 网站根目录
root html/site1;
index index.html index.htm;
# 日志配置
access_log logs/site1_access.log;
error_log logs/site1_error.log;
# 主路径配置
location / {
try_files $uri$uri/ =404;
}
# 状态监控
location /status {
stub_status on;
access_log off;
allow 192.168.14.112;
deny all;
}
# 错误页面配置
error_page 404 /404.html;
error_page 500 502 503 504 /50x.html;
location = /404.html {
root html/site1;
}
location = /50x.html {
root html;
}
# 禁止访问 .ht 文件
location ~ /\.ht {
deny all;
}
}
server {
listen 80;
server_name www.site2.com;
# 网站根目录
root html/site2;
index index.html index.htm;
# 日志配置
access_log logs/site2_access.log;
error_log logs/site2_error.log;
# 主路径配置
location / {
try_files $uri$uri/ =404;
}
# 错误页面配置
error_page 404 /404.html;
error_page 500 502 503 504 /50x.html;
location = /404.html {
root html/site2;
}
location = /50x.html {
root html;
}
# 禁止访问 .ht 文件
location ~ /\.ht {
deny all;
}
}
}
步骤 3:测试配置并重启 Nginx
测试配置文件语法:
[root@localhost ~]# /usr/local/nginx/sbin/nginx -t
重启 Nginx 服务:
[root@localhost ~]# /usr/local/nginx/sbin/nginx -s reload
步骤 4:访问测试
在浏览器中访问:
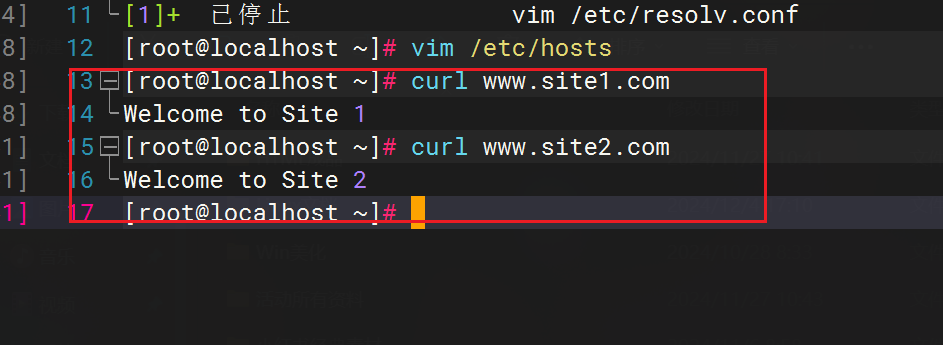
- http://www.site1.com,应显示 Welcome to Site 1。
- http://www.site2.com,应显示 Welcome to Site 2。
客户端测试
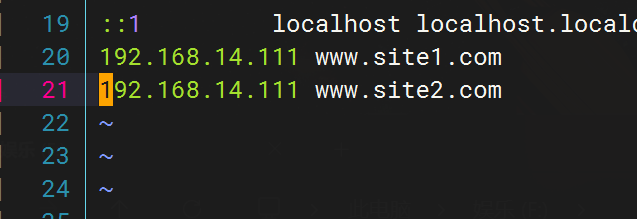
修改hosts文件(本地dns解析)
[root@localhost ~]# vim /etc/hosts
2. 基于 IP 的虚拟主机
步骤 1:准备网站根目录
为每个 IP 创建独立的子目录,并添加测试页面:
[root@localhost ~]# mkdir -p /usr/local/nginx/html/ip1
[root@localhost ~]# mkdir -p /usr/local/nginx/html/ip2

[root@localhost ~]# echo "Welcome to IP 192.168.14.111" > /usr/local/nginx/html/ip1/index.html
[root@localhost ~]# echo "Welcome to IP 192.168.14.112" > /usr/local/nginx/html/ip2/index.html
步骤 2:修改 Nginx 配置文件
打开 Nginx 的配置文件:
[root@localhost ~]# vim /usr/local/nginx/conf/nginx.conf
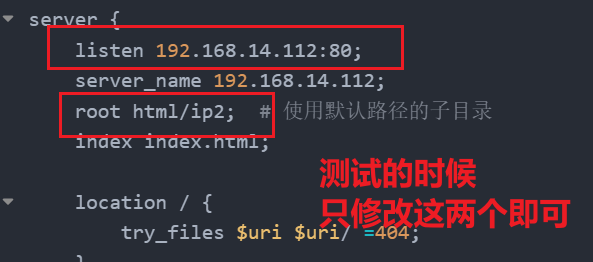
在 http 配置段中添加以下内容:
server {
    listen 192.168.14.111:80;
    server_name 192.168.14.111;
    root html/ip1;  # 使用默认路径的子目录
    index index.html;

    location / {
        try_files $uri$uri/ =404;
    }

    # 错误页面
    error_page 500 502 503 504 /50x.html;
    location = /50x.html {
        root html;  # 默认错误页面路径
    }
}

server {
    listen 192.168.14.112:80;
    server_name 192.168.14.112;
    root html/ip2;  # 使用默认路径的子目录
    index index.html;

    location / {
        try_files $uri$uri/ =404;
    }

    # 错误页面
    error_page 500 502 503 504 /50x.html;
    location = /50x.html {
        root html;  # 默认错误页面路径
    }
}
步骤 3:测试配置并重启 Nginx
测试配置文件语法:
[root@localhost ~]# /usr/local/nginx/sbin/nginx -t
重启 Nginx 服务:
[root@localhost ~]# /usr/local/nginx/sbin/nginx -s reload
步骤 4:访问测试
在浏览器中访问:
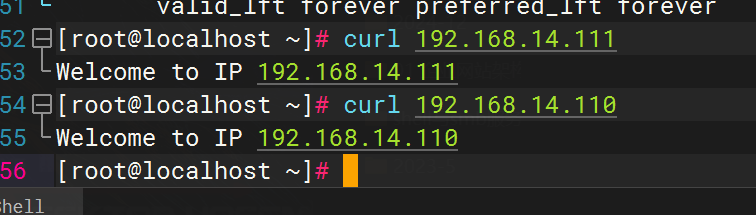
- http://192.168.14.111,应显示 Welcome to IP 192.168.14.111。
- http://192.168.14.112,应显示 Welcome to IP 192.168.14.112。
客户端测试
因为我在虚拟机测试 只有一个网卡 所以我在虚拟一个网卡 这个你可以忽视 看测试结果即可
ip addr add 192.168.14.110/24 dev ens33
3. 基于端口的虚拟主机
步骤 1:准备网站根目录
为每个端口创建独立的子目录,并添加测试页面:
[root@localhost ~]# mkdir -p /usr/local/nginx/html/port1
[root@localhost ~]# mkdir -p /usr/local/nginx/html/port2

[root@localhost ~]# echo "Welcome to Port 8080" > /usr/local/nginx/html/port1/index.html
[root@localhost ~]# echo "Welcome to Port 9090" > /usr/local/nginx/html/port2/index.html
步骤 2:修改 Nginx 配置文件
打开 Nginx 的配置文件:
[root@localhost ~]# vim /usr/local/nginx/conf/nginx.conf
在 http 配置段中添加以下内容:
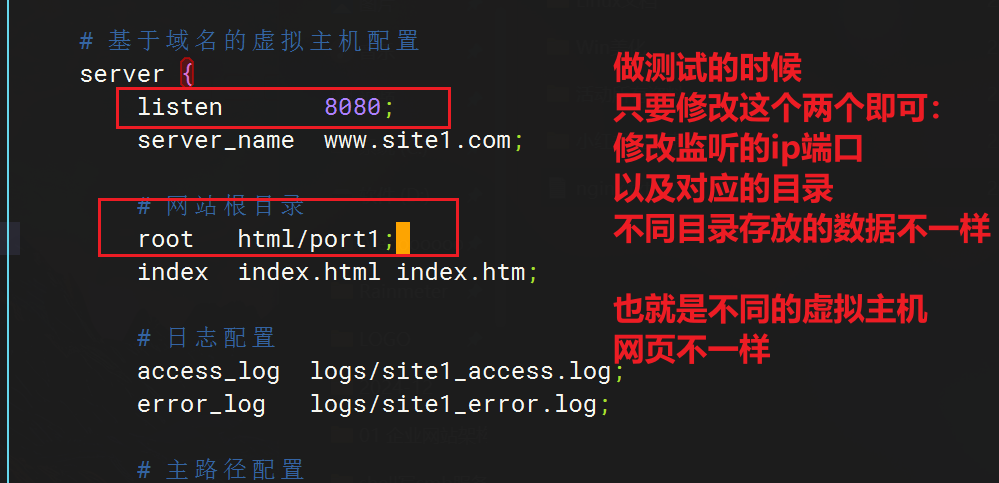
server {
    listen 8080;
    server_name localhost;
    root html/port1;  # 使用默认路径的子目录
    index index.html;

    location / {
        try_files $uri$uri/ =404;
    }

    # 错误页面
    error_page 500 502 503 504 /50x.html;
    location = /50x.html {
        root html;  # 默认错误页面路径
    }
}

server {
    listen 9090;
    server_name localhost;
    root html/port2;  # 使用默认路径的子目录
    index index.html;

    location / {
        try_files $uri$uri/ =404;
    }

    # 错误页面
    error_page 500 502 503 504 /50x.html;
    location = /50x.html {
        root html;  # 默认错误页面路径
    }
}
步骤 3:测试配置并重启 Nginx
测试配置文件语法:
[root@localhost ~]# /usr/local/nginx/sbin/nginx -t
重启 Nginx 服务:
[root@localhost ~]# /usr/local/nginx/sbin/nginx -s reload
步骤 4:访问测试
在浏览器中访问:
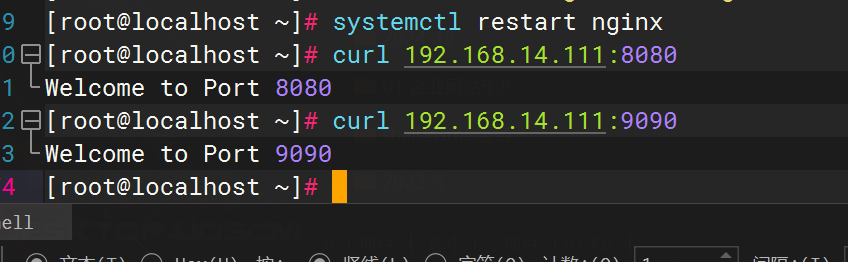
- http://192.168.14.111:8080,应显示 Welcome to Port 8080。
- http://192.168.14.111:9090,应显示 Welcome to Port 9090。
客户端测试
4.总结
通过本文的详细步骤,我们成功实现了基于域名、IP 和端口的虚拟主机配置。Nginx 的灵活性和高性能使其能够轻松应对多站点服务的需求。
这些配置方法不仅适用于日常开发和测试环境,也能在生产环境中提供稳定可靠的服务。如果你对 Nginx 的配置还有疑问或其他需求,欢迎留言交流,让我们共同学习、共同进步!