上一篇文章再次把Swagger的使用进行了讲解,完成了对Swagger的分组、描述和开启小绿锁以进行身份的认证授权,那么本篇就来说说身份认证授权。
开始之前先搞清楚几个概念,请注意认证与授权是不同的意思,简单理解:认证,是证明你的身份,你有账号密码,你可以登录进我们的系统,说明你认证成功了;授权,即权限,分配给用户某一权限标识,用户得到什么什么权限,才能使用系统的某一功能,就是授权。
身份认证可以有很多种方式,可以创建一个用户表,使用账号密码,也可以接入第三方平台,在这里我接入GitHub进行身份认证。当然你可以选择其他方式(如:QQ、微信、微博等),可以自己扩展。
打开GitHub,进入开发者设置界面(https://github.com/settings/developers),我们新建一个 oAuth App。
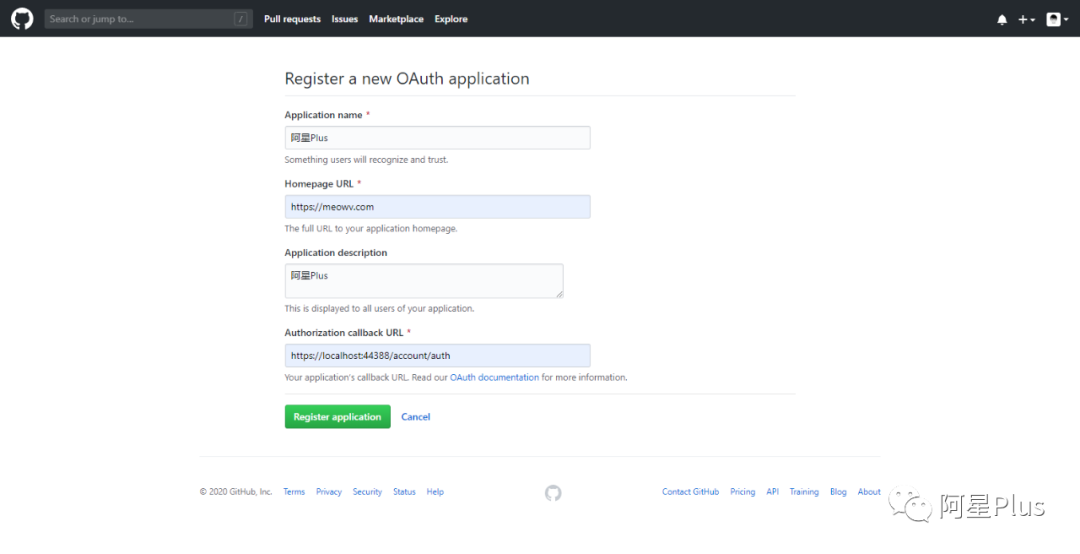
如图所示,我们将要用到敏感数据放在appsettings.json中
{ ... "Github": { "UserId": 13010050, "ClientID": "5956811a5d04337ec2ca", "ClientSecret": "8fc1062c39728a8c2a47ba445dd45165063edd92", "RedirectUri": "https://localhost:44388/account/auth", "ApplicationName": "阿星Plus" }}
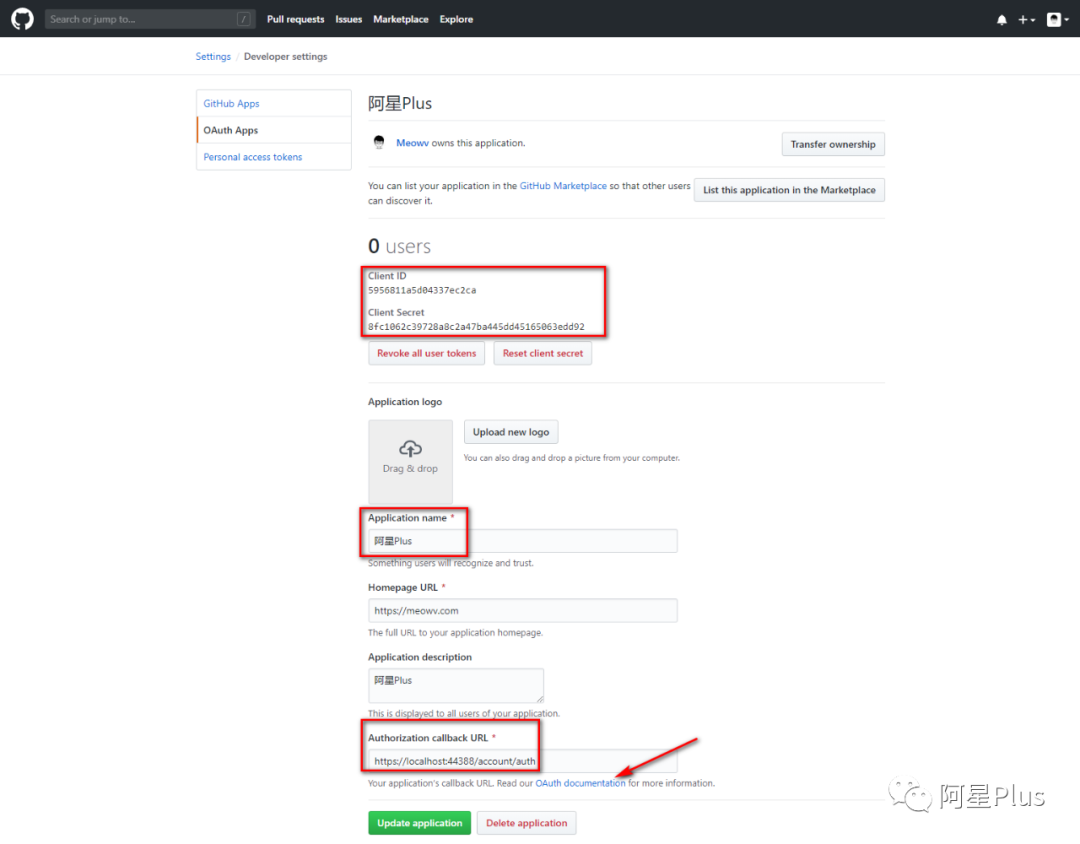
ClientID和ClientSecret是GitHub为我们生成的,请注意保管好你的ClientID和ClientSecret。我这里直接给出了明文,我将在本篇结束后删掉此 oAuth App 😝。请自己创建噢!
RedirectUri是我们自己添加的回调地址。ApplicationName是我们应用的名称,全部都要和GitHub对应。
相应的在AppSettings.cs中读取
... public static class GitHub { public static int UserId => Convert.ToInt32(_config["Github:UserId"]);
public static string Client_ID => _config["Github:ClientID"];
public static
string Client_Secret => _config["Github:ClientSecret"];
public static string Redirect_Uri => _config["Github:RedirectUri"];
public static string ApplicationName => _config["Github:ApplicationName"]; }...
接下来,我们大家自行去GitHub的OAuth官方文档看看,https://developer.github.com/apps/building-oauth-apps/authorizing-oauth-apps/
分析一下,我们接入GitHub身份认证授权整个流程下来分以下几步
根据参数生成GitHub重定向的地址,跳转到GitHub登录页,进行登录
登录成功之后会跳转到我们的回调地址,回调地址会携带code参数
拿到code参数,就可以换取到access_token
有了access_token,可以调用GitHub获取用户信息的接口,得到当前登录成功的用户信息
开始之前,先将GitHub的API简单处理一下。
在.Domain层中Configurations文件夹下新建GitHubConfig.cs配置类,将所需要的API以及appsettings.json的内容读取出来。
namespace Meowv.Blog.Domain.Configurations{ public class GitHubConfig { public static string API_Authorize = "https://github.com/login/oauth/authorize";
public static string API_AccessToken = "https://github.com/login/oauth/access_token";
public static string API_User = "https://api.github.com/user";
public static int UserId = AppSettings.GitHub.UserId;
public static string Client_ID = AppSettings.GitHub.Client_ID;
public static string Client_Secret = AppSettings.GitHub.Client_Secret;
public static string Redirect_Uri = AppSettings.GitHub.Redirect_Uri;
public static string ApplicationName = AppSettings.GitHub.ApplicationName; }}
细心的同学可能以及看到了,我们在配置的时候多了一个UserId。在这里使用一个策略,因为我是博客系统,管理员用户就只有我一个人,GitHub的用户Id是唯一的,我将自己的UserId配置进去,当我们通过api获取到UserId和自己配置的UserId一致时,就为其授权,你就是我,我认可你,你可以进入后台随意玩耍了。
在开始写接口之前,还有一些工作要做,就是在 .net core 中开启使用我们的身份认证和授权,因为.HttpApi.Hosting层引用了项目.Application,.Application层本身也需要添加Microsoft.AspNetCore.Authentication.JwtBearer,所以在.Application添加包:Microsoft.AspNetCore.Authentication.JwtBearer,打开程序包管理器控制台用命令Install-Package Microsoft.AspNetCore.Authentication.JwtBearer安装,这样就不需要重复添加引用了。
在.HttpApi.Hosting模块类MeowvBlogHttpApiHostingModule,ConfigureServices中添加
public override void ConfigureServices(ServiceConfigurationContext context){ context.Services.AddAuthentication(JwtBearerDefaults.AuthenticationScheme) .AddJwtBearer(options => { options.TokenValidationParameters = new TokenValidationParameters { ValidateIssuer = true, ValidateAudience = true, ValidateLifetime = true, ClockSkew = TimeSpan.FromSeconds(30), ValidateIssuerSigningKey = true, ValidAudience = AppSettings.JWT.Domain, ValidIssuer = AppSettings.JWT.Domain, IssuerSigningKey = new SymmetricSecurityKey(AppSettings.JWT.SecurityKey.GetBytes()) }; });
context.Services.AddAuthorization();
context.Services.AddHttpClient();}
因为待会我们要在代码中调用GitHub的api,所以这里提前将System.Net.Http.IHttpClientFactory和相关服务添加到IServiceCollection中。
解释一下TokenValidationParameters参数的含义:
ValidateIssuer:是否验证颁发者。ValidateAudience:是否验证访问群体。ValidateLifetime:是否验证生存期。ClockSkew:验证Token的时间偏移量。ValidateIssuerSigningKey:是否验证安全密钥。ValidAudience:访问群体。ValidIssuer:颁发者。IssuerSigningKey:安全密钥。
GetBytes()是abp的一个扩展方法,可以直接使用。
设置值全部为true,时间偏移量为30秒,然后将ValidAudience、ValidIssuer、IssuerSigningKey的值配置在appsettings.json中,这些值都是可以自定义的,不一定按照我填的来。
{ ... "JWT": { "Domain": "https://localhost:44388", "SecurityKey": "H4sIAAAAAAAAA3N0cnZxdXP38PTy9vH18w8I9AkOCQ0Lj4iMAgDB4fXPGgAAAA==", "Expires": 30 }}
... public static class JWT { public static string Domain => _config["JWT:Domain"];
public static string SecurityKey => _config["JWT:SecurityKey"];
public static int Expires => Convert.ToInt32(_config["JWT:Expires"]); }...
Expires是我们的token过期时间,这里也给个30。至于它是30分钟还是30秒,由你自己决定。
SecurityKey是我随便用编码工具进行生成的。
同时在OnApplicationInitialization(...)中使用它。
... public override void OnApplicationInitialization(ApplicationInitializationContext context) { ... app.UseAuthentication();
app.UseAuthorization(); ... }...
此时配置就完成了,接下来去写接口生成Token并在Swagger中运用起来。
在.Application层之前已经添加了包:Microsoft.AspNetCore.Authentication.JwtBearer,直接新建Authorize文件夹,添加接口IAuthorizeService以及实现类AuthorizeService。
using Meowv.Blog.ToolKits.Base;using System.Threading.Tasks;
namespace Meowv.Blog.Application.Authorize{ public interface IAuthorizeService {
Taskstring>> GetLoginAddressAsync();
Taskstring>> GetAccessTokenAsync(string code);
Taskstring>> GenerateTokenAsync(string access_token); }}
添加三个接口成员方法,全部为异步的方式,同时注意我们是用之前编写的返回模型接收噢,然后一一去实现他们。
先实现GetLoginAddressAsync(),咱们构建一个AuthorizeRequest对象,用来填充生成GitHub登录地址,在.ToolKits层新建GitHub文件夹,引用.Domain项目,添加类:AuthorizeRequest.cs。
using Meowv.Blog.Domain.Configurations;using System;
namespace Meowv.Blog.ToolKits.GitHub{ public class AuthorizeRequest { public string Client_ID = GitHubConfig.Client_ID;
public string Redirect_Uri = GitHubConfig.Redirect_Uri;
public string State { get; set; } = Guid.NewGuid().ToString("N");
public string Scope { get; set; } = "user,public_repo"; }}
实现方法如下,拼接参数,输出GitHub重定向的地址。
... public async Taskstring>> GetLoginAddressAsync() { var result = new ServiceResult<string>();
var request = new AuthorizeRequest(); var address = string.Concat(new string[] { GitHubConfig.API_Authorize, "?client_id=", request.Client_ID, "&scope=", request.Scope, "&state=", request.State, "&redirect_uri=", request.Redirect_Uri });
result.IsSuccess(address); return await Task.FromResult(result); }...
同样的,实现GetAccessTokenAsync(string code),构建AccessTokenRequest对象,在.ToolKitsGitHub文件夹添加类:AccessTokenRequest.cs。
using Meowv.Blog.Domain.Configurations;
namespace Meowv.Blog.ToolKits.GitHub{ public class AccessTokenRequest { public string Client_ID = GitHubConfig.Client_ID;
public string Client_Secret = GitHubConfig.Client_Secret;
public string Code { get; set; }
public string Redirect_Uri = GitHubConfig.Redirect_Uri;
public string State { get; set; } }}
根据登录成功得到的code来获取AccessToken,因为涉及到HTTP请求,在这之前我们需要在构造函数中依赖注入IHttpClientFactory,使用IHttpClientFactory创建HttpClient。
...private readonly IHttpClientFactory _httpClient;
public AuthorizeService(IHttpClientFactory httpClient){ _httpClient = httpClient;}...
... public async Taskstring>> GetAccessTokenAsync(string code) { var result = new ServiceResult<string>();
if (string.IsNullOrEmpty(code)) { result.IsFailed("code为空"); return result; }
var request = new AccessTokenRequest();
var content = new StringContent($"code={code}&client_id={request.Client_ID}&redirect_uri={request.Redirect_Uri}&client_secret={request.Client_Secret}"); content.Headers.ContentType = new MediaTypeHeaderValue("application/x-www-form-urlencoded");
using var client = _httpClient.CreateClient(); var httpResponse = await client.PostAsync(GitHubConfig.API_AccessToken, content);
var response = await httpResponse.Content.ReadAsStringAsync();
if (response.StartsWith("access_token")) result.IsSuccess(response.Split("=")[1].Split("&").First()); else result.IsFailed("code不正确");
return result; }...
使用IHttpClientFactory创建
HttpClient可以自动释放对象,用HttpClient发送一个POST请求,如果GitHub服务器给我们返回了带access_token的字符串便表示成功了,将其处理一下输出access_token。如果没有,就代表参数code有误。
在.HttpApi层新建一个AuthController控制器,注入我们的IAuthorizeServiceService,试试我们的接口。
using Meowv.Blog.Application.Authorize;using Meowv.Blog.ToolKits.Base;using Microsoft.AspNetCore.Authorization;using Microsoft.AspNetCore.Mvc;using System.Threading.Tasks;using Volo.Abp.AspNetCore.Mvc;using static Meowv.Blog.Domain.Shared.MeowvBlogConsts;
namespace Meowv.Blog.HttpApi.Controllers{ [ApiController] [AllowAnonymous] [Route("[controller]")] [ApiExplorerSettings(GroupName = Grouping.GroupName_v4)] public class AuthController : AbpController { private readonly IAuthorizeService _authorizeService;
public AuthController(IAuthorizeService authorizeService) { _authorizeService = authorizeService; }
[HttpGet] [Route("url")] public async Taskstring>> GetLoginAddressAsync() { return await _authorizeService.GetLoginAddressAsync(); }
[HttpGet] [Route("access_token")] public async Taskstring>> GetAccessTokenAsync(string code) { return await _authorizeService.GetAccessTokenAsync(code); } }}
注意这里我们添加了两个Attribute:[AllowAnonymous]、[ApiExplorerSettings(GroupName = Grouping.GroupName_v4)],在
.Swagger层中为AuthController添加描述信息
...new OpenApiTag { Name = "Auth", Description = "JWT模式认证授权", ExternalDocs = new OpenApiExternalDocs { Description = "JSON Web Token" }}...
打开Swagger文档,调用一下我们两个接口看看效果。
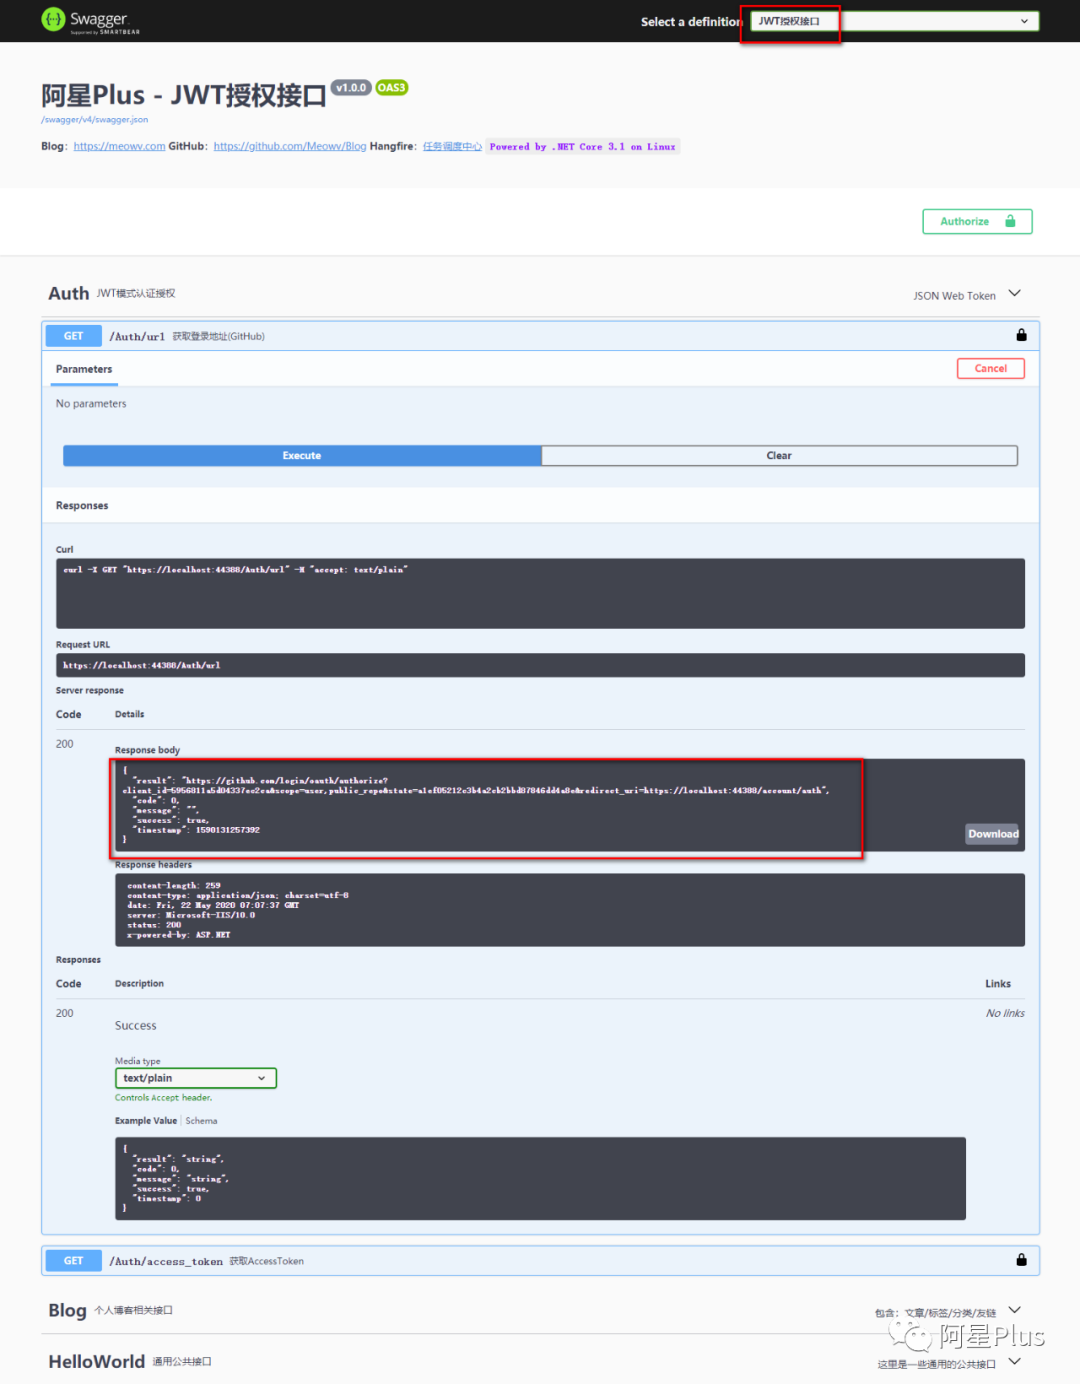
然后打开我们生成的重定向地址,会跳转到登录页面,如下:
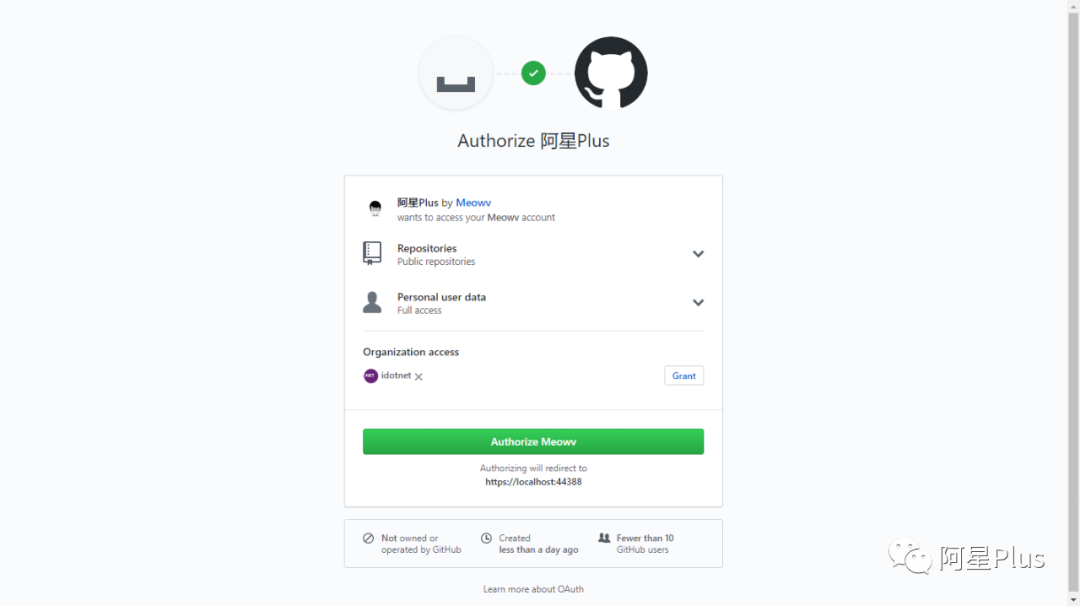
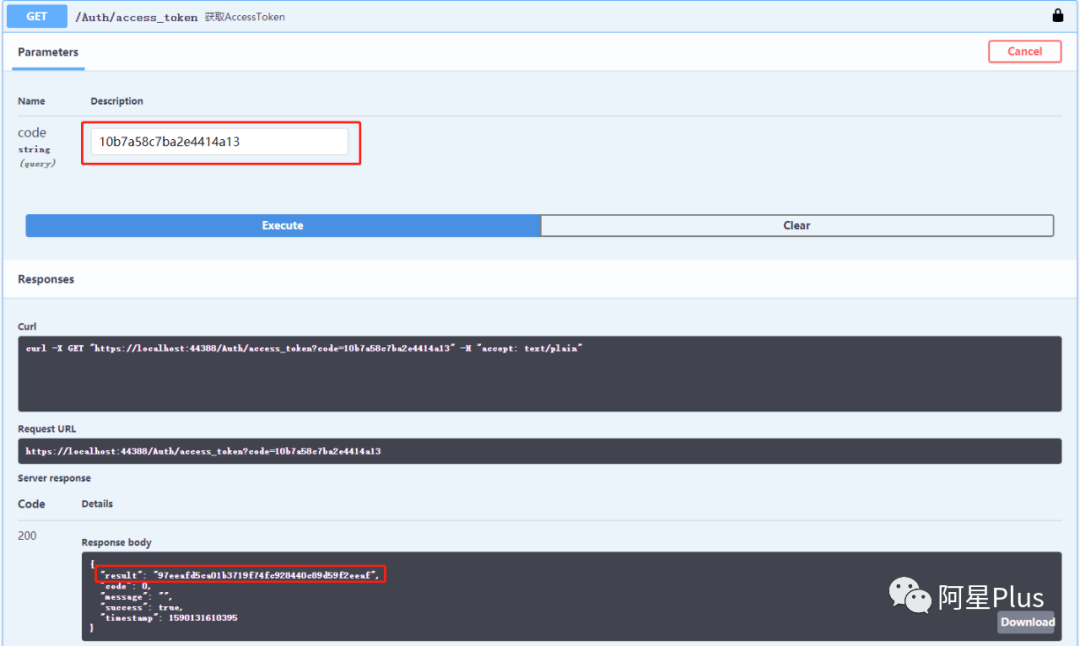
点击Authorize按钮,登录成功后会跳转至我们配置的回调页面,.../account/auth?code=10b7a58c7ba2e4414a14&state=a1ef05212c3b4a2cb2bbd87846dd4a8e
然后拿到code(10b7a58c7ba2e4414a14),在去调用一下获取AccessToken接口,成功返回我们的access_token(97eeafd5ca01b3719f74fc928440c89d59f2eeag)。
拿到access_token,就可以去调用获取用户信息API了。在这之前我们先来写几个扩展方法,待会和以后都用得着,在.ToolKits层新建文件夹Extensions,添加几个比较常用的扩展类(...)。
扩展类的代码我就不贴出来了。大家可以去GitHub(https://github.com/Meowv/Blog/tree/blog_tutorial/src/Meowv.Blog.ToolKits/Extensions)自行下载,每个扩展方法都有具体的注释。
接下来实现GenerateTokenAsync(string access_token),生成Token。
有了access_token,可以直接调用获取用户信息的接口:https://api.github.com/user?access_token=97eeafd5ca01b3719f74fc928440c89d59f2eeag ,会得到一个json,将这个json包装成一个模型类UserResponse.cs。
在这里教大家一个小技巧,如果你需要将json或者xml转换成模型类,可以使用Visual Studio的一个快捷功能,点击左上角菜单:编辑 => 选择性粘贴 => 将JSON粘贴为类/将XML粘贴为类,是不是很方便,快去试试吧。
namespace Meowv.Blog.ToolKits.GitHub{ public class UserResponse { public string Login { get; set; }
public int Id { get; set; }
public string Avatar_url { get; set; }
public string Html_url { get; set
; }
public string Repos_url { get; set; }
public string Name { get; set; }
public string Company { get; set; }
public string Blog { get; set; }
public string Location { get; set; }
public string Email { get; set; }
public string Bio { get; set; }
public int Public_repos { get; set; } }}
然后看一下具体生成token的方法吧。
... public async Taskstring>> GenerateTokenAsync(string access_token) { var result = new ServiceResult<string>();
if (string.IsNullOrEmpty(access_token)) { result.IsFailed("access_token为空"); return result; }
var url = $"{GitHubConfig.API_User}?access_token={access_token}"; using var client = _httpClient.CreateClient(); client.DefaultRequestHeaders.Add("User-Agent", "Mozilla/5.0 (Windows NT 10.0; Win64; x64) AppleWebKit/537.36 (KHTML, like Gecko) Chrome/83.0.4103.14 Safari/537.36 Edg/83.0.478.13"); var httpResponse = await client.GetAsync(url); if (httpResponse.StatusCode != HttpStatusCode.OK) { result.IsFailed("access_token不正确"); return result; }
var content = await httpResponse.Content.ReadAsStringAsync();
var user = content.FromJson(); if (user.IsNull()) { result.IsFailed("未获取到用户数据"); return result; }
if (user.Id != GitHubConfig.UserId) { result.IsFailed("当前账号未授权"); return result; }
var claims = new[] { new Claim(ClaimTypes.Name, user.Name), new Claim(ClaimTypes.Email, user.Email), new Claim(JwtRegisteredClaimNames.Exp, $"{new DateTimeOffset(DateTime.Now.AddMinutes(AppSettings.JWT.Expires)).ToUnixTimeSeconds()}"),
new Claim(JwtRegisteredClaimNames.Nbf, $"{new DateTimeOffset(DateTime.Now).ToUnixTimeSeconds()}") };
var key = new SymmetricSecurityKey(AppSettings.JWT.SecurityKey.SerializeUtf8()); var creds = new SigningCredentials(key, SecurityAlgorithms.HmacSha256);
var securityToken = new JwtSecurityToken( issuer: AppSettings.JWT.Domain, audience: AppSettings.JWT.Domain, claims: claims, expires: DateTime.Now.AddMinutes(AppSettings.JWT.Expires), signingCredentials: creds);
var token = new JwtSecurityTokenHandler().WriteToken(securityToken);
result.IsSuccess(token); return await Task.FromResult(result); }...
GitHub的这个API做了相应的安全机制,有一点要注意一下,当我们用代码去模拟请求的时候,需要给他加上User-Agent,不然是不会成功返回结果的。
FromJson是之前我们添加的扩展方法,将JSON字符串转为实体对象。
SymmetricSecurityKey(byte[] key)接收一个byte[]参数,这里也用到一个扩展方法SerializeUtf8()字符串序列化成字节序列。
我们判断返回的Id是否为我们配置的用户Id,如果是的话,就验证成功,进行授权,生成Token。
生成Token的代码也很简单,指定了 Name,Email,过期时间为30分钟。具体各项含义可以去这里看看:https://tools.ietf.org/html/rfc7519。
最后调用new JwtSecurityTokenHandler().WriteToken(SecurityToken token)便可成功生成Token,在Controller添加好,去试试吧。
... [HttpGet] [Route("token")] public async Taskstring>> GenerateTokenAsync(string access_token) { return await _authorizeService.GenerateTokenAsync(access_token); }...
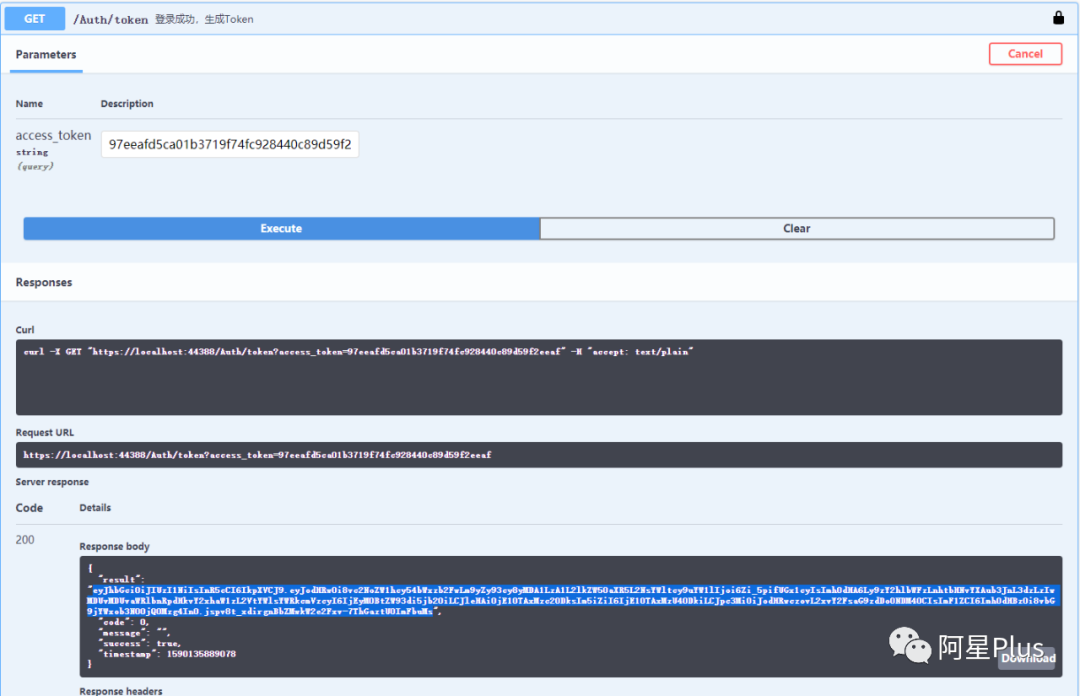
将之前拿到的access_token传进去,调用接口可以看到已经成功生成了token。
前面为AuthController添加了一个Attribute:[AllowAnonymous],代表这个Controller下的接口都不需要授权,就可以访问,当然你不添加的话默认也是开放的。可以为整个Controller指定,同时也可以为具体的接口指定。
当想要保护某个接口时,只需要加上Attribute:[Authorize]就可以了。现在来保护我们的BlogController下非查询接口,给增删改添加上[Authorize],注意引用命名空间Microsoft.AspNetCore.Authorization。
... ... [HttpPost] [Authorize] public async Taskstring>> InsertPostAsync([FromBody] PostDto dto) ...
[HttpDelete] [Authorize] public async Task DeletePostAsync([Required] int id) ...
[HttpPut] [Authorize] public async Taskstring>> UpdatePostAsync([Required] int id, [FromBody] PostDto dto) ...
[HttpGet] public async Task> GetPostAsync([Required] int id) ......
现在编译运行一下,调用上面的增删改看看能不能成功?
这时接口就会直接给我们返回一个状态码为401的错误,为了避免这种不友好的错误,我们可以添加一个中间件来处理我们的管道请求或者在AddJwtBearer()中处理我们的身份验证事件机制,当遇到错误的状态码时,我们还是返回我们之前的创建的模型,定义友好的返回错误,将在后面篇章中给出具体方法。
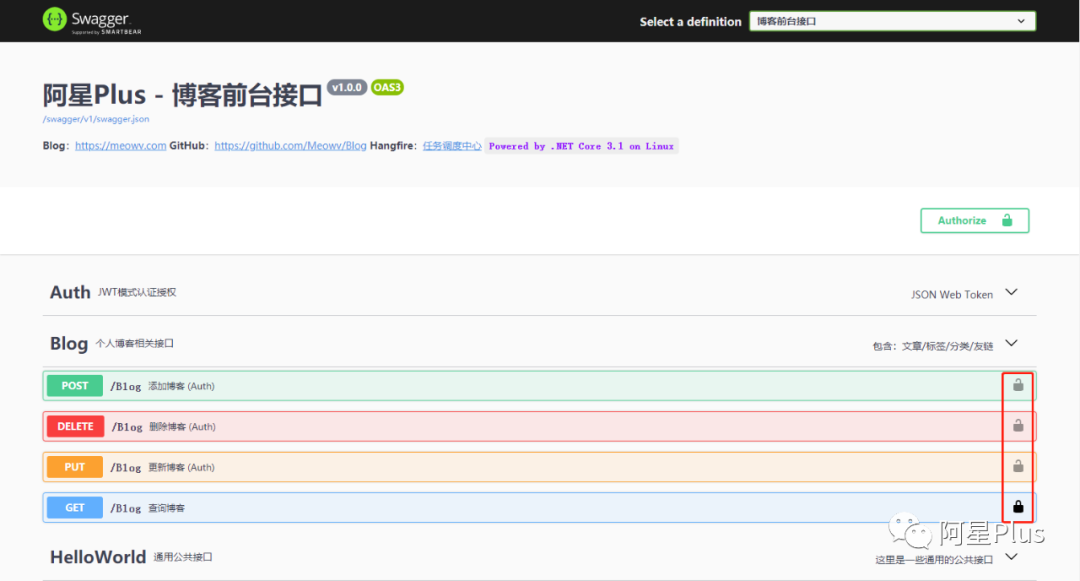
可以看到公开的API和需要授权的API小绿锁是不一样的,公开的显示为黑色,需要授权的显示为灰色。
如果需要在Swagger中调用我们的非公开API,要怎么做呢?点击我们的小绿锁将生成的token按照Bearer {Token}的方式填进去即可。
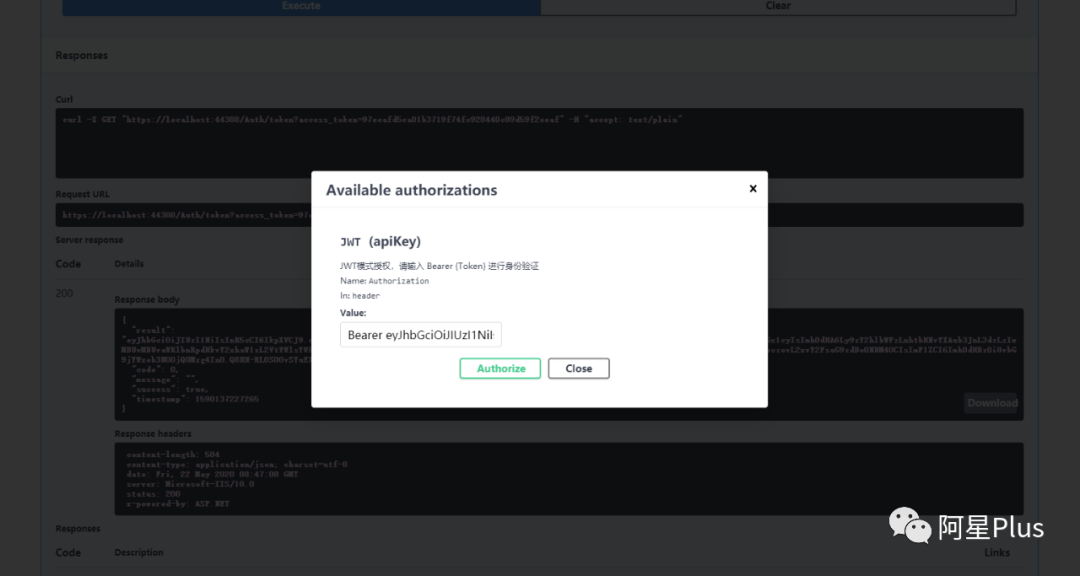
注意不要点Logout,否则就退出了。

可以看到当我们请求的时候,请求头上多了一个authorization: Bearer {token},此时便大功告成了。当我们在web中调用的时候,也遵循这个规则即可。
在我做授权的时候,token也生成成功了,也在Swagger中正确填写Bearer {token}了。调用接口的时候始终还是返回401,最终发现导致这个问题的原因是在配置Swagger小绿锁时一个错误名称导致的。
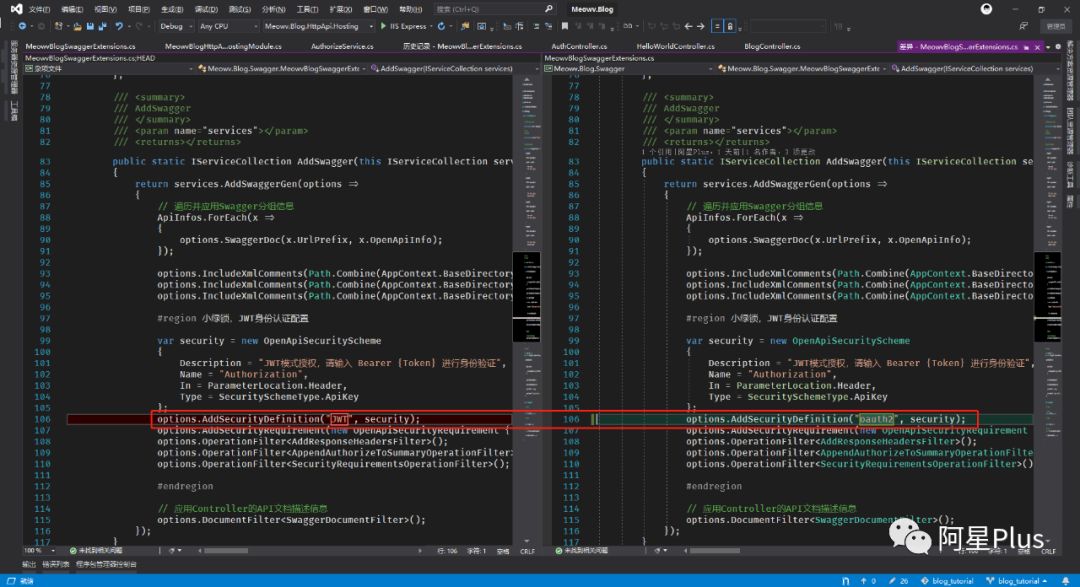
看他的描述为:A unique name for the scheme, as per the Swagger spec.(根据Swagger规范,该方案的唯一名称)
如图,将其名称改为 "oauth2" ,便可以成功授权。本篇接入了GitHub,实现了认证和授权,用JWT的方式保护我们写的API,你学会了吗?😁😁😁
开源地址:https://github.com/Meowv/Blog/tree/blog_tutorial