近年来,深度学习和计算机视觉领域取得了一系列突破。特别是行业引入了非常深的卷积神经网络后,在这些模型的帮助下,图像识别和图像分类等问题取得了非常好的成果。
因此这些年来,深度学习架构变得越来越深(层越来越多)以解决越来越复杂的任务,这也有助于提高分类和识别任务的性能,并让它们表现稳健。
但当我们继续向神经网络添加更多层时,模型训练起来也越来越困难,模型的准确度开始饱和,然后还会下降。于是 ResNet 诞生了,让我们摆脱了这种窘境,并能帮助解决这个问题。
残差网络(ResNet)是著名的深度学习模型之一,由任少清、何开明、孙健和张翔宇在他们的论文中引入。这篇 2015 年的论文全名叫“Deep Residual Learning for Image Recognition”[1]。ResNet 模型是迄今为止广泛流行和最成功的深度学习模型之一。
随着这些残差(Residual)块的引入,训练非常深的网络时面临的问题得到了缓解,ResNet 模型由这些块组成。
 来源:“图像识别的深度残差学习”论文
随着这些残差块的引入,训练非常深的网络时面临的问题得到了缓解,ResNet 模型由这些块组成。
在上图中,我们可以注意到的第一件事是跳过模型的某些层的直接连接。这种连接称为“跳过连接”,是残差块的核心。由于存在这种跳过连接,输出是不相同的。如果没有跳过连接,输入‘X 将乘以层的权重,然后添加一个偏置项。
然后是激活函数 f(),我们得到输出为 H(x)。
H(x)=f(wx+b) 或 H(x)=f(x)
现在引入了新的跳过连接技术,输出 H(x) 更改为
H(x)=f(x)+x
但是输入的维度可能与输出的维度不同,这可能发生在卷积层或池化层中。因此,这个问题可以用这两种方法来处理:
H(x)=f(x)+w1.x
这里添加了一个额外的参数 w1,而在使用第一种方法时没有添加额外的参数。
ResNet 中的这些跳过连接技术通过梯度流经的替代快捷路径来解决深度 CNN 中梯度消失的问题。此外,如果有任何层损害了架构的性能,跳过连接也能起作用,它将被正则化跳过。
架构中有一个 34 层的普通网络,其灵感来自 VGG-19,其中添加了快捷连接或跳过连接。这些跳过连接或残差块将架构转换为残差网络,如下图所示。
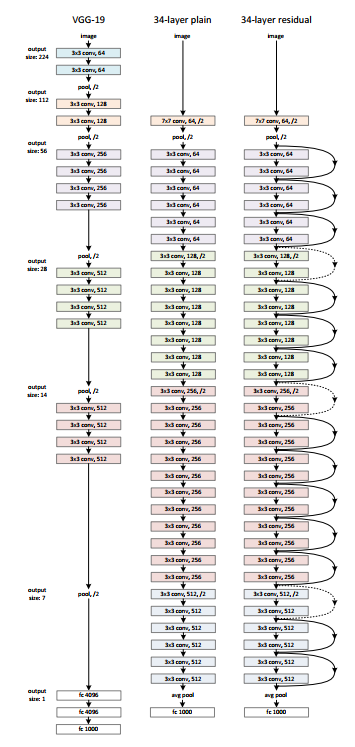
来源:“图像识别的深度残差学习”论文
Keras 是一个开源深度学习库,能够在 TensorFlow 上运行。Keras Applications 提供以下 ResNet 版本。
ResNet50
ResNet50V2
ResNet101
ResNet101V2
ResNet152
ResNet152V2
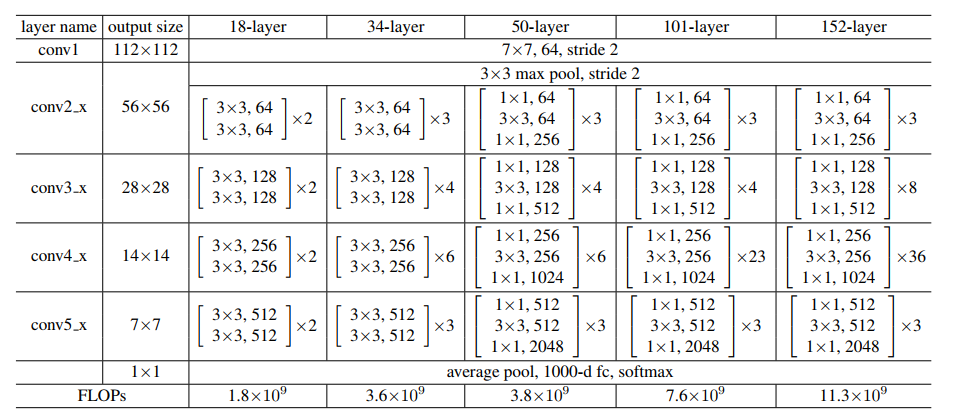
来源:“图像识别的深度残差学习”论文
我们将上图作为参考,开始构建网络。
ResNet 架构多次使用 CNN 块,因此我们为 CNN 块创建一个类,它接受输入通道和输出通道。每个 conv 层之后都有一个 batchnorm2d。
import torch
import torch.nn as nn
class block(nn.Module):
def __init__(
self, in_channels, intermediate_channels, identity_downsample=None, stride=1
):
super(block, self).__init__()
self.expansion = 4
self.conv1 = nn.Conv2d(
in_channels, intermediate_channels, kernel_size=1, stride=1, padding=0, bias=False
)
self.bn1 = nn.BatchNorm2d(intermediate_channels)
self.conv2 = nn.Conv2d(
intermediate_channels,
intermediate_channels,
kernel_size=3,
stride=stride,
padding=1,
bias=False
)
self.bn2 = nn.BatchNorm2d(intermediate_channels)
self.conv3 = nn.Conv2d(
intermediate_channels,
intermediate_channels * self.expansion,
kernel_size=1,
stride=1,
padding=0,
bias=False
)
self.bn3 = nn.BatchNorm2d(intermediate_channels * self.expansion)
self.relu = nn.ReLU()
self.identity_downsample = identity_downsample
self.stride = stride
def forward(self, x):
identity = x.clone()
x = self.conv1(x)
x = self.bn1(x)
x = self.relu(x)
x = self.conv2(x)
x = self.bn2(x)
x = self.relu(x)
x = self.conv3(x)
x = self.bn3(x)
if self.identity_downsample is not None:
identity = self.identity_downsample(identity)
x += identity
x = self.relu(x)
return x
然后创建一个 ResNet 类,它接受许多块、层、图像通道和类数的输入。在下面的代码中,函数‘_make_layer’
创建 ResNet 层,它接受块的输入、残差块数、输出通道和步幅。
class ResNet(nn.Module):
def __init__(self, block, layers, image_channels, num_classes):
super(ResNet, self).__init__()
self.in_channels = 64
self.conv1 = nn.Conv2d(image_channels, 64, kernel_size=7, stride=2, padding=3, bias=False)
self.bn1 = nn.BatchNorm2d(64)
self.relu = nn.ReLU()
self.maxpool = nn.MaxPool2d(kernel_size=3, stride=2, padding=1)
# Essentially the entire ResNet architecture are in these 4 lines below
self.layer1 = self._make_layer(
block, layers[0], intermediate_channels=64, stride=1
)
self.layer2 = self._make_layer(
block, layers[1], intermediate_channels=128, stride=2
)
self.layer3 = self._make_layer(
block, layers[2], intermediate_channels=256, stride=2
)
self.layer4 = self._make_layer(
block, layers[3], intermediate_channels=512, stride=2
)
self.avgpool = nn.AdaptiveAvgPool2d((1, 1))
self.fc = nn.Linear(512 * 4, num_classes)
def forward(self, x):
x = self.conv1(x)
x = self.bn1(x)
x = self.relu(x)
x = self.maxpool(x)
x = self.layer1(x)
x = self.layer2(x)
x = self.layer3(x)
x = self.layer4(x)
x = self.avgpool(x)
x = x.reshape(x.shape[0], -1)
x = self.fc(x)
return x
def _make_layer(self, block, num_residual_blocks, intermediate_channels, stride):
identity_downsample = None
layers = []
# Either if we half the input space for ex, 56x56 -> 28x28 (stride=2), or channels changes
# we need to adapt the Identity (skip connection) so it will be able to be added
# to the layer that's ahead
if stride != 1 or self.in_channels != intermediate_channels * 4:
identity_downsample = nn.Sequential(
nn.Conv2d(
self.in_channels,
intermediate_channels * 4,
kernel_size=1,
stride=stride,
bias=False
),
nn.BatchNorm2d(intermediate_channels * 4),
)
layers.append(
block(self.in_channels, intermediate_channels, identity_downsample, stride)
)
# The expansion size is always 4 for ResNet 50,101,152
self.in_channels = intermediate_channels * 4
# For example for first resnet layer: 256 will be mapped to 64 as intermediate layer,
# then finally back to 256. Hence no identity downsample is needed, since stride = 1,
# and also same amount of channels.
for i in range(num_residual_blocks - 1):
layers.append(block(self.in_channels, intermediate_channels))
返回 nn.Sequential(*layers)
然后定义不同版本的 ResNet
对于 ResNet50,层序列为 [3,4,6,3]。
对于 ResNet101,层序列为 [3,4,23,3]。
对于 ResNet152,层序列为 [3,8,36,3]。(请参阅“图像识别的深度残差学习”论文)
def ResNet50(img_channel=3, num_classes=1000):
return ResNet(block, [3, 4, 6, 3], img_channel, num_classes)
def ResNet101(img_channel=3, num_classes=1000):
return ResNet(block, [3, 4, 23, 3], img_channel, num_classes)
def ResNet152(img_channel=3, num_classes=1000):
return ResNet(block, [3, 8, 36, 3], img_channel, num_classes)
然后编写一个小的测试来检查模型是否工作正常。
def test():
net = ResNet101(img_channel=3, num_classes=1000)
device = "cuda" if torch.cuda.is_available() else "cpu"
y = net(torch.randn(4, 3, 224, 224)).to(device)
print(y.size())
test()
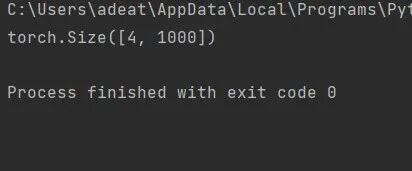
对于上面的测试用例,输出应该是:
全部代码可以在这里访问:
https://github.com/BakingBrains/Deep_Learning_models_implementation_from-scratch_using_pytorch_/blob/main/ResNet_.py
[1]:Kaiming He, Xiangyu Zhang, Shaoqing Ren, Jian Sun: Deep Residual Learning for Image Recognition, Dec 2015, DOI:https://arxiv.org/abs/1512.03385
原文链接:
https://www.analyticsvidhya.com/blog/2021/06/build-resnet-from-scratch-with-python/?utm_source=feedburner&utm_medium=feed&utm_campaign=Feed%3A+AnalyticsVidhya+%28Analytics+Vidhya%29&fileGuid=45ZbZ1uTOtQ8SANF)