在这篇文章中,我们使用了来自 tfx-bsl 的 RunInference API,该 API 是 TensorFlow Extended(TFX)的一种实用程序转换,它将我们从手工实现模式中抽象出来。RunInference 可用于在批量或流模式下构建生产推理管道时简化管道和减少技术债务。
本文将介绍以下四种模式:
使用 RunInference 进行机器学习预测调用。
对 RunInference 结果进行后处理。在业务流程中,进行预测通常是业务流程中多步处理的第一个部分。此处我们将结果处理为可用于下游的形式。
附加一个键。尽管模型本身并没有使用该标识符,但在传递给模型的数据时,常常需要一个标识符 (例如,物联网设备 ID 或客户标识符)。本文将演示如何实现这一点。
在同一管道中对多个模型进行推理。一般来说,你可能需要在同一管道中运行多个模型,无论是并行的还是作为预测 - 处理 - 预测调用的序列。举个简单的例子来说明。
要演示这些模式,我们将使用一个简单的模型,让我们重点讨论输入和输出管道所需的数据工程。这个模型将会被训练成数字 5 的近似乘法。
请注意,下面的代码片断可以作为 Notebook 环境中的单元格运行。
%pip install tfx_bsl==0.29.0 --quiet
import argparse
import tensorflow as tf
from tensorflow import keras
from tensorflow_serving.apis import prediction_log_pb2
import apache_beam as beam
import tfx_bsl
from tfx_bsl.public.beam import RunInference
from tfx_bsl.public import tfxio
from tfx_bsl.public.proto import model_spec_pb2
import numpy
from typing import Dict, Text, Any, Tuple, List
from apache_beam.options.pipeline_options import PipelineOptions
project = ""
bucket = ""
save_model_dir_multiply = f'gs://{bucket}/tfx-inference/model/multiply_five/v1/'
save_model_dir_multiply_ten = f'gs://{bucket}/tfx-inference/model/multiply_ten/v1/'
该步骤创建了一个小数据集,其中包含范围从 0 到 99 的值,以及对应于每个数值乘以 5 的标签。
"""
Create our training data which represents the 5 times multiplication table for 0 to 99. x is the data and y the labels.
x is a range of values from 0 to 99.
y is a list of 5x
value_to_predict includes a values outside of the training data
"""
x = numpy.arange(0, 100)
y = x * 5
"""
Build a simple linear regression model.
Note the model has a shape of (1) for its input layer, it will expect a single int64 value.
"""
input_layer = keras.layers.Input(shape=(1), dtype=tf.float32, name='x')
output_layer= keras.layers.Dense(1)(input_layer)
model = keras.Model(input_layer, output_layer)
model.compile(optimizer=tf.optimizers.Adam(), loss='mean_absolute_error')
model.summary()
我们来教一下关于 5 的乘法的模型。
model.fit(x, y, epochs=2000)
下一步,使用一些测试数据检查模型运行情况。
value_to_predict = numpy.array([105, 108, 1000, 1013], dtype=numpy.float32)
model.predict(value_to_predict)
根据以下的结果,这个简单的模型已经学习了它的 5 倍表,足够满足我们的需求。
OUTPUT:
array([[ 524.9939],
[ 539.9937],
[4999.935 ],
[5064.934 ]], dtype=float32)
在我们刚建立的模型中,我们使用一个简单的列表来生成数据,并将这些数据传递到模型中。下一步,我们将使用 tf.example 对象训练模型,从而使模型更健壮。
tf.example 是一个从名字到张量的可序列化字典(或映射),它可以确保模型仍然可以工作,甚至在基本示例中增加新的特征。用 tf.example 也有一个优点,即可以在不同的模型中以一种有效的序列化格式移植数据。
要使用本例中的 tf.example,我们首先需要创建一个 helper 类,即ExampleProcessor,用于序列化数据点。
class ExampleProcessor:
def create_example_with_label(self, feature: numpy.float32,
label: numpy.float32)-> tf.train.Example:
return tf.train.Example(
features=tf.train.Features(
feature={'x': self.create_feature(feature),
'y' : self.create_feature(label)
}))
def create_example(self, feature: numpy.float32):
return tf.train.Example(
features=tf.train.Features(
feature={'x' : self.create_feature(feature)})
)
def create_feature(self, element: numpy.float32):
return tf.train.Feature(float_list=tf.train.FloatList(value=[element]))
有了 ExampleProcess 类,现在就可以把列表从内存移动到磁盘。
# Create our labeled example file for 5 times table
example_five_times_table = 'example_five_times_table.tfrecord'
with tf.io.TFRecordWriter(example_five_times_table) as writer:
for i in zip(x, y):
example = ExampleProcessor().create_example_with_label(
feature=i[0], label=i[1])
writer.write(example.SerializeToString())
# Create a file containing the values to predict
predict_values_five_times_table = 'predict_values_five_times_table.tfrecord'
with tf.io.TFRecordWriter(predict_values_five_times_table) as writer:
for i in value_to_predict:
example = ExampleProcessor().create_example(feature=i)
writer.write(example.SerializeToString())
我们可以使用 Dataset API 准备数据,这样,通过将新示例存储在磁盘上的 TFRecord 文件中,模型就可以使用这些数据。
RAW_DATA_TRAIN_SPEC = {
'x': tf.io.FixedLenFeature([], tf.float32),
'y': tf.io.FixedLenFeature([], tf.float32)
}
RAW_DATA_PREDICT_SPEC = {
'x': tf.io.FixedLenFeature([], tf.float32),
}
通过特征规范,我们可以像以前那样训练模型。
dataset = tf.data.TFRecordDataset(example_five_times_table)
dataset = dataset.map(lambda e : tf.io.parse_example(e, RAW_DATA_TRAIN_SPEC))
dataset = dataset.map(lambda t : (t['x'], t['y']))
dataset = dataset.batch(100)
dataset = dataset.repeat()
model.fit(dataset, epochs=500, steps_per_epoch=1)
需要注意的是,如果我们使用TFX 管道来建立模型,而不像这里那样手工制作模型,那么这些步骤会自动完成。
既然我们已经有了一个模型,我们需要将其保存以用于 RunInference 转换。在配置过程中,RunInference 接受 TensorFlow 保存的模型 pb 文件。必须将保存的模型文件存储在可由 RunInference 转换访问的位置。对于 Notebook,这可以是一个本地文件系统;但是,为了在 Dataflow 上运行管道,所有工作器都要访问这个文件,因此这里我们使用 GCP 桶。
请注意,tfkeras.models.save_modelapi 直接支持 gs://schema。
tf.keras.models.save_model(model, save_model_dir_multiply)
能够检查保存的模型文件的内容在开发期间是很有用的。我们使用 TensorFlow 附带的 saved_model_cli来完成这个任务。你可以从单元格运行以下命令:
!saved_model_cli show --dir {save_model_dir_multiply} --all
以下为所保存模型文件的简要输出。请注意签名def 'serving_default',它接受浮点数类型的张量。在下一节中,我们将把它改为接受另一个类型。
OUTPUT:
signature_def['serving_default']:
The given SavedModel SignatureDef contains the following input(s):
inputs['example'] tensor_info:
dtype: DT_FLOAT
shape: (-1, 1)
name: serving_default_example:0
The given SavedModel SignatureDef contains the following output(s):
outputs['dense_1'] tensor_info:
dtype: DT_FLOAT
shape: (-1, 1)
name: StatefulPartitionedCall:0
Method name is: tensorflow/serving/predict
RunInference 会将序列化的 tf.example 传递给模型,与当前签名中出现的浮点类型张量不同。要实现这一点,我们还需要另外一个步骤来准备模型:创建特定签名。
特征是一种强大的特性,因为它允许我们控制调用程序如何与模型交互。可以在 TensorFlow 文档中看到:
“可选的签名参数控制 obj 中可以用于使用 SavedModels 的程序的方法,例如,为 API 服务的程序。可以使用 @TF.Function(input_signature=...) 对 Python 函数进行修饰,然后直接将其作为签名传递,或者将 get_concrete_function 的调用延迟用到 @TF.Function 修饰的方法。”
在我们的示例中,以下代码将创建一个签名,该签名接受名为“examples”的tf.string数据类型。该签名随后随模型一起保存,以取代先前保存的模型。
@tf.function(input_signature=[tf.TensorSpec(shape=[None], dtype=tf.string , name='examples')])
def serve_tf_examples_fn(serialized_tf_examples):
"""Returns the output to be used in the serving signature."""
features = tf.io.parse_example(serialized_tf_examples, RAW_DATA_PREDICT_SPEC)
return model(features, training=False)
signature = {'serving_default': serve_tf_examples_fn}
tf.keras.models.save_model(model, save_model_dir_multiply, signatures=signature)
假如你再次运行 saved_model_cli 命令,你将看到已将输入签名转换为DT_STRING。
现在该模型已经准备好将 RunInference 转换插入 Apache Beam 管道。以下管道使用 TFXIOTFExampleRecord,它通过 RawRecordBeamSource() 进行转换。保存的模型位置和签名作为 SavedModelSpec 配置对象传递给 RunInference API。
pipeline = beam.Pipeline()
tfexample_beam_record = tfx_bsl.public.tfxio.TFExampleRecord(file_pattern=predict_values_five_times_table)
with pipeline as p:
_ = (p | tfexample_beam_record.RawRecordBeamSource()
| RunInference(
model_spec_pb2.InferenceSpecType(
saved_model_spec=model_spec_pb2.SavedModelSpec(model_path=save_model_dir_multiply)))
| beam.Map(print)
)
注:
有两种类型的推理可以使用 RunInference 执行:
这里有一个输出片段。这些数字有些难以解释,因为它们是未处理的原始格式。原始结果将在下一节进行后处理。
OUTPUT:
predict_log {
request {
model_spec { signature_name: "serving_default" }
inputs {
key: "examples"
...
string_val: "\n\022\n\020\n\007example\022\005\032\003\n\001i"
...
response {
outputs {
key: "output_0"
value {
...
float_val: 524.993896484375
RunInference API 会返回一个 PredictionLog 对象,其中包含序列化的输入和调用模型的输出。通过访问输入和输出,你可以在后处理过程中创建简单的元组,以供管道下游使用。还有一点很重要, RunInference 会考虑模型的可批处理能力(并为性能目的进行批处理推理),这对你是透明的。
PredictionProcessorbeam.DoFn接收 RunInference 的输出,并生成格式化的文本作为输出,其中包含问题和答案。在生产系统中,输出通常是 Tuple[input,output],或者只是输出,这取决于用例。
class PredictionProcessor(beam.DoFn):
def process(
self,
element: prediction_log_pb2.PredictionLog):
predict_log = element.predict_log
input_value = tf.train.Example.FromString(predict_log.request.inputs['examples'].string_val[0])
output_value = predict_log.response.outputs
yield (f"input is [{input_value.features.feature['x'].float_list.value}] output is {output_value['output_0'].float_val}");
pipeline = beam.Pipeline()
tfexample_beam_record = tfx_bsl.public.tfxio.TFExampleRecord(file_pattern=predict_values_five_times_table)
with pipeline as p:
_ = (p | tfexample_beam_record.RawRecordBeamSource()
| RunInference(
model_spec_pb2.InferenceSpecType(
saved_model_spec=model_spec_pb2.SavedModelSpec(model_path=save_model_dir_multiply)))
| beam.ParDo(PredictionProcessor())
| beam.Map(print)
)
现在,输出包含原始输入和模型的输出值。
OUTPUT:
input is [[105.]] output is [523.6328735351562]
input is [[108.]] output is [538.5157470703125]
input is [[1000.]] output is [4963.6787109375]
input is [[1013.]] output is [5028.1708984375]
一种有用的模式是能够将信息(通常是一个唯一的标识符)与输入到模型的信息一起传递,并且能够从输出中访问这个标识符。举例来说,在物联网的一个用例中,你可以将设备 ID 与输入的数据一起传递给模型。一般情况下,这种类型的键对模型本身没有用,因此不应该被传递到第一层。
RunInference 解决了这一问题,它接受 Tuple[key,value] [key,PredictLog]。
因为我们需要一个附加键的预测数据,所以在这个步骤中,我们在 BigQuery 中创建了一个表,它包含两列:第一列用于存储键,第二列用于存储测试值。
CREATE OR REPLACE TABLE
maths.maths_problems_1 ( key STRING OPTIONS(description="A unique key for the maths problem"),
value FLOAT64 OPTIONS(description="Our maths problem" ) );
INSERT INTO
maths.maths_problems_1
VALUES
( "first_question", 105.00),
( "second_question", 108.00),
( "third_question", 1000.00),
( "fourth_question", 1013.00)
在这个步骤中,我们:
更改管道以读取新 BigQuery 源表中的数据。
通过将表行转换为 Tuple[bytes,Example],添加映射转换。
修改后推理处理器以输出结果和键。
class PredictionWithKeyProcessor(beam.DoFn):
def __init__(self):
beam.DoFn.__init__(self)
def process(
self,
element: Tuple[bytes, prediction_log_pb2.PredictionLog]):
predict_log = element[1].predict_log
input_value = tf.train.Example.FromString(predict_log.request.inputs['examples'].string_val[0])
output_value = predict_log.response.outputs
yield (f"key is {element[0]} input is {input_value.features.feature['x'].float_list.value} output is { output_value['output_0'].float_val[0]}" )
pipeline_options = PipelineOptions().from_dictionary({'temp_location':f'gs://{bucket}/tmp'})
pipeline = beam.Pipeline(options=pipeline_options)
with pipeline as p:
_ = (p | beam.io.gcp.bigquery.ReadFromBigQuery(table=f'{project}:maths.maths_problems_1')
| beam.Map(lambda x : (bytes(x['key'], 'utf-8'), ExampleProcessor().create_example(numpy.float32(x['value']))))
| RunInference(
model_spec_pb2.InferenceSpecType(
saved_model_spec=model_spec_pb2.SavedModelSpec(model_path=save_model_dir_multiply)))
| beam.ParDo(PredictionWithKeyProcessor())
| beam.Map(print)
)
key is b'first_question' input is [105.] output is 524.0875854492188
key is b'second_question' input is [108.] output is 539.0093383789062
key is b'third_question' input is [1000.] output is 4975.75830078125
key is b'fourth_question' input is [1013.] output is 5040.41943359375
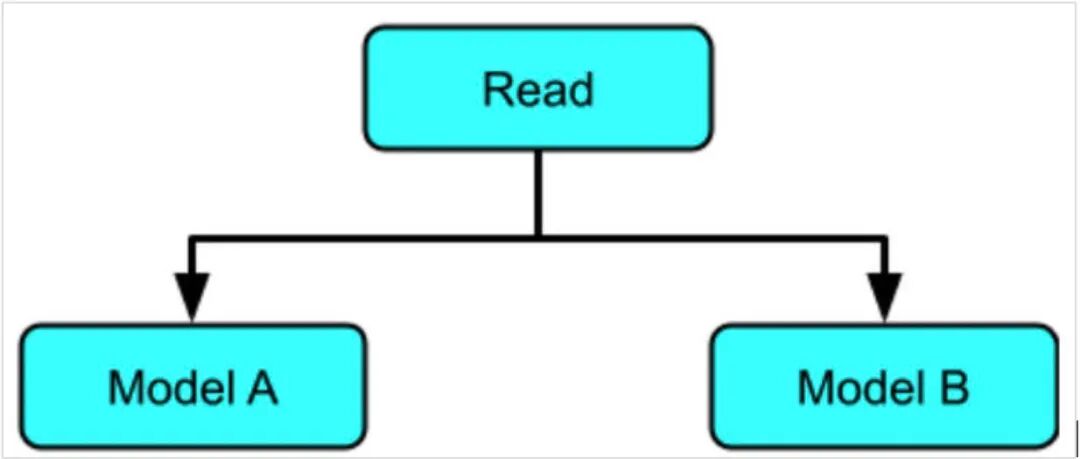
本系列文章的第一部分,“连接多个模型的结果”模式介绍了 Apache Beam 中各种分支技术,使得通过多个模型运行数据成为可能。
在 RunInferenceAPI 中,这些技术都是有效的,并且可以通过相同或不同的模型轻松地在一个管道中的多个分支中使用。虽然数据通过一个 Apache Beam DAG 在多个模型中流动,但这在功能上与级联集合相似。
在这个例子中,相同的数据通过两种不同的模型运行:一种是我们用来乘以 5 的模型,另一种是新模型,它将学会乘以 10。
"""
Create multiply by 10 table.
x is a range of values from 0 to 100.
y is a list of x * 10
value_to_predict includes a values outside of the training data
"""
x = numpy.arange( 0, 1000)
y = x * 10
# Create our labeled example file for 10 times table
example_ten_times_table = 'example_ten_times_table.tfrecord'
with tf.io.TFRecordWriter( example_ten_times_table ) as writer:
for i in zip(x, y):
example = ExampleProcessor().create_example_with_label(
feature=i[0], label=i[1])
writer.write(example.SerializeToString())
dataset = tf.data.TFRecordDataset(example_ten_times_table)
dataset = dataset.map(lambda e : tf.io.parse_example(e, RAW_DATA_TRAIN_SPEC))
dataset = dataset.map(lambda t : (t['x'], t['y']))
dataset = dataset.batch(100)
dataset = dataset.repeat()
model.fit(dataset, epochs=500, steps_per_epoch=10, verbose=0)
tf.keras.models.save_model(model,
save_model_dir_multiply_ten,
signatures=signature)
现在有了两种模型,就可以将其应用于源数据。
pipeline_options = PipelineOptions().from_dictionary(
{'temp_location':f'gs://{bucket}/tmp'})
pipeline = beam.Pipeline(options=pipeline_options)
with pipeline as p:
questions = p | beam.io.gcp.bigquery.ReadFromBigQuery(
table=f'{project}:maths.maths_problems_1')
multiply_five = ( questions
| "CreateMultiplyFiveTuple" >>
beam.Map(lambda x : (bytes('{}{}'.format(x['key'],' * 5'),'utf-8'),
ExampleProcessor().create_example(x['value'])))

| "Multiply Five" >> RunInference(
model_spec_pb2.InferenceSpecType(
saved_model_spec=model_spec_pb2.SavedModelSpec(
model_path=save_model_dir_multiply)))
)
multiply_ten = ( questions
| "CreateMultiplyTenTuple" >>
beam.Map(lambda x : (bytes('{}{}'.format(x['key'],'* 10'), 'utf-8'),
ExampleProcessor().create_example(x['value'])))
| "Multiply Ten" >> RunInference(
model_spec_pb2.InferenceSpecType(
saved_model_spec=model_spec_pb2.SavedModelSpec(
model_path=save_model_dir_multiply_ten)))
)
_ = ((multiply_five, multiply_ten) | beam.Flatten()
| beam.ParDo(PredictionWithKeyProcessor())
| beam.Map(print))
Output:
key is b'first_question * 5' input is [105.] output is 524.0875854492188
key is b'second_question * 5' input is [108.] output is 539.0093383789062
key is b'third_question * 5' input is [1000.] output is 4975.75830078125
key is b'fourth_question * 5' input is [1013.] output is 5040.41943359375
key is b'first_question* 10' input is [105.] output is 1054.333984375
key is b'second_question* 10' input is [108.] output is 1084.3131103515625
key is b'third_question* 10' input is [1000.] output is 9998.0908203125
key is b'fourth_question* 10' input is [1013.] output is 10128.0009765625
在顺序模式中,数据顺序地发送给一个或多个模型,并且每个模型的输出都链接到下一个模型。
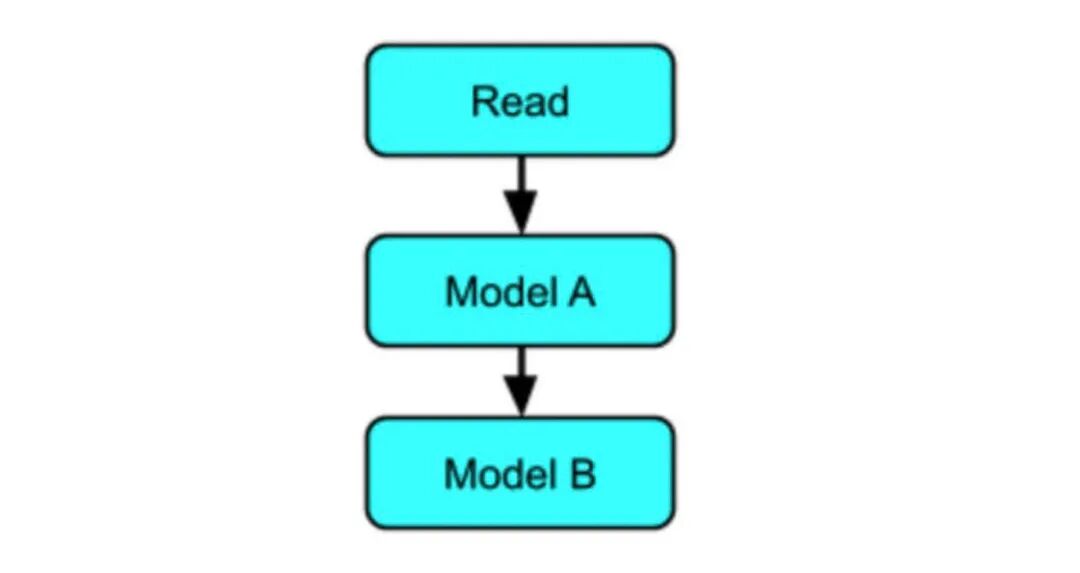
以下是步骤:
从 BigQuery 读取数据
映射数据
乘 5 模型的 RunInference
处理结果
乘 10 模型的 RunInference
处理结果
pipeline_options = PipelineOptions().from_dictionary(
{'temp_location':f'gs://{bucket}/tmp'})
pipeline = beam.Pipeline(options=pipeline_options)
def process_interim_inference(element : Tuple[
bytes, prediction_log_pb2.PredictionLog
])-> Tuple[bytes, tf.train.Example]:

key = '{} original input is {}'.format(
element[0], str(tf.train.Example.FromString(
element[1].predict_log.request.inputs['examples'].string_val[0]
).features.feature['x'].float_list.value[0]))

value = ExampleProcessor().create_example(
element[1].predict_log.response.outputs['output_0'].float_val[0])

return (bytes(key,'utf-8'),value)
with pipeline as p:

questions = p | beam.io.gcp.bigquery.ReadFromBigQuery(
table=f'{project}:maths.maths_problems_1')
multiply = ( questions
| "CreateMultiplyTuple" >>
beam.Map(lambda x : (bytes(x['key'],'utf-8'),
ExampleProcessor().create_example(x['value'])))
| "MultiplyFive" >> RunInference(
model_spec_pb2.InferenceSpecType(
saved_model_spec=model_spec_pb2.SavedModelSpec(
model_path=save_model_dir_multiply)))

)
_ = ( multiply
| "Extract result " >>
beam.Map(lambda x : process_interim_inference(x))
| "MultiplyTen" >> RunInference(
model_spec_pb2.InferenceSpecType(
saved_model_spec=model_spec_pb2.SavedModelSpec(
model_path=save_model_dir_multiply_ten)))
| beam.ParDo(PredictionWithKeyProcessor())
| beam.Map(print)
)
Output:
key is b"b'first_question' original input is 105.0" input is [524.9771118164062] output is 5249.7822265625
key is b"b'second_question' original input is 108.0" input is [539.9765014648438] output is 5399.7763671875
key is b"b'third_question' original input is 1000.0" input is [4999.7841796875] output is 49997.9453125
key is b"b'forth_question' original input is 1013.0" input is [5064.78125] output is 50647.91796875
到目前为止,管道都是在本地运行的,使用直接运行器,而在使用默认配置的情况下,运行管道时使用的是直接操作器。你可以使用生产型 Dataflow 运行器运行同样的例子,方法是传递配置参数,包括--runner。具体的细节和例子可以在 这里 找到。
以下为在 Dataflow 服务上运行的多模型管道图的示例:
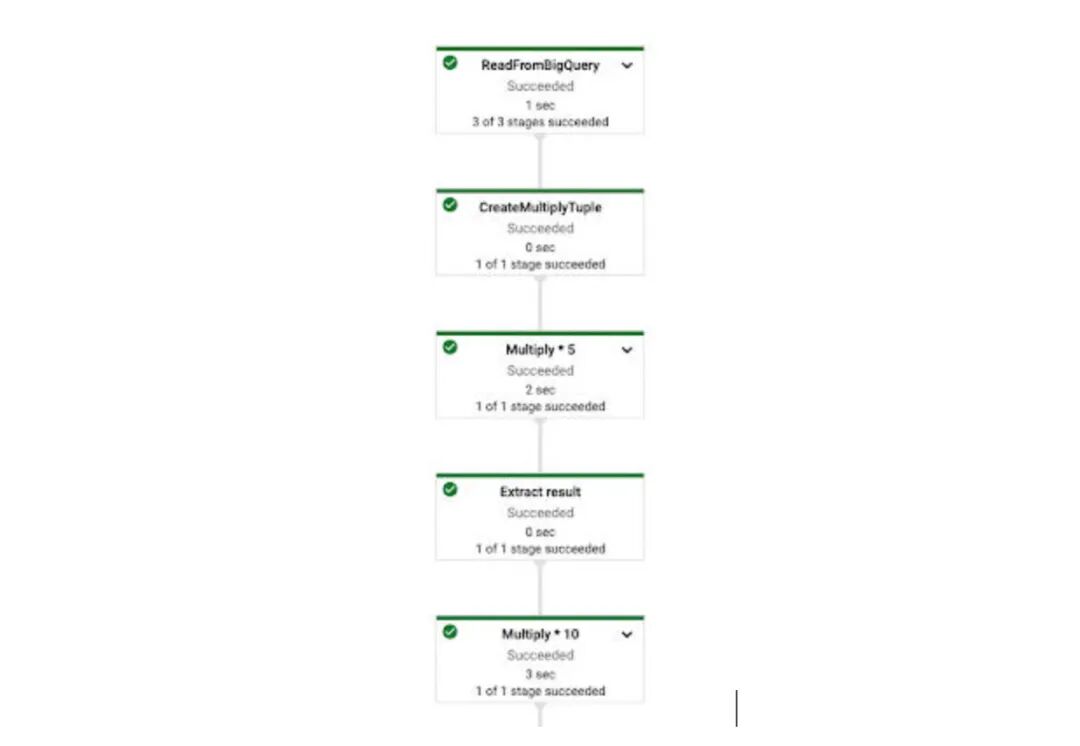
使用 Dataflow 运行器,你还可以访问管道监控以及从 RunInference 转换中输出的度量结果。下面的表格显示了来自库中较大列表的这些指标的一部分。

在本博客(本系列的第二部分)中,我们探讨了 tfx-bsl RunInference 在一些常见场景中的使用,从标准推理到后处理,以及在管道中多个位置使用 RunInference API。
要了解更多信息,请参考Dataflow和TFX文档,你也可以用 Google Cloud AI AI 平台管道试用 TFX。
原文链接:
https://blog.tensorflow.org/2021/05/using-tfx-inference-with-dataflow-for-large-scale-ml-inference-patterns.html
想要了解更多资讯,请扫描下方二维码,关注机器学习研究会

转自:AI前线


