本文约1800字,建议阅读8分钟
高斯噪声是深度学习中用于为输入数据或权重添加随机性的一种技术。
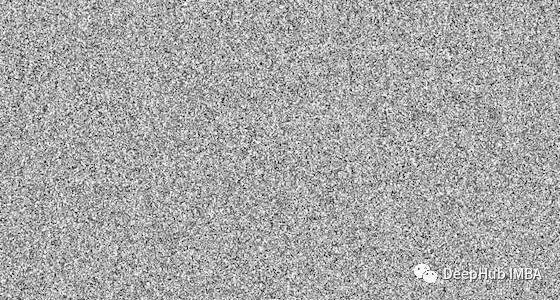
在数学上,高斯噪声是一种通过向输入数据添加均值为零和标准差(σ)的正态分布随机值而产生的噪声。正态分布,也称为高斯分布,是一种连续概率分布,由其概率密度函数 (PDF) 定义:
pdf(x) = (1 / (σ * sqrt(2 * π))) * e^(- (x — μ)² / (2 * σ²))
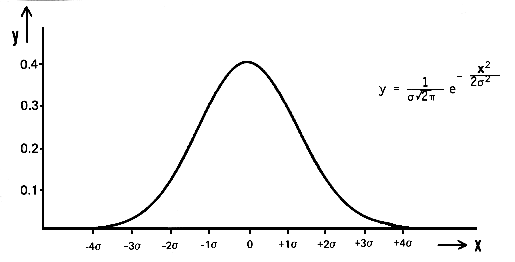
其中 x 是随机变量,μ 是均值,σ 是标准差。
通过生成具有正态分布的随机值并将它们添加到输入数据。例如如果对图像添加高斯噪声,可以将图像表示为像素值的二维矩阵,然后使用 numpy 库 np.random.randn(rows,cols) 生成具有正态分布的随机值, 并将它们添加到图像的像素值中。这就会得到添加了高斯噪声的新图像。
高斯噪声也称为白噪声,是一种服从正态分布的随机噪声。在深度学习中,训练时往往会在输入数据中加入高斯噪声,以提高模型的鲁棒性和泛化能力。这称为数据扩充。通过向输入数据添加噪声,模型被迫学习对输入中的微小变化具有鲁棒性的特征,这可以帮助它在新的、看不见的数据上表现更好。高斯噪声也可以在训练过程中添加到神经网络的权重中以提高其性能,这种技术称为 Dropout。
让我们先从一个简单的例子开始:
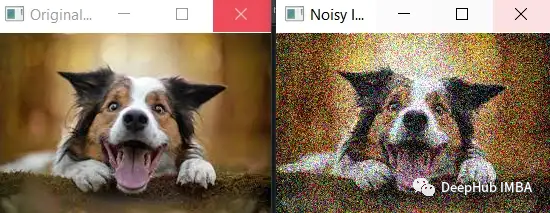
噪声的标准偏差 (noise_std) 被设置为较大的值 50,这将导致更多的噪声被添加到图像中。可以看到噪声更加明显,并且原始图像的特征不太明显。
值得注意的是,在添加更多噪声时,需要确保噪声不超过像素值的有效范围(即 0 到 255 之间)。在这个例子中,np.clip() 函数用于确保噪声图像的像素值落在有效范围内。
虽然更多的噪声可能更容易看出原始图像和噪声图像之间的差异,但它也可能使模型更难以从数据中学习有用的特征,并可能导致过度拟合或欠拟合。所以最好从少量噪声开始,然后在监控模型性能的同时逐渐增加噪声。
import cv2 import numpy as np image = cv2.imread('dog.jpg') noise_std = 50 noise = np.random.randn(*image.shape) * noise_std noisy_image = np.clip(image + noise, 0, 255).astype(np.uint8) cv2.imshow('Original Image', image) cv2.imshow('Noisy Image', noisy_image)
cv2.waitKey(0) cv2.destroyAllWindows()
高斯噪声如何用于深度学习的一些示例。
在上述所有示例中,高斯噪声通过特定的均值和标准差,以受控方式添加到输入或权重。目标是提高模型的性能和鲁棒性,同时又不会让模型很难从数据中学习。
下面我们介绍如何在使用 Python 和 Keras在训练期间将高斯噪声添加到输入数据,说明如何在训练期间将高斯噪声添加到输入数据,然后再将其传递给模型:
from keras.preprocessing.image import ImageDataGenerator datagen = ImageDataGenerator( featurewise_center=False, samplewise_center=False, featurewise_std_normalization=False, samplewise_std_normalization=False, zca_whitening=False, rotation_range=0, width_shift_range=0.1, height_shift_range=0.1, horizontal_flip=False, vertical_flip=False, noise_std=0.5 ) model.fit_generator(datagen.flow(x_train, y_train, batch_size=32), steps_per_epoch=len(x_train) / 32, epochs=epochs)
Keras 的 ImageDataGenerator 类用于定义一个数据生成器,该数据生成器将指定的数据增强技术应用于输入数据。我们将 noise_std 设置为 0.5,这意味着标准偏差为 0.5 的高斯噪声将添加到输入数据中。然后在调用 model.fit_generator 期间使用生成器在训练期间将数据扩充应用于输入数据。
至于Dropout,可以使用Keras中的Dropout层,设置dropout的rate,如果设置rate为0.5,那么dropout层会drop掉50%的权重。以下是如何向模型添加 dropout 层的示例:
from keras.layers import Dropout model = Sequential() model.add(Dense(64, input_dim=64, activation='relu')) model.add(Dropout(0.5)) model.add(Dense(64, activation='relu')) model.add(Dense(10, activation='softmax'))
需要注意的是,标准差、Dropout的实际值将取决于具体问题和数据的特征。使用不同的值进行试验并监视模型的性能通常是一个好主意。
下面我们介绍使用Keras 在训练期间将高斯噪声添加到输入数据和权重。为了向输入数据添加噪声,我们可以使用 numpy 库生成随机噪声并将其添加到输入数据中。这是如何执行此操作的示例:
import numpy as np x_train = np.random.rand(1000, 64) y_train = np.random.rand(1000, 10) noise_std = 0.5 x_train_noisy = x_train + noise_std * np.random.randn(*x_train.shape) model.fit(x_train_noisy, y_train, epochs=10)
我们输入数据 x_train 是形状为 (1000, 64) 的二维数组,噪声是使用 np.random.randn(*x_train.shape) 生成的,它将返回具有相同形状的正态分布均值为 0,标准差为 1的随机值数组。然后将生成的噪声与噪声的标准差 (0.5) 相乘,并将其添加到输入数据中,从而将其添加到输入数据中。
为了给权重添加噪声,我们可以使用 Keras 中的 Dropout 层,它会在训练过程中随机丢弃一些权重。高斯噪声是深度学习中广泛使用的技术,在图像分类训练时可以在图像中加入高斯噪声,提高图像分类模型的鲁棒性。这在训练数据有限或具有很大可变性时特别有用,因为模型被迫学习对输入中的小变化具有鲁棒性的特征。
以下是如何在训练期间向图像添加高斯噪声以提高图像分类模型的鲁棒性的示例:
from keras.preprocessing.image import ImageDataGenerator datagen = ImageDataGenerator( featurewise_center=False, samplewise_center=False, featurewise_std_normalization=False, samplewise_std_normalization=False, zca_whitening=False, rotation_range=0, width_shift_range=0, height_shift_range=0, horizontal_flip=False, vertical_flip=False, noise_std=0.5 ) model.fit_generator(datagen.flow(x_train, y_train, batch_size=32), steps_per_epoch=len(x_train) / 32, epochs=epochs)
目标检测:在目标检测模型的训练过程中,可以将高斯噪声添加到输入数据中,以使其对图像中的微小变化(例如光照条件、遮挡和摄像机角度)更加鲁棒。
def add_noise(image, std): """Add Gaussian noise to an image.""" noise = np.random.randn(*image.shape) * std return np.clip(image + noise, 0, 1) x_train_noisy = np.array([add_noise(img, 0.1) for img in x_train]) model.fit(x_train_noisy, y_train, epochs=10)
语音识别:在训练过程中,可以在音频数据中加入高斯噪声,这可以帮助模型更好地处理音频信号中的背景噪声和其他干扰,提高语音识别模型的鲁棒性。
def add_noise(audio, std): """Add Gaussian noise to an audio signal.""" noise = np.random.randn(*audio.shape) * std
return audio + noise x_train_noisy = np.array([add_noise(audio, 0.1) for audio in x_train]) model.fit(x_train_noisy, y_train, epochs=10)
生成模型:在 GAN、Generative Pre-training Transformer (GPT) 和 VAE 等生成模型中,可以在训练期间将高斯噪声添加到输入数据中,以提高模型生成新的、看不见的数据的能力。
noise = np.random.randn(batch_size, 100) fake_images = generator.predict(noise) fake_images_noisy = fake_images + 0.1 * np.random.randn(*fake_images.shape) discriminator.train_on_batch(fake_images_noisy, np.zeros((batch_size, 1)))
在这个例子中,生成器被训练为基于随机噪声作为输入生成新的图像,并且在生成的图像传递给鉴别器之前,将高斯噪声添加到生成的图像中。这提高了生成器生成新的、看不见的数据的能力。
对抗训练:在对抗训练时,可以在输入数据中加入高斯噪声,使模型对对抗样本更加鲁棒。
下面的对抗训练使用快速梯度符号法(FGSM)生成对抗样本,高斯噪声为 在训练期间将它们传递给模型之前添加到对抗性示例中。这提高了模型对对抗性示例的鲁棒性。
x_adv = fgsm(model, x_train, y_train, eps=0.01) noise_std = 0.05 x_adv_noisy = x_adv + noise_std * np.random.randn(*x_adv.shape) model.fit(x_adv_noisy, y_train, epochs=10)
去噪:可以将高斯噪声添加到图像或信号中,模型的目标是学习去除噪声并恢复原始信号。下面的例子中输入图像“x_train”首先用标准的高斯噪声破坏 0.1 的偏差,然后将损坏的图像通过去噪自动编码器以重建原始图像。自动编码器学习去除噪声并恢复原始信号。
noise_std = 0.1 x_train_noisy = x_train + noise_std * np.random.randn(*x_train.shape) input_img = Input(shape=(28, 28, 1)) x = Conv2D(32, (3, 3), activation='relu', padding='same')(input_img) x = MaxPooling2D((2, 2), padding='same')(x) x = Conv2D(32, (3, 3), activation='relu', padding='same')(x) encoded = MaxPooling2D((2, 2), padding='same')(x) x = Conv2D(32, (3, 3), activation='relu', padding='same')(encoded) x = UpSampling2D((2, 2))(x) x = Conv2D(32, (3, 3), activation='relu', padding='same')(x) x = UpSampling2D((2, 2))(x) decoded = Conv2D(1, (3, 3), activation='sigmoid', padding='same')(x)
autoencoder = Model(input_img, decoded) autoencoder.compile(optimizer='adam', loss='binary
异常检测:高斯噪声可以添加到正常数据中,模型的目标是学习将添加的噪声作为异常检测。
noise_std = 0.1 x_train_noisy = x_train + noise_std * np.random.randn(*x_train.shape) x_train_concat = np.concatenate((x_train, x_train_noisy)) y_train_concat = np.concatenate((np.zeros(x_train.shape[0]), np.ones(x_train_noisy.shape[0]))) model.fit(x_train_concat, y_train_concat, epochs=10)
稳健优化:在优化过程中,可以将高斯噪声添加到模型的参数中,使其对参数中的小扰动更加稳健。
def loss_fn(params): model.set_weights(params) return model.evaluate(x_test, y_test, batch_size=32)[0] optimizer = optimizers.Adam(1e-3) def step_fn(params): with tf.GradientTape() as tape: loss = loss_fn(params) grads = tape.gradient(loss, params) optimizer.apply_gradients(zip(grads, params)) return params + noise_std * np.random.randn(*params.shape) params = model.get_weights()
高斯噪声是深度学习中用于为输入数据或权重添加随机性的一种技术。它是一种通过将均值为零且标准差 (σ) 正态分布的随机值添加到输入数据中而生成的随机噪声。向数据中添加噪声的目的是使模型对输入中的小变化更健壮,并且能够更好地处理看不见的数据。高斯噪声可用于广泛的应用,例如图像分类、对象检测、语音识别、生成模型和稳健优化。
作者:AI TutorMaster